Sony COM-2 Operating Instructions - Page 30
Registering Wireless Networks - manual
 |
UPC - 027242720817
View all Sony COM-2 manuals
Add to My Manuals
Save this manual to your list of manuals |
Page 30 highlights
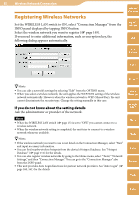
30 Wireless Network Connection Table of Contents Registering Wireless Networks Set the WIRELESS LAN switch to ON, select "Connection Manager" from the INFO panel displayed by tapping INFO button. Select the wireless network you want to register ( page 149). If you need to enter additional information, such as encryption key, the following dialog appears automatically. mylo Widget Web RSS/ Podcast AIM Skype Hints You can edit a network's settings by selecting "Edit" from the OPTION menu. When you select a wireless network, the unit applies the WEP/WPA setting of the wireless network automatically. However when the wireless network is WEP (Shared Key), the unit cannot discriminate the security type. Change the setting manually in this case. If you do not know about the setting details Ask the administrator or provider of the network. Notes When the WIRELESS LAN switch ( page 15) is set to "OFF," you cannot connect to a wireless network. When the wireless network setting is completed, the unit tries to connect to a wireless network whenever available. Hints If the wireless network you want to use is not listed on the Connection Manager, select "New" and input necessary information. You can find nearby wireless hotspots from the device's Hotspot Database. See "Hotspot Database" ( page 151) for the details. You can also register wireless networks by going to the Home menu, select "Tools," "Network Settings," and then "Connection Manager." You can go to the "Connection Manager" also from the INFO panel. This unit provides Auto Login functions for partner network providers. See "Auto Login" ( page 160, 161) for the details. Yahoo! Messenger Google Talk Music Photo Video Camera Tools Index
-
 1
1 -
2
-
3
-
4
-
5
-
6
-
7
-
8
-
9
-
10
-
11
-
12
-
13
-
14
-
15
-
16
-
17
-
18
-
19
-
20
-
21
-
22
-
23
-
24
-
 25
25 -
 26
26 -
 27
27 -
 28
28 -
 29
29 -
 30
30 -
 31
31 -
 32
32 -
 33
33 -
 34
34 -
 35
35 -
36
-
37
-
38
-
39
-
40
-
41
-
42
-
43
-
44
-
45
-
46
-
47
-
48
-
49
-
50
-
51
-
52
-
53
-
54
-
55
-
56
-
57
-
58
-
59
-
60
-
61
-
62
-
63
-
64
-
65
-
66
-
67
-
68
-
69
-
70
-
71
-
72
-
73
-
74
-
75
-
76
-
77
-
78
-
79
-
80
-
81
-
82
-
83
-
84
-
85
-
86
-
87
-
88
-
89
-
90
-
91
-
92
-
93
-
94
-
95
-
96
-
97
-
98
-
99
-
100
-
101
-
102
-
103
-
104
-
105
-
106
-
107
-
108
-
109
-
110
-
111
-
112
-
113
-
114
-
115
-
116
-
117
-
118
-
119
-
120
-
121
-
122
-
123
-
124
-
125
-
126
-
127
-
128
-
129
-
130
-
131
-
132
-
133
-
134
-
135
-
136
-
137
-
138
-
139
-
140
-
141
-
142
-
143
-
144
-
145
-
146
-
147
-
148
-
149
-
150
-
151
-
152
-
153
-
154
-
155
-
156
-
157
-
158
-
159
-
160
-
161
-
162
-
163
-
164
-
165
-
166
-
167
-
168
-
169
-
170
-
171
-
172
-
173
-
174
-
175
-
176
-
177
-
178
-
179
-
180
-
181
-
182
-
183
-
184
-
185
-
186
-
187
-
188
-
189
-
190
-
191
-
192
-
193
-
194
-
195
-
196
-
197
-
198
-
199
-
200
-
201
-
202
-
203
-
204
-
205
-
206
-
207
-
208
-
209
-
210
-
211
-
212
-
213
-
214
-
215
-
216
-
217
-
218
-
219
-
220
-
221
-
222
-
223
-
224
-
225
-
226
-
227
-
228
-
229
-
230
-
231
-
232
-
233
-
234
-
235
-
236
-
237
-
238
-
239
-
240
-
241
-
242
-
243
-
244
-
245
-
246
-
247
-
248
-
249
-
250
-
251
-
252
-
253
-
254
-
255
-
256
-
257
-
258
-
259
-
260
-
261
-
262
-
263
-
264
-
265
-
266
-
267
-
268
-
269
-
270
 |
 |
