Sony COM-2 Operating Instructions - Page 139
Taking Photos, Adjusting zoom, exposure and white balance - reviews
 |
UPC - 027242720817
View all Sony COM-2 manuals
Add to My Manuals
Save this manual to your list of manuals |
Page 139 highlights
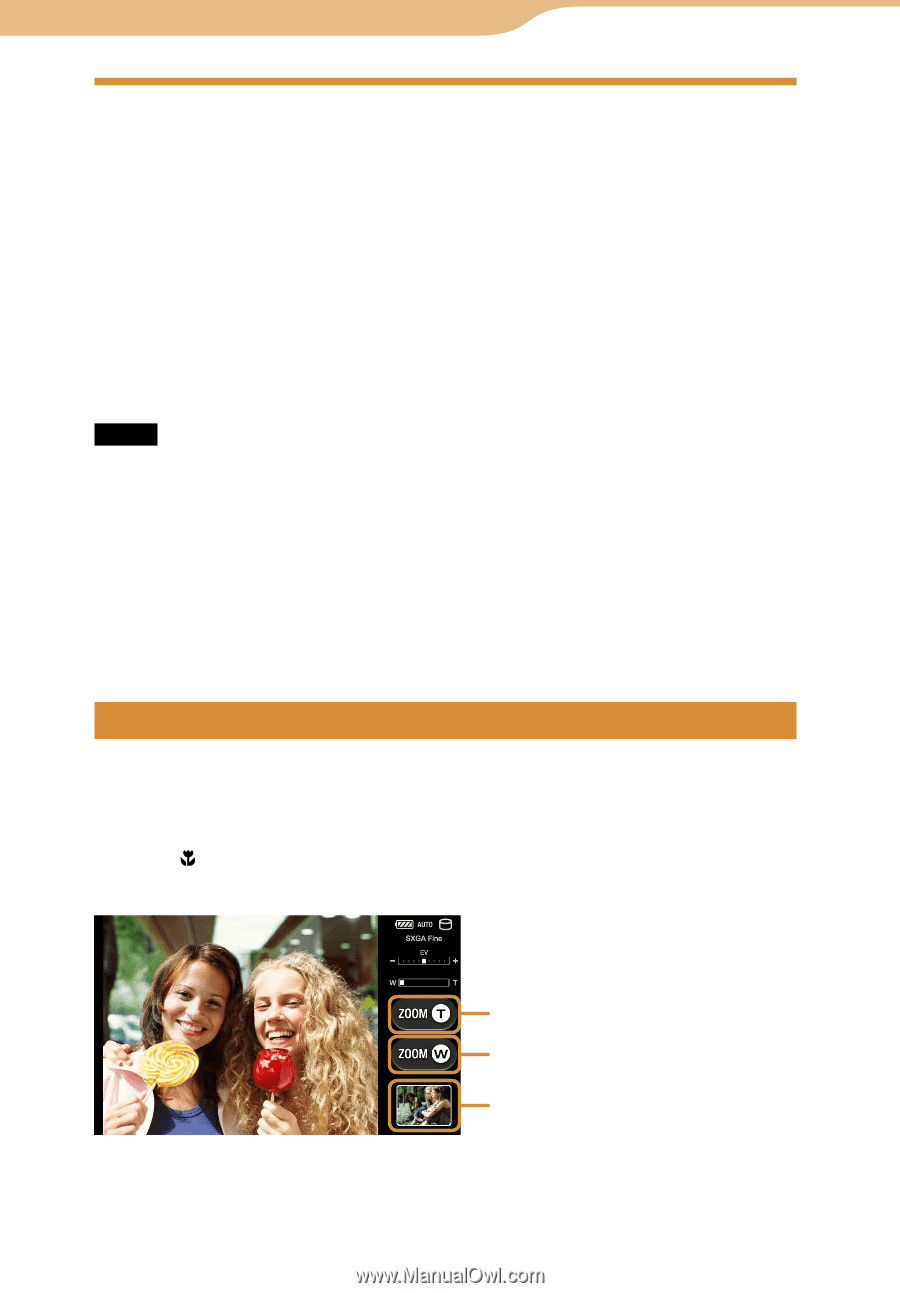
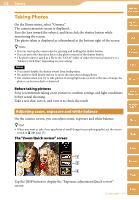
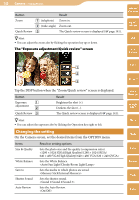
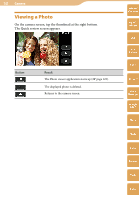
139 Camera Taking Photos Table of Contents On the Home menu, select "Camera." The camera monitor screen is displayed. Face the lens toward the subject, and then click the shutter button while monitoring the screen. The photo taken is displayed as a thumbnail at the bottom right of the screen. mylo Widget Web Hints You can start up the camera also by pressing and holding the shutter button. You can press the Operation key to take photos instead of the shutter button. The photo taken is saved as a file to the "DCIM" folder of either the internal memory or a "Memory Stick Duo," depending on your setting. Notes You cannot disable the shutter sound from loudspeaker. Be careful to hold firmly and not to move the unit when taking photos. Use caution when you try to take photos of strong light sources such as the sun or lamps, the photos can become dark or distorted. RSS/ Podcast AIM Skype Before taking pictures Sony recommends taking a test picture to confirm settings and light conditions before actual shooting. Take a test shot, save it, and view it to check the result. Adjusting zoom, exposure and white balance Yahoo! Messenger Google Talk On the camera screen, you can adjust zoom, exposure and white balance. Hint When you want to take close-up photos of small things (macro photography), set the macro switch to ( page 15). The "Zoom/Quick review" screen Music Photo Video Camera Tools Tap the DISP button to display the "Exposure adjustment/Quick review" screen. Index Continued
-
 1
1 -
2
-
3
-
4
-
5
-
6
-
7
-
8
-
9
-
10
-
11
-
12
-
13
-
14
-
15
-
16
-
17
-
18
-
19
-
20
-
21
-
22
-
23
-
24
-
25
-
26
-
27
-
28
-
29
-
30
-
31
-
32
-
33
-
34
-
35
-
36
-
37
-
38
-
39
-
40
-
41
-
42
-
43
-
44
-
45
-
46
-
47
-
48
-
49
-
50
-
51
-
52
-
53
-
54
-
55
-
56
-
57
-
58
-
59
-
60
-
61
-
62
-
63
-
64
-
65
-
66
-
67
-
68
-
69
-
70
-
71
-
72
-
73
-
74
-
75
-
76
-
77
-
78
-
79
-
80
-
81
-
82
-
83
-
84
-
85
-
86
-
87
-
88
-
89
-
90
-
91
-
92
-
93
-
94
-
95
-
96
-
97
-
98
-
99
-
100
-
101
-
102
-
103
-
104
-
105
-
106
-
107
-
108
-
109
-
110
-
111
-
112
-
113
-
114
-
115
-
116
-
117
-
118
-
119
-
120
-
121
-
122
-
123
-
124
-
125
-
126
-
127
-
128
-
129
-
130
-
131
-
132
-
133
-
 134
134 -
 135
135 -
 136
136 -
 137
137 -
 138
138 -
 139
139 -
 140
140 -
 141
141 -
 142
142 -
 143
143 -
 144
144 -
145
-
146
-
147
-
148
-
149
-
150
-
151
-
152
-
153
-
154
-
155
-
156
-
157
-
158
-
159
-
160
-
161
-
162
-
163
-
164
-
165
-
166
-
167
-
168
-
169
-
170
-
171
-
172
-
173
-
174
-
175
-
176
-
177
-
178
-
179
-
180
-
181
-
182
-
183
-
184
-
185
-
186
-
187
-
188
-
189
-
190
-
191
-
192
-
193
-
194
-
195
-
196
-
197
-
198
-
199
-
200
-
201
-
202
-
203
-
204
-
205
-
206
-
207
-
208
-
209
-
210
-
211
-
212
-
213
-
214
-
215
-
216
-
217
-
218
-
219
-
220
-
221
-
222
-
223
-
224
-
225
-
226
-
227
-
228
-
229
-
230
-
231
-
232
-
233
-
234
-
235
-
236
-
237
-
238
-
239
-
240
-
241
-
242
-
243
-
244
-
245
-
246
-
247
-
248
-
249
-
250
-
251
-
252
-
253
-
254
-
255
-
256
-
257
-
258
-
259
-
260
-
261
-
262
-
263
-
264
-
265
-
266
-
267
-
268
-
269
-
270
 |
 |