Xerox 4150 User Guide - Page 101
E-mail, Send
 |
UPC - 095205228717
View all Xerox 4150 manuals
Add to My Manuals
Save this manual to your list of manuals |
Page 101 highlights
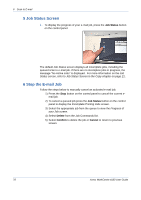
E-mail 6 Scan to E-mail Send Use the Send options to enter recipient information. From This option provides information about the sender. NOTE: If E-mail is accessed via Authentication Mode, the information contained will be linked with the login name. To Use the keypad on the Touch Screen to enter the e-mail address of the recipient. Cc Use the keypad on the Touch Screen to enter the e-mail address of the recipient you wish to be copied on the e-mail job. Bcc Use the keypad on the Touch Screen to enter the e-mail address of the recipient you wish to be copied on the e-mail job, without their name being displayed on the e-mail. Add Me Use this option to enter your own e-mail address and receive a copy of the email job. Edit Subject Use this option to add a new subject or edit the default e-mail subject. The subject is the title of the e-mail and not the text contained within the e-mail. The subject line can contain up to 50 characters and displays on the touch screen under the Edit Subject button. Add/Edit Message Use this option to add new body text. The body text can contain up to 80 characters and displays on the touch screen under the Message field. Details Use this option to view the details of the selected recipient. The information displayed is determined by how the address was originally added to the Address List, either from the Internal or Public Address Book, or entered manually. Remove Use this option to delete the selected address from the Address List. Xerox WorkCentre 4150 User Guide 79
-
 1
1 -
2
-
3
-
4
-
5
-
6
-
7
-
8
-
9
-
10
-
11
-
12
-
13
-
14
-
15
-
16
-
17
-
18
-
19
-
20
-
21
-
22
-
23
-
24
-
25
-
26
-
27
-
28
-
29
-
30
-
31
-
32
-
33
-
34
-
35
-
36
-
37
-
38
-
39
-
40
-
41
-
42
-
43
-
44
-
45
-
46
-
47
-
48
-
49
-
50
-
51
-
52
-
53
-
54
-
55
-
56
-
57
-
58
-
59
-
60
-
61
-
62
-
63
-
64
-
65
-
66
-
67
-
68
-
69
-
70
-
71
-
72
-
73
-
74
-
75
-
76
-
77
-
78
-
79
-
80
-
81
-
82
-
83
-
84
-
85
-
86
-
87
-
88
-
89
-
90
-
91
-
92
-
93
-
94
-
95
-
 96
96 -
 97
97 -
 98
98 -
 99
99 -
 100
100 -
 101
101 -
 102
102 -
 103
103 -
 104
104 -
 105
105 -
 106
106 -
107
-
108
-
109
-
110
-
111
-
112
-
113
-
114
-
115
-
116
-
117
-
118
-
119
-
120
-
121
-
122
-
123
-
124
-
125
-
126
-
127
-
128
-
129
-
130
-
131
-
132
-
133
-
134
-
135
-
136
-
137
-
138
-
139
-
140
-
141
-
142
-
143
-
144
-
145
-
146
-
147
-
148
-
149
-
150
-
151
-
152
-
153
-
154
-
155
-
156
-
157
-
158
-
159
-
160
-
161
-
162
-
163
-
164
-
165
-
166
-
167
-
168
-
169
-
170
-
171
-
172
-
173
-
174
-
175
-
176
-
177
-
178
-
179
-
180
-
181
-
182
-
183
-
184
-
185
-
186
-
187
-
188
-
189
-
190
-
191
-
192
-
193
-
194
-
195
-
196
-
197
-
198
-
199
-
200
-
201
 |
 |