Xerox 4150 User Guide - Page 83
Scanning Resources - service manual
 |
UPC - 095205228717
View all Xerox 4150 manuals
Add to My Manuals
Save this manual to your list of manuals |
Page 83 highlights
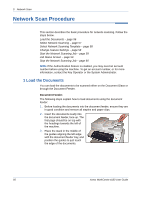
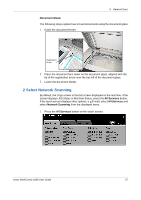
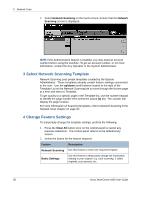
Scanning Resources 5 Network Scan Additional scanning software can be added to the machine's network scanning capabilities: FreeFlow™ SMARTsend™ Enables the installation, set up and management of Network Scanning on the network. FreeFlow™ SMARTsend™ is composed of several different elements that work together to create and deliver the scanned document to its final destination. For more information, contact your Xerox sales representative. CentreWare Internet Services Enables the set up of the Network Scanning feature through the machine's embedded web server. The user scans a document at the machine and it is stored on a file server or workstation on the network, called the scan repository. The user manually retrieves the image from the scan repository. Access to the Network Scanning features is gained using the Services button on the control panel. Depending on the options enabled and how your machine has been configured, you may have to select All Services and Network Scanning to display the Network Scanning feature tabs. Use the Network Scanning tab on the Touch Screen to select the standard features for a scan job. The tabs available for selecting the Network Scanning features are: • Network Scanning on page 62. • Basic Settings on page 64. • Advanced Settings on page 66. • Options on page 69. • Refresh Destinations on page 71. Xerox WorkCentre 4150 User Guide 61
-
 1
1 -
2
-
3
-
4
-
5
-
6
-
7
-
8
-
9
-
10
-
11
-
12
-
13
-
14
-
15
-
16
-
17
-
18
-
19
-
20
-
21
-
22
-
23
-
24
-
25
-
26
-
27
-
28
-
29
-
30
-
31
-
32
-
33
-
34
-
35
-
36
-
37
-
38
-
39
-
40
-
41
-
42
-
43
-
44
-
45
-
46
-
47
-
48
-
49
-
50
-
51
-
52
-
53
-
54
-
55
-
56
-
57
-
58
-
59
-
60
-
61
-
62
-
63
-
64
-
65
-
66
-
67
-
68
-
69
-
70
-
71
-
72
-
73
-
74
-
75
-
76
-
77
-
 78
78 -
 79
79 -
 80
80 -
 81
81 -
 82
82 -
 83
83 -
 84
84 -
 85
85 -
 86
86 -
 87
87 -
 88
88 -
89
-
90
-
91
-
92
-
93
-
94
-
95
-
96
-
97
-
98
-
99
-
100
-
101
-
102
-
103
-
104
-
105
-
106
-
107
-
108
-
109
-
110
-
111
-
112
-
113
-
114
-
115
-
116
-
117
-
118
-
119
-
120
-
121
-
122
-
123
-
124
-
125
-
126
-
127
-
128
-
129
-
130
-
131
-
132
-
133
-
134
-
135
-
136
-
137
-
138
-
139
-
140
-
141
-
142
-
143
-
144
-
145
-
146
-
147
-
148
-
149
-
150
-
151
-
152
-
153
-
154
-
155
-
156
-
157
-
158
-
159
-
160
-
161
-
162
-
163
-
164
-
165
-
166
-
167
-
168
-
169
-
170
-
171
-
172
-
173
-
174
-
175
-
176
-
177
-
178
-
179
-
180
-
181
-
182
-
183
-
184
-
185
-
186
-
187
-
188
-
189
-
190
-
191
-
192
-
193
-
194
-
195
-
196
-
197
-
198
-
199
-
200
-
201
 |
 |