Xerox 4150 User Guide - Page 99
Enter the Address Details, Start the E-mail Job, Edit Subject, Add Message, Start, Feature
 |
UPC - 095205228717
View all Xerox 4150 manuals
Add to My Manuals
Save this manual to your list of manuals |
Page 99 highlights
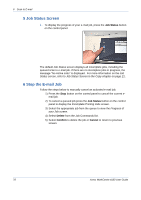
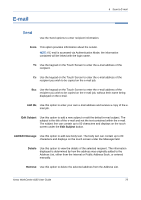
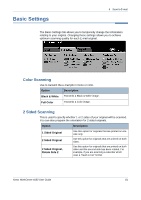
6 Scan to E-mail Feature Description E-mail Use this tab to select the standard options for an e-mail job, e.g. address fields, subject lines, message body, etc. Basic Settings Use this tab to enter the settings of the e-mail originals, e.g. color scanning, 2 sided originals, type, etc. Advanced Settings Use this tab to access the advanced e-mail settings, e.g. image options, resolution, file format, etc. If necessary, press one of the tabs and configure the e-mail settings. For information on the individual tabs, refer to the following: E-mail - page 79 Basic Settings - page 81 Advanced Settings- page 83 3 Enter the Address Details There are two methods of entering the e-mail address: • Manually enter the e-mail address. • Use the Address Book option to enter an e-mail address from the address book loaded onto your machine. You do not need to enter the full name, and can search the address book on the first few letters. For more information on addressing options, refer to Address List in the Scan to E-mail chapter on page 80. Repeat the process as required to enter the recipient address(es) and any Cc: or Bcc: addresses. Select Edit Subject to add a subject line that will appear in the recipient's email inbox. Use the touchscreen keypad to enter the text. Select Add Message to add a short message to accompany the scanned original. Use the touchscreen keypad to enter the text. 4 Start the E-mail Job Press the Start button. Each document is scanned only once and the machine sends originals as an e-mail attachment. Xerox WorkCentre 4150 User Guide 77
-
 1
1 -
2
-
3
-
4
-
5
-
6
-
7
-
8
-
9
-
10
-
11
-
12
-
13
-
14
-
15
-
16
-
17
-
18
-
19
-
20
-
21
-
22
-
23
-
24
-
25
-
26
-
27
-
28
-
29
-
30
-
31
-
32
-
33
-
34
-
35
-
36
-
37
-
38
-
39
-
40
-
41
-
42
-
43
-
44
-
45
-
46
-
47
-
48
-
49
-
50
-
51
-
52
-
53
-
54
-
55
-
56
-
57
-
58
-
59
-
60
-
61
-
62
-
63
-
64
-
65
-
66
-
67
-
68
-
69
-
70
-
71
-
72
-
73
-
74
-
75
-
76
-
77
-
78
-
79
-
80
-
81
-
82
-
83
-
84
-
85
-
86
-
87
-
88
-
89
-
90
-
91
-
92
-
93
-
 94
94 -
 95
95 -
 96
96 -
 97
97 -
 98
98 -
 99
99 -
 100
100 -
 101
101 -
 102
102 -
 103
103 -
 104
104 -
105
-
106
-
107
-
108
-
109
-
110
-
111
-
112
-
113
-
114
-
115
-
116
-
117
-
118
-
119
-
120
-
121
-
122
-
123
-
124
-
125
-
126
-
127
-
128
-
129
-
130
-
131
-
132
-
133
-
134
-
135
-
136
-
137
-
138
-
139
-
140
-
141
-
142
-
143
-
144
-
145
-
146
-
147
-
148
-
149
-
150
-
151
-
152
-
153
-
154
-
155
-
156
-
157
-
158
-
159
-
160
-
161
-
162
-
163
-
164
-
165
-
166
-
167
-
168
-
169
-
170
-
171
-
172
-
173
-
174
-
175
-
176
-
177
-
178
-
179
-
180
-
181
-
182
-
183
-
184
-
185
-
186
-
187
-
188
-
189
-
190
-
191
-
192
-
193
-
194
-
195
-
196
-
197
-
198
-
199
-
200
-
201
 |
 |