Xerox 4150 User Guide - Page 142
Junk Fax Prevention, Polling Passcode, Secure Polling, and replace
 |
UPC - 095205228717
View all Xerox 4150 manuals
Add to My Manuals
Save this manual to your list of manuals |
Page 142 highlights
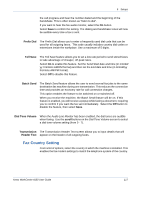
9 Setups The default selection for Junk Fax Prevention is Off so there is no filtering of incoming faxes. Select the On button to switch on the feature. With the feature switched on, the machine will block ALL incoming faxes except those from fax numbers that are included in the machine's Individual Directory. To block incoming faxes from numbers already in the Individual Directory, add the numbers to the Junk Fax Numbers List. Junk Fax Numbers List To add a number to the list touch an empty list location to highlight it and then touch the Edit List button. Input the last 7 digits of the number you wish to block using the keypad and then select the Save button. Repeat this process for all the numbers you want to block up to a maximum of 10 numbers and then select the Save button. To delete a number from this directory, touch the line number to highlight it, then select the Edit List button. Press C (Clear) on the keypad to clear the number and then select the Save button. Receive Mode This feature allows you to switch between Telephone, Answering Machine/ Fax and Fax receive options. Telephone Use to operate in manual mode. When a call is received, pick up the external phone handset. If a fax tone can be heard, press Start and replace the handset. Fax The machine answers the incoming call and immediately switches to fax receive mode. Answering Machine/Fax Use if attaching an answering machine to the machine. If the machine detects a fax tone, it switches to fax mode automatically. Remote Code When enabled, enter the external phone key (0-9) to start the fax receive. Secure Polling The machine can be programmed to send documents in the user's absence when polled. When enabled, a Polling Passcode is required to access the documents stored for Secure Polling. Add, Delete or Save passcodes to the Polling Passcodes list. 120 Xerox WorkCentre 4150 User Guide
-
 1
1 -
2
-
3
-
4
-
5
-
6
-
7
-
8
-
9
-
10
-
11
-
12
-
13
-
14
-
15
-
16
-
17
-
18
-
19
-
20
-
21
-
22
-
23
-
24
-
25
-
26
-
27
-
28
-
29
-
30
-
31
-
32
-
33
-
34
-
35
-
36
-
37
-
38
-
39
-
40
-
41
-
42
-
43
-
44
-
45
-
46
-
47
-
48
-
49
-
50
-
51
-
52
-
53
-
54
-
55
-
56
-
57
-
58
-
59
-
60
-
61
-
62
-
63
-
64
-
65
-
66
-
67
-
68
-
69
-
70
-
71
-
72
-
73
-
74
-
75
-
76
-
77
-
78
-
79
-
80
-
81
-
82
-
83
-
84
-
85
-
86
-
87
-
88
-
89
-
90
-
91
-
92
-
93
-
94
-
95
-
96
-
97
-
98
-
99
-
100
-
101
-
102
-
103
-
104
-
105
-
106
-
107
-
108
-
109
-
110
-
111
-
112
-
113
-
114
-
115
-
116
-
117
-
118
-
119
-
120
-
121
-
122
-
123
-
124
-
125
-
126
-
127
-
128
-
129
-
130
-
131
-
132
-
133
-
134
-
135
-
136
-
 137
137 -
 138
138 -
 139
139 -
 140
140 -
 141
141 -
 142
142 -
 143
143 -
 144
144 -
 145
145 -
 146
146 -
 147
147 -
148
-
149
-
150
-
151
-
152
-
153
-
154
-
155
-
156
-
157
-
158
-
159
-
160
-
161
-
162
-
163
-
164
-
165
-
166
-
167
-
168
-
169
-
170
-
171
-
172
-
173
-
174
-
175
-
176
-
177
-
178
-
179
-
180
-
181
-
182
-
183
-
184
-
185
-
186
-
187
-
188
-
189
-
190
-
191
-
192
-
193
-
194
-
195
-
196
-
197
-
198
-
199
-
200
-
201
 |
 |
