Brother International HL 1850 Service Manual - Page 167
Periodical, Cleaning, Warning
 |
UPC - 012502603900
View all Brother International HL 1850 manuals
Add to My Manuals
Save this manual to your list of manuals |
Page 167 highlights
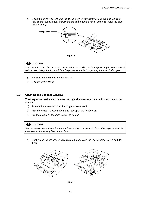
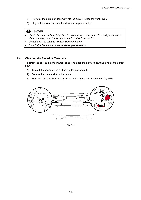
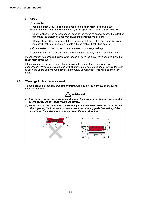
CHAPTER 5 PERIODIC MAINTENANCE 3. PERIODICAL CLEANING Clean the following parts periodically to avoid any printer problems or print image defects. • CAUTION: While drum unit and scanner window cleaning basically can be implemented by the end user, the electrical terminals inside the printer and on the drum unit should be cleaned by a service technician. Instruct the users not to touch those terminals. A WARNING There are high voltage electrodes inside the printer. Before cleaning the printer, make sure that the power switch has been turned off and the power cord has been unplugged from the power outlet. 3.1 Cleaning the Printer Exterior Clean the printer exterior to keep the printer clean. 1) Turn off the power switch and unplug the power cord. 2) Wipe dirt and dust away from the printer exterior with a damp cloth and allow the printer to dry completely before turning the power on again. 3) Plug in the power cord. A CAUTION: • Use water or neutral detergents for cleaning. Cleaning with volatile liquids such as thinner or benzene will damage the surface of the printer. • Do not use cleaning materials that contain ammonia. They will damage the printer and the toner cartridge. 3.2 Cleaning the Drum Unit When replacing the drum unit or toner cartridge with a new one, be sure to clean the drum unit. 1) Turn off the power switch and unplug the power cord. 2) Press the cover release button, and then open the front cover. 3) Pull out the drum unit assembly. 0 CAUTION: It is recommended to place the drum unit assembly on a piece of disposable paper or cloth in case you accidentally spill or scatter toner. 5-6
-
 1
1 -
2
-
3
-
4
-
5
-
6
-
7
-
8
-
9
-
10
-
11
-
12
-
13
-
14
-
15
-
16
-
17
-
18
-
19
-
20
-
21
-
22
-
23
-
24
-
25
-
26
-
27
-
28
-
29
-
30
-
31
-
32
-
33
-
34
-
35
-
36
-
37
-
38
-
39
-
40
-
41
-
42
-
43
-
44
-
45
-
46
-
47
-
48
-
49
-
50
-
51
-
52
-
53
-
54
-
55
-
56
-
57
-
58
-
59
-
60
-
61
-
62
-
63
-
64
-
65
-
66
-
67
-
68
-
69
-
70
-
71
-
72
-
73
-
74
-
75
-
76
-
77
-
78
-
79
-
80
-
81
-
82
-
83
-
84
-
85
-
86
-
87
-
88
-
89
-
90
-
91
-
92
-
93
-
94
-
95
-
96
-
97
-
98
-
99
-
100
-
101
-
102
-
103
-
104
-
105
-
106
-
107
-
108
-
109
-
110
-
111
-
112
-
113
-
114
-
115
-
116
-
117
-
118
-
119
-
120
-
121
-
122
-
123
-
124
-
125
-
126
-
127
-
128
-
129
-
130
-
131
-
132
-
133
-
134
-
135
-
136
-
137
-
138
-
139
-
140
-
141
-
142
-
143
-
144
-
145
-
146
-
147
-
148
-
149
-
150
-
151
-
152
-
153
-
154
-
155
-
156
-
157
-
158
-
159
-
160
-
161
-
 162
162 -
 163
163 -
 164
164 -
 165
165 -
 166
166 -
 167
167 -
 168
168 -
 169
169 -
 170
170 -
 171
171 -
 172
172 -
173
-
174
-
175
-
176
-
177
-
178
-
179
-
180
-
181
-
182
-
183
-
184
-
185
-
186
-
187
-
188
-
189
-
190
-
191
-
192
-
193
-
194
-
195
-
196
-
197
-
198
-
199
-
200
-
201
-
202
-
203
-
204
-
205
-
206
-
207
-
208
-
209
-
210
-
211
-
212
-
213
-
214
-
215
-
216
-
217
-
218
-
219
-
220
-
221
-
222
-
223
-
224
-
225
-
226
-
227
-
228
-
229
-
230
-
231
-
232
-
233
-
234
-
235
-
236
-
237
-
238
-
239
-
240
-
241
-
242
-
243
-
244
-
245
-
246
-
247
-
248
-
249
-
250
-
251
-
252
-
253
-
254
-
255
-
256
-
257
-
258
-
259
-
260
-
261
-
262
-
263
-
264
-
265
-
266
-
267
-
268
-
269
-
270
-
271
-
272
-
273
-
274
-
275
-
276
-
277
 |
 |