Brother International HL 1850 Service Manual - Page 211
Faulty, registration, fixing
 |
UPC - 012502603900
View all Brother International HL 1850 manuals
Add to My Manuals
Save this manual to your list of manuals |
Page 211 highlights
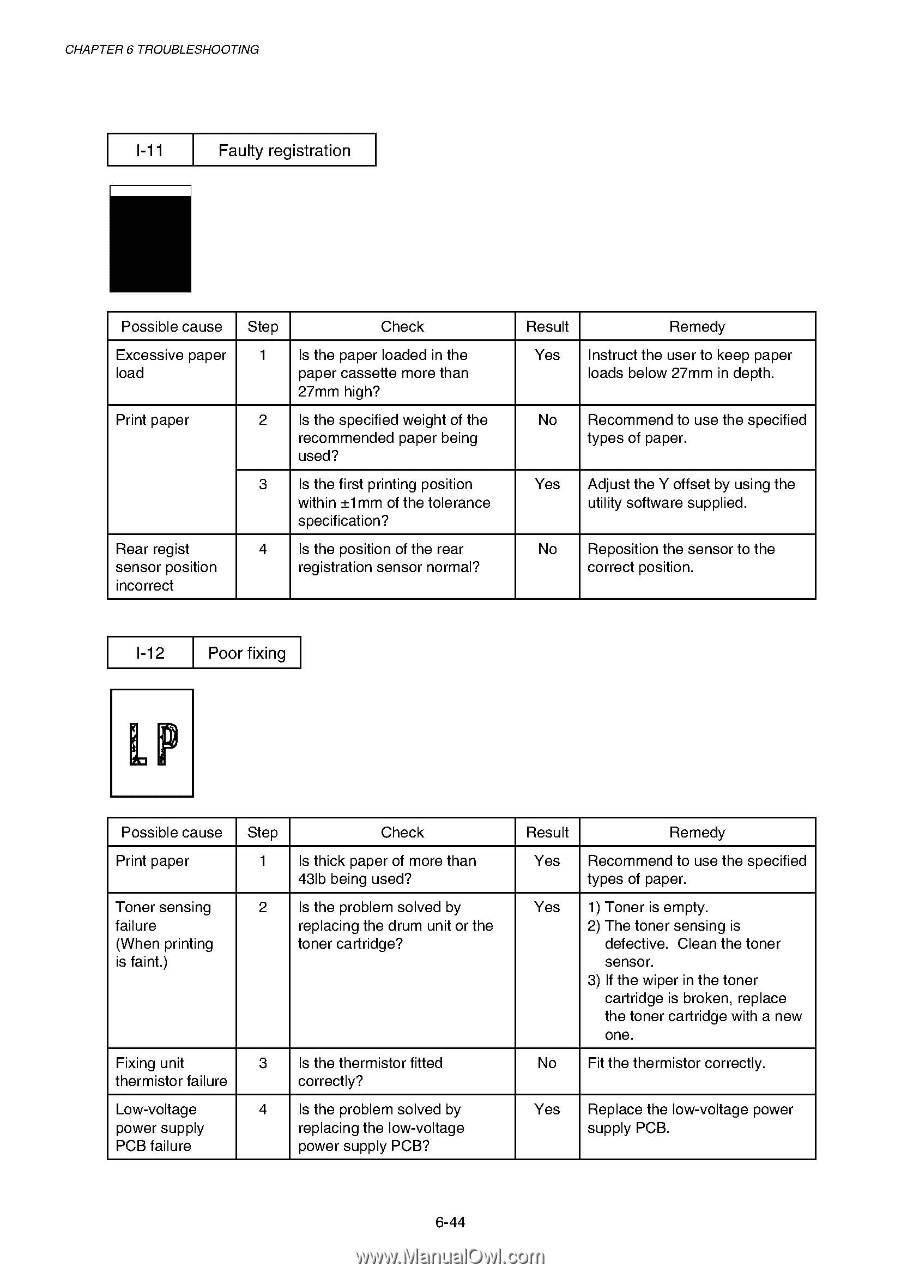
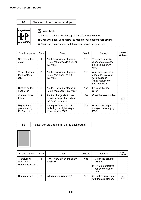
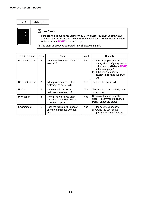
CHAPTER 6 TROUBLESHOOTING Faulty registration Possible cause Excessive paper load Print paper Rear regist sensor position incorrect Step 1 2 3 4 Check Is the paper loaded in the paper cassette more than 27mm high? Is the specified weight of the recommended paper being used? Is the first printing position within ±1mm of the tolerance specification? Is the position of the rear registration sensor normal? Result Remedy Yes Instruct the user to keep paper loads below 27mm in depth. No Recommend to use the specified types of paper. Yes Adjust the Y offset by using the utility software supplied. No Reposition the sensor to the correct position. 1-12 Poor fixing Possible cause Print paper Toner sensing failure (When printing is faint.) Step Check 1 Is thick paper of more than 43Ib being used? 2 Is the problem solved by replacing the drum unit or the toner cartridge? Fixing unit 3 Is the thermistor fitted thermistor failure correctly? Low-voltage power supply PCB failure 4 Is the problem solved by replacing the low-voltage power supply PCB? Result Remedy Yes Recommend to use the specified types of paper. Yes 1) Toner is empty. 2) The toner sensing is defective. Clean the toner sensor. 3) If the wiper in the toner cartridge is broken, replace the toner cartridge with a new one. No Fit the thermistor correctly. Yes Replace the low-voltage power supply PCB. 6-44
-
 1
1 -
2
-
3
-
4
-
5
-
6
-
7
-
8
-
9
-
10
-
11
-
12
-
13
-
14
-
15
-
16
-
17
-
18
-
19
-
20
-
21
-
22
-
23
-
24
-
25
-
26
-
27
-
28
-
29
-
30
-
31
-
32
-
33
-
34
-
35
-
36
-
37
-
38
-
39
-
40
-
41
-
42
-
43
-
44
-
45
-
46
-
47
-
48
-
49
-
50
-
51
-
52
-
53
-
54
-
55
-
56
-
57
-
58
-
59
-
60
-
61
-
62
-
63
-
64
-
65
-
66
-
67
-
68
-
69
-
70
-
71
-
72
-
73
-
74
-
75
-
76
-
77
-
78
-
79
-
80
-
81
-
82
-
83
-
84
-
85
-
86
-
87
-
88
-
89
-
90
-
91
-
92
-
93
-
94
-
95
-
96
-
97
-
98
-
99
-
100
-
101
-
102
-
103
-
104
-
105
-
106
-
107
-
108
-
109
-
110
-
111
-
112
-
113
-
114
-
115
-
116
-
117
-
118
-
119
-
120
-
121
-
122
-
123
-
124
-
125
-
126
-
127
-
128
-
129
-
130
-
131
-
132
-
133
-
134
-
135
-
136
-
137
-
138
-
139
-
140
-
141
-
142
-
143
-
144
-
145
-
146
-
147
-
148
-
149
-
150
-
151
-
152
-
153
-
154
-
155
-
156
-
157
-
158
-
159
-
160
-
161
-
162
-
163
-
164
-
165
-
166
-
167
-
168
-
169
-
170
-
171
-
172
-
173
-
174
-
175
-
176
-
177
-
178
-
179
-
180
-
181
-
182
-
183
-
184
-
185
-
186
-
187
-
188
-
189
-
190
-
191
-
192
-
193
-
194
-
195
-
196
-
197
-
198
-
199
-
200
-
201
-
202
-
203
-
204
-
205
-
 206
206 -
 207
207 -
 208
208 -
 209
209 -
 210
210 -
 211
211 -
 212
212 -
 213
213 -
 214
214 -
 215
215 -
 216
216 -
217
-
218
-
219
-
220
-
221
-
222
-
223
-
224
-
225
-
226
-
227
-
228
-
229
-
230
-
231
-
232
-
233
-
234
-
235
-
236
-
237
-
238
-
239
-
240
-
241
-
242
-
243
-
244
-
245
-
246
-
247
-
248
-
249
-
250
-
251
-
252
-
253
-
254
-
255
-
256
-
257
-
258
-
259
-
260
-
261
-
262
-
263
-
264
-
265
-
266
-
267
-
268
-
269
-
270
-
271
-
272
-
273
-
274
-
275
-
276
-
277
 |
 |