Brother International HL 1850 Service Manual - Page 209
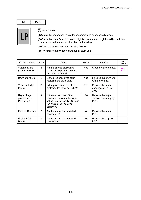
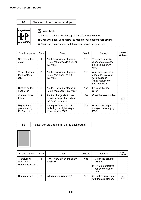
Black, blurred, horizontal, stripes, vertical, streaks, background
 |
UPC - 012502603900
View all Brother International HL 1850 manuals
Add to My Manuals
Save this manual to your list of manuals |
Page 209 highlights
CHAPTER 6 TROUBLESHOOTING 1-7 Black and blurred horizontal stripes HArA4.4.weiii kjVA User Check (1) The drum unit may be damaged. Install a new drum unit. (2) Check the paper used meets the recommended paper specifications. (3) Clean the printer interior and the corona wire in the drum unit. Possible cause Scratch on the drum Toner stuck on the developer roller Step Check , 1 Are the horizontal stripes at 94mm (photosensitive drum) intervals? , 2 Are the horizontal stripes at 39mm (developer roller) intervals? Scratch on the heat roller Corona contact failure High-voltage power supply PCB failure 3 Are the horizontal stripes at 79mm (heat roller) intervals? 4 Are the charge electrodes between the printer body and the drum unit dirty? 5 Is the problem solved after replacing the high-voltage power supply PCB? Result Remedy . Yes The photosensitive drum was scratched. Replace the drum . unit. Yes After printing several pages, the problem will disappear. If not, replace the toner cartridge. Yes Replace the heat roller. Yes Clean both electrodes. Ground contacts (3) Yes Replace the highvoltage power supply PCB. 1-8 Black vertical streaks (in a gray background) Possible cause Translucent stain on the scanner window Corona failure Step Check Result Remedy 1 Is there any dirt on the scanner Yes 1) Clean the scanner window? window. 2) If it is not effective, replace the laser unit. 2 Is the corona wire dirty? Yes Clean the corona wire with the wire cleaner. Ground contacts (2) 6-42
-
 1
1 -
2
-
3
-
4
-
5
-
6
-
7
-
8
-
9
-
10
-
11
-
12
-
13
-
14
-
15
-
16
-
17
-
18
-
19
-
20
-
21
-
22
-
23
-
24
-
25
-
26
-
27
-
28
-
29
-
30
-
31
-
32
-
33
-
34
-
35
-
36
-
37
-
38
-
39
-
40
-
41
-
42
-
43
-
44
-
45
-
46
-
47
-
48
-
49
-
50
-
51
-
52
-
53
-
54
-
55
-
56
-
57
-
58
-
59
-
60
-
61
-
62
-
63
-
64
-
65
-
66
-
67
-
68
-
69
-
70
-
71
-
72
-
73
-
74
-
75
-
76
-
77
-
78
-
79
-
80
-
81
-
82
-
83
-
84
-
85
-
86
-
87
-
88
-
89
-
90
-
91
-
92
-
93
-
94
-
95
-
96
-
97
-
98
-
99
-
100
-
101
-
102
-
103
-
104
-
105
-
106
-
107
-
108
-
109
-
110
-
111
-
112
-
113
-
114
-
115
-
116
-
117
-
118
-
119
-
120
-
121
-
122
-
123
-
124
-
125
-
126
-
127
-
128
-
129
-
130
-
131
-
132
-
133
-
134
-
135
-
136
-
137
-
138
-
139
-
140
-
141
-
142
-
143
-
144
-
145
-
146
-
147
-
148
-
149
-
150
-
151
-
152
-
153
-
154
-
155
-
156
-
157
-
158
-
159
-
160
-
161
-
162
-
163
-
164
-
165
-
166
-
167
-
168
-
169
-
170
-
171
-
172
-
173
-
174
-
175
-
176
-
177
-
178
-
179
-
180
-
181
-
182
-
183
-
184
-
185
-
186
-
187
-
188
-
189
-
190
-
191
-
192
-
193
-
194
-
195
-
196
-
197
-
198
-
199
-
200
-
201
-
202
-
203
-
 204
204 -
 205
205 -
 206
206 -
 207
207 -
 208
208 -
 209
209 -
 210
210 -
 211
211 -
 212
212 -
 213
213 -
 214
214 -
215
-
216
-
217
-
218
-
219
-
220
-
221
-
222
-
223
-
224
-
225
-
226
-
227
-
228
-
229
-
230
-
231
-
232
-
233
-
234
-
235
-
236
-
237
-
238
-
239
-
240
-
241
-
242
-
243
-
244
-
245
-
246
-
247
-
248
-
249
-
250
-
251
-
252
-
253
-
254
-
255
-
256
-
257
-
258
-
259
-
260
-
261
-
262
-
263
-
264
-
265
-
266
-
267
-
268
-
269
-
270
-
271
-
272
-
273
-
274
-
275
-
276
-
277
 |
 |
