Brother International HL 1850 Service Manual - Page 47
Printing, Output, Printing, Sides, Paper, Duplex
 |
UPC - 012502603900
View all Brother International HL 1850 manuals
Add to My Manuals
Save this manual to your list of manuals |
Page 47 highlights
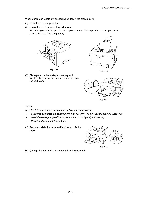
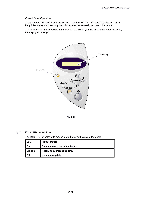
CHAPTER 2 INSTALLATIONAND BASIC OPERATION 4.3 Printing to the Face up Output Tray (Face up Printing) When the face up output tray is open, the printer has a straight paper path from the paper cassette or multi-purpose tray to the rear of the printer. Use this output method when printing on special media that is thick or should not be bent, such as heavy paper, labels, transparencies, card stock or envelopes. When printing to the face up output tray, follow the steps below; (1) Open the face up output tray. (2) Unfold the face up output tray extension. (3) Place the paper into the paper cassette or multi-purpose tray. I Fig. 2-26 Fig. 2-27 (4) After the printer ejects all the printed pages, remove them and close the face up output tray. 4.4 Printing on Both Sides of the Paper (Duplex Printing) The supplied printer drivers for Windows® 95/98/Me, Windows® NT 4.0, Windows® 2000/XP supports automatic duplex printing. Guidelines for duplexprinting: • If the paper is thin, it may wrinkle. • If paper is curled, straighten it, and then place it in the paper cassette. • Use A4, Letter or Legal size plain paper (60 to 105 g/m2 or 16 to 28 lb.). Do not use bond paper. • If the paper is not feeding correctly, it may be curled. Remove the paper and straighten it. When printing on both sides of the paper, follow the steps below; (1) Load paper into the paper cassette or multi-purpose tray (2) When using A4 or Letter size paper, set the paper adjustment lever for duplex printing to match the paper size. 0 NOTE: Fig. 2-28 2-18
-
 1
1 -
2
-
3
-
4
-
5
-
6
-
7
-
8
-
9
-
10
-
11
-
12
-
13
-
14
-
15
-
16
-
17
-
18
-
19
-
20
-
21
-
22
-
23
-
24
-
25
-
26
-
27
-
28
-
29
-
30
-
31
-
32
-
33
-
34
-
35
-
36
-
37
-
38
-
39
-
40
-
41
-
 42
42 -
 43
43 -
 44
44 -
 45
45 -
 46
46 -
 47
47 -
 48
48 -
 49
49 -
 50
50 -
 51
51 -
 52
52 -
53
-
54
-
55
-
56
-
57
-
58
-
59
-
60
-
61
-
62
-
63
-
64
-
65
-
66
-
67
-
68
-
69
-
70
-
71
-
72
-
73
-
74
-
75
-
76
-
77
-
78
-
79
-
80
-
81
-
82
-
83
-
84
-
85
-
86
-
87
-
88
-
89
-
90
-
91
-
92
-
93
-
94
-
95
-
96
-
97
-
98
-
99
-
100
-
101
-
102
-
103
-
104
-
105
-
106
-
107
-
108
-
109
-
110
-
111
-
112
-
113
-
114
-
115
-
116
-
117
-
118
-
119
-
120
-
121
-
122
-
123
-
124
-
125
-
126
-
127
-
128
-
129
-
130
-
131
-
132
-
133
-
134
-
135
-
136
-
137
-
138
-
139
-
140
-
141
-
142
-
143
-
144
-
145
-
146
-
147
-
148
-
149
-
150
-
151
-
152
-
153
-
154
-
155
-
156
-
157
-
158
-
159
-
160
-
161
-
162
-
163
-
164
-
165
-
166
-
167
-
168
-
169
-
170
-
171
-
172
-
173
-
174
-
175
-
176
-
177
-
178
-
179
-
180
-
181
-
182
-
183
-
184
-
185
-
186
-
187
-
188
-
189
-
190
-
191
-
192
-
193
-
194
-
195
-
196
-
197
-
198
-
199
-
200
-
201
-
202
-
203
-
204
-
205
-
206
-
207
-
208
-
209
-
210
-
211
-
212
-
213
-
214
-
215
-
216
-
217
-
218
-
219
-
220
-
221
-
222
-
223
-
224
-
225
-
226
-
227
-
228
-
229
-
230
-
231
-
232
-
233
-
234
-
235
-
236
-
237
-
238
-
239
-
240
-
241
-
242
-
243
-
244
-
245
-
246
-
247
-
248
-
249
-
250
-
251
-
252
-
253
-
254
-
255
-
256
-
257
-
258
-
259
-
260
-
261
-
262
-
263
-
264
-
265
-
266
-
267
-
268
-
269
-
270
-
271
-
272
-
273
-
274
-
275
-
276
-
277
 |
 |