Brother International HL 1850 Service Manual - Page 203
Troubleshooting, Image, Defect, Light
 |
UPC - 012502603900
View all Brother International HL 1850 manuals
Add to My Manuals
Save this manual to your list of manuals |
Page 203 highlights
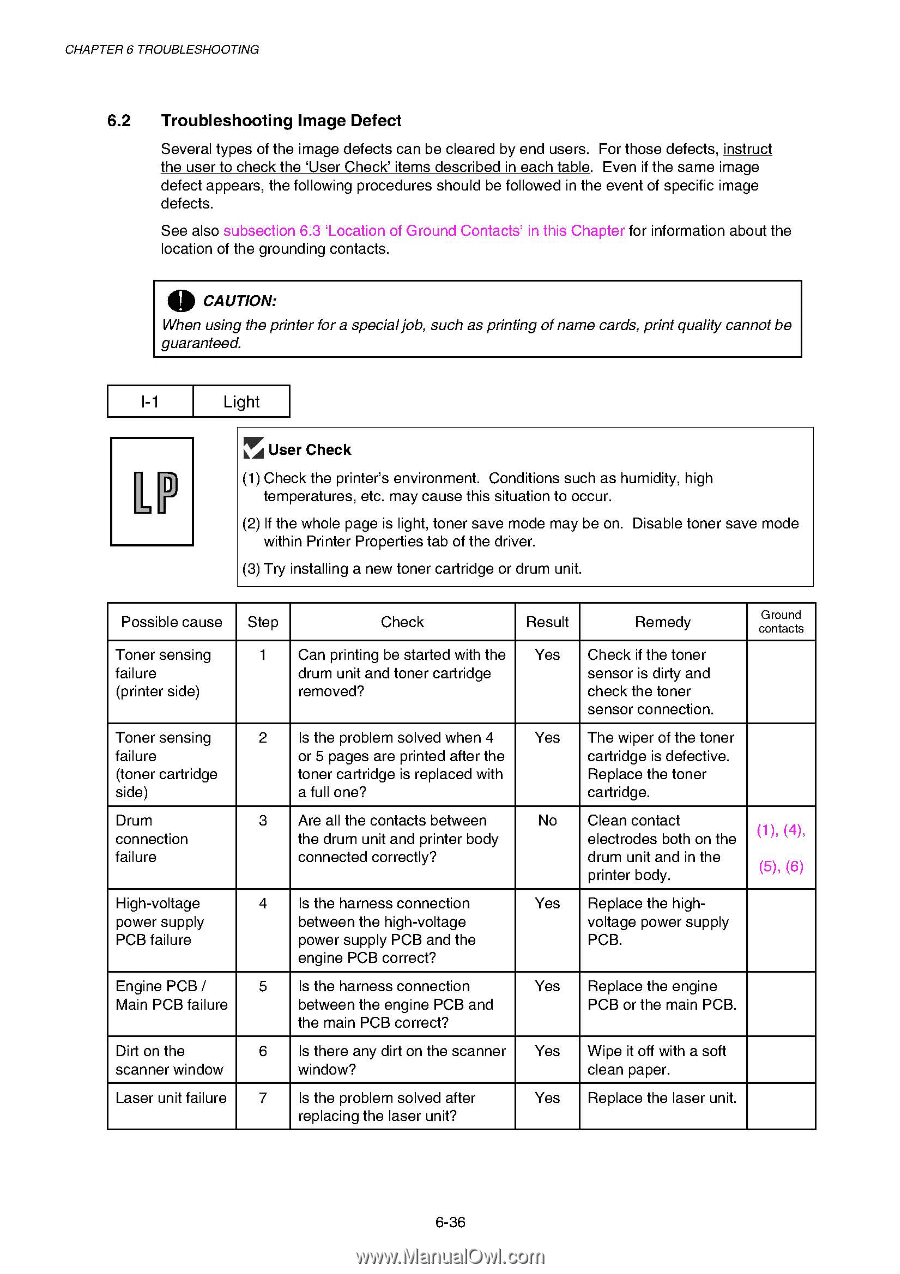
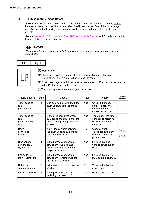
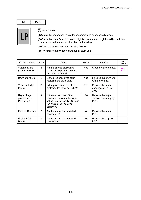
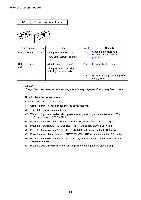
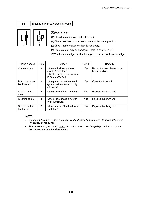
CHAPTER 6 TROUBLESHOOTING 6.2 Troubleshooting Image Defect Several types of the image defects can be cleared by end users. For those defects, instruct the user to check the `User Check' items described in each table. Even if the same image defect appears, the following procedures should be followed in the event of specific image defects. See also subsection 6.3 `Location of Ground Contacts' in this Chapter for information about the location of the grounding contacts. 0 CAUTION: When using the printer for a special job, such as printing of name cards, print quality cannot be guaranteed. 1-1 ILP Light FLAr User Check (1) Check the printer's environment. Conditions such as humidity, high temperatures, etc. may cause this situation to occur. (2) If the whole page is light, toner save mode may be on. Disable toner save mode within Printer Properties tab of the driver. (3) Try installing a new toner cartridge or drum unit. Possible cause Step Check Result Remedy Ground contacts Toner sensing failure (printer side) 1 Can printing be started with the Yes Check if the toner drum unit and toner cartridge sensor is dirty and removed? check the toner sensor connection. Toner sensing failure (toner cartridge side) 2 Is the problem solved when 4 Yes The wiper of the toner or 5 pages are printed after the cartridge is defective. toner cartridge is replaced with Replace the toner a full one? cartridge. Drum connection failure 3 Are all the contacts between the drum unit and printer body connected correctly? No Clean contact electrodes both on the (1), (4), drum unit and in the printer body. (5), (6) High-voltage power supply PCB failure 4 Is the harness connection between the high-voltage power supply PCB and the engine PCB correct? Yes Replace the highvoltage power supply PCB. Engine PCB / 5 Is the harness connection Main PCB failure between the engine PCB and the main PCB correct? Yes Replace the engine PCB or the main PCB. Dirt on the scanner window 6 Is there any dirt on the scanner Yes Wipe it off with a soft window? clean paper. Laser unit failure 7 Is the problem solved after , replacing the laser unit? Yes Replace the laser unit. 6-36
-
 1
1 -
2
-
3
-
4
-
5
-
6
-
7
-
8
-
9
-
10
-
11
-
12
-
13
-
14
-
15
-
16
-
17
-
18
-
19
-
20
-
21
-
22
-
23
-
24
-
25
-
26
-
27
-
28
-
29
-
30
-
31
-
32
-
33
-
34
-
35
-
36
-
37
-
38
-
39
-
40
-
41
-
42
-
43
-
44
-
45
-
46
-
47
-
48
-
49
-
50
-
51
-
52
-
53
-
54
-
55
-
56
-
57
-
58
-
59
-
60
-
61
-
62
-
63
-
64
-
65
-
66
-
67
-
68
-
69
-
70
-
71
-
72
-
73
-
74
-
75
-
76
-
77
-
78
-
79
-
80
-
81
-
82
-
83
-
84
-
85
-
86
-
87
-
88
-
89
-
90
-
91
-
92
-
93
-
94
-
95
-
96
-
97
-
98
-
99
-
100
-
101
-
102
-
103
-
104
-
105
-
106
-
107
-
108
-
109
-
110
-
111
-
112
-
113
-
114
-
115
-
116
-
117
-
118
-
119
-
120
-
121
-
122
-
123
-
124
-
125
-
126
-
127
-
128
-
129
-
130
-
131
-
132
-
133
-
134
-
135
-
136
-
137
-
138
-
139
-
140
-
141
-
142
-
143
-
144
-
145
-
146
-
147
-
148
-
149
-
150
-
151
-
152
-
153
-
154
-
155
-
156
-
157
-
158
-
159
-
160
-
161
-
162
-
163
-
164
-
165
-
166
-
167
-
168
-
169
-
170
-
171
-
172
-
173
-
174
-
175
-
176
-
177
-
178
-
179
-
180
-
181
-
182
-
183
-
184
-
185
-
186
-
187
-
188
-
189
-
190
-
191
-
192
-
193
-
194
-
195
-
196
-
197
-
 198
198 -
 199
199 -
 200
200 -
 201
201 -
 202
202 -
 203
203 -
 204
204 -
 205
205 -
 206
206 -
 207
207 -
 208
208 -
209
-
210
-
211
-
212
-
213
-
214
-
215
-
216
-
217
-
218
-
219
-
220
-
221
-
222
-
223
-
224
-
225
-
226
-
227
-
228
-
229
-
230
-
231
-
232
-
233
-
234
-
235
-
236
-
237
-
238
-
239
-
240
-
241
-
242
-
243
-
244
-
245
-
246
-
247
-
248
-
249
-
250
-
251
-
252
-
253
-
254
-
255
-
256
-
257
-
258
-
259
-
260
-
261
-
262
-
263
-
264
-
265
-
266
-
267
-
268
-
269
-
270
-
271
-
272
-
273
-
274
-
275
-
276
-
277
 |
 |