Brother International HL 1850 Service Manual - Page 34
correctly.
 |
UPC - 012502603900
View all Brother International HL 1850 manuals
Add to My Manuals
Save this manual to your list of manuals |
Page 34 highlights
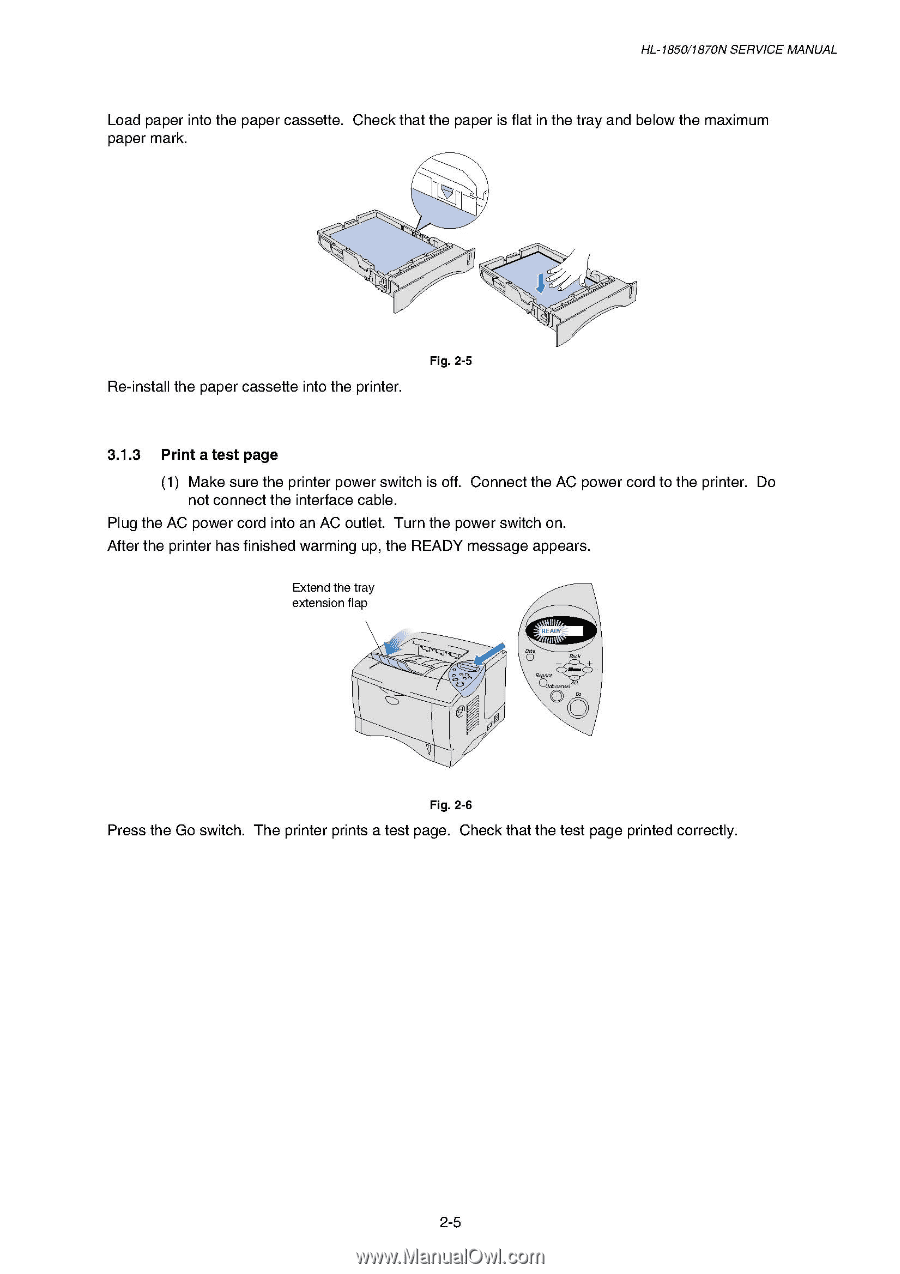
HL-1850/1870N SERVICE MANUAL Load paper into the paper cassette. Check that the paper is flat in the tray and below the maximum paper mark. I Re-install the paper cassette into the printer. Fig. 2-5 3.1.3 Print a test page (1) Make sure the printer power switch is off. Connect the AC power cord to the printer. Do not connect the interface cable. Plug the AC power cord into an AC outlet. Turn the power switch on. After the printer has finished warming up, the READY message appears. Extend the tray extension flap READY REQriM et3 0 Fig. 2-6 Press the Go switch. The printer prints a test page. Check that the test page printed correctly. 2-5
-
 1
1 -
2
-
3
-
4
-
5
-
6
-
7
-
8
-
9
-
10
-
11
-
12
-
13
-
14
-
15
-
16
-
17
-
18
-
19
-
20
-
21
-
22
-
23
-
24
-
25
-
26
-
27
-
28
-
 29
29 -
 30
30 -
 31
31 -
 32
32 -
 33
33 -
 34
34 -
 35
35 -
 36
36 -
 37
37 -
 38
38 -
 39
39 -
40
-
41
-
42
-
43
-
44
-
45
-
46
-
47
-
48
-
49
-
50
-
51
-
52
-
53
-
54
-
55
-
56
-
57
-
58
-
59
-
60
-
61
-
62
-
63
-
64
-
65
-
66
-
67
-
68
-
69
-
70
-
71
-
72
-
73
-
74
-
75
-
76
-
77
-
78
-
79
-
80
-
81
-
82
-
83
-
84
-
85
-
86
-
87
-
88
-
89
-
90
-
91
-
92
-
93
-
94
-
95
-
96
-
97
-
98
-
99
-
100
-
101
-
102
-
103
-
104
-
105
-
106
-
107
-
108
-
109
-
110
-
111
-
112
-
113
-
114
-
115
-
116
-
117
-
118
-
119
-
120
-
121
-
122
-
123
-
124
-
125
-
126
-
127
-
128
-
129
-
130
-
131
-
132
-
133
-
134
-
135
-
136
-
137
-
138
-
139
-
140
-
141
-
142
-
143
-
144
-
145
-
146
-
147
-
148
-
149
-
150
-
151
-
152
-
153
-
154
-
155
-
156
-
157
-
158
-
159
-
160
-
161
-
162
-
163
-
164
-
165
-
166
-
167
-
168
-
169
-
170
-
171
-
172
-
173
-
174
-
175
-
176
-
177
-
178
-
179
-
180
-
181
-
182
-
183
-
184
-
185
-
186
-
187
-
188
-
189
-
190
-
191
-
192
-
193
-
194
-
195
-
196
-
197
-
198
-
199
-
200
-
201
-
202
-
203
-
204
-
205
-
206
-
207
-
208
-
209
-
210
-
211
-
212
-
213
-
214
-
215
-
216
-
217
-
218
-
219
-
220
-
221
-
222
-
223
-
224
-
225
-
226
-
227
-
228
-
229
-
230
-
231
-
232
-
233
-
234
-
235
-
236
-
237
-
238
-
239
-
240
-
241
-
242
-
243
-
244
-
245
-
246
-
247
-
248
-
249
-
250
-
251
-
252
-
253
-
254
-
255
-
256
-
257
-
258
-
259
-
260
-
261
-
262
-
263
-
264
-
265
-
266
-
267
-
268
-
269
-
270
-
271
-
272
-
273
-
274
-
275
-
276
-
277
 |
 |
HL
-1850/1870N
SERVICE
MANUAL
Load
paper
into
the
paper
cassette.
Check
that
the
paper
is
flat
in
the
tray
and
below
the
maximum
paper
mark.
I
Fig.
2-5
Re
-install
the
paper
cassette
into
the
printer.
3.1.3
Print
a
test
page
(1)
Make
sure
the
printer
power
switch
is
off.
Connect
the
AC
power
cord
to
the
printer.
Do
not
connect
the
interface
cable.
Plug
the
AC
power
cord
into
an
AC
outlet.
Turn
the
power
switch
on.
After
the
printer
has
finished
warming
up,
the
READY
message
appears.
Extend
the
tray
extension
flap
READY
et3
REQriM
0
Fig.
2-6
Press
the
Go
switch.
The
printer
prints
a
test
page.
Check
that
the
test
page
printed
correctly.
2-5