Epson PowerLite 1825 User's Guide - Page 114
Creating a Slideshow, Displaying the Slideshow
 |
View all Epson PowerLite 1825 manuals
Add to My Manuals
Save this manual to your list of manuals |
Page 114 highlights
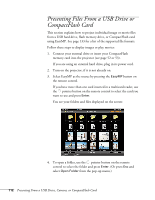
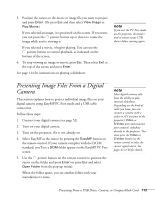
note Make sure your camera shows up on your desktop as a drive letter. If it does, it is probably a USB-mounted device and will work with the projector software. The EasyMP software does not support TWAIN-compliant digital cameras. 6. Select the folder and press Enter (or press Esc and select Open Folder). You see your image files when the folder opens. 7. Position the cursor on the file you want to project and press Enter (or press Esc and select View Image). While the image is projected on the screen, you can: ■ Press the pointer button right to display the next image. ■ Press the pointer button left to display the previous image. ■ Press the pointer button up or down to rotate the image. ■ Press Enter to start a slideshow. ■ Press Esc to return to the folder screen. 8. To stop viewing images, select Exit at the top of the screen and press Enter. Creating a Slideshow If you have a folder containing an assortment of images, you can display them as a slideshow. See page 133 for a list of the supported file formats. Displaying the Slideshow First make sure the images are stored in a folder on the USB drive or CompactFlash memory card. Then follow these steps: 1. Connect your external drive (see page 52) or insert your CompactFlash memory card (see page 53). If you are using an external hard drive, plug in its power cord. 2. Turn on the projector, if it is not already on. 3. Select EasyMP as the source by pressing the EasyMP button on the remote control. If you have more than one card inserted in a multicard reader, use the pointer button on the remote control to select the card you want to use and press Enter. 114 Presenting From a USB Drive, Camera, or CompactFlash Card
-
 1
1 -
2
-
3
-
4
-
5
-
6
-
7
-
8
-
9
-
10
-
11
-
12
-
13
-
14
-
15
-
16
-
17
-
18
-
19
-
20
-
21
-
22
-
23
-
24
-
25
-
26
-
27
-
28
-
29
-
30
-
31
-
32
-
33
-
34
-
35
-
36
-
37
-
38
-
39
-
40
-
41
-
42
-
43
-
44
-
45
-
46
-
47
-
48
-
49
-
50
-
51
-
52
-
53
-
54
-
55
-
56
-
57
-
58
-
59
-
60
-
61
-
62
-
63
-
64
-
65
-
66
-
67
-
68
-
69
-
70
-
71
-
72
-
73
-
74
-
75
-
76
-
77
-
78
-
79
-
80
-
81
-
82
-
83
-
84
-
85
-
86
-
87
-
88
-
89
-
90
-
91
-
92
-
93
-
94
-
95
-
96
-
97
-
98
-
99
-
100
-
101
-
102
-
103
-
104
-
105
-
106
-
107
-
108
-
 109
109 -
 110
110 -
 111
111 -
 112
112 -
 113
113 -
 114
114 -
 115
115 -
 116
116 -
 117
117 -
 118
118 -
 119
119 -
120
-
121
-
122
-
123
-
124
-
125
-
126
-
127
-
128
-
129
-
130
-
131
-
132
-
133
-
134
-
135
-
136
-
137
-
138
-
139
-
140
-
141
-
142
-
143
-
144
-
145
-
146
-
147
-
148
-
149
-
150
-
151
-
152
-
153
-
154
-
155
-
156
-
157
-
158
-
159
-
160
-
161
-
162
-
163
-
164
-
165
-
166
-
167
-
168
-
169
-
170
-
171
-
172
-
173
-
174
-
175
-
176
-
177
-
178
-
179
-
180
-
181
-
182
-
183
-
184
-
185
-
186
-
187
-
188
-
189
-
190
-
191
-
192
-
193
-
194
-
195
-
196
-
197
-
198
-
199
-
200
-
201
-
202
-
203
-
204
-
205
-
206
-
207
-
208
-
209
-
210
-
211
-
212
-
213
-
214
-
215
-
216
-
217
-
218
-
219
-
220
-
221
-
222
 |
 |