Epson PowerLite 1825 User's Guide - Page 151
Multi-screen Color Adjustment
 |
View all Epson PowerLite 1825 manuals
Add to My Manuals
Save this manual to your list of manuals |
Page 151 highlights
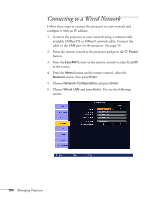
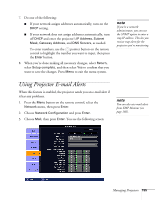
Multi-screen Color Adjustment You can match the color of projected images when two or more projectors are being used to display images near each other, or when you use the multi-screen feature to project from one source (one image) as described on page 98. For each screen, you can set five levels of brightness and color correction. 1. Before starting, you may want to assign a numeric ID to each projector. This lets you use the remote control to select the projector you want to adjust. See page 36 for instructions. To match the display colors as closely as possible, make sure that all the projectors are set to the same color mode before starting. See page 138 for instructions. 2. Press the Menu button on the remote control. You see the projector's menu screen. 3. Select Extended > Multi-screen. 4. Start by setting the Adjustment Level to 1 for two projectors. Then use Brightness Correct to match the darker projector to the lighter one. Press Enter to see the effects of your adjustments. 5. Next, adjust the brightness of Level 5 for the same two projectors. Match the brighter projector to the darker one. 6. Adjust and match the brightness of Levels 2, 3, and 4. 7. Adjust and match the G/R color correction for all levels. Then adjust and match the B/Y correction for all levels. 8. If you are using three or more projectors, repeat steps 4 through 7 to match projector 3 to projector 2, then match projector 4 to projector 3, and so on. note If you use two or more projectors side-by-side, exhaust from adjacent projectors might cause overheating. Leave at least 2 feet (60 centimeters) of space between projectors. Fine-Tuning the Projector 151
-
 1
1 -
2
-
3
-
4
-
5
-
6
-
7
-
8
-
9
-
10
-
11
-
12
-
13
-
14
-
15
-
16
-
17
-
18
-
19
-
20
-
21
-
22
-
23
-
24
-
25
-
26
-
27
-
28
-
29
-
30
-
31
-
32
-
33
-
34
-
35
-
36
-
37
-
38
-
39
-
40
-
41
-
42
-
43
-
44
-
45
-
46
-
47
-
48
-
49
-
50
-
51
-
52
-
53
-
54
-
55
-
56
-
57
-
58
-
59
-
60
-
61
-
62
-
63
-
64
-
65
-
66
-
67
-
68
-
69
-
70
-
71
-
72
-
73
-
74
-
75
-
76
-
77
-
78
-
79
-
80
-
81
-
82
-
83
-
84
-
85
-
86
-
87
-
88
-
89
-
90
-
91
-
92
-
93
-
94
-
95
-
96
-
97
-
98
-
99
-
100
-
101
-
102
-
103
-
104
-
105
-
106
-
107
-
108
-
109
-
110
-
111
-
112
-
113
-
114
-
115
-
116
-
117
-
118
-
119
-
120
-
121
-
122
-
123
-
124
-
125
-
126
-
127
-
128
-
129
-
130
-
131
-
132
-
133
-
134
-
135
-
136
-
137
-
138
-
139
-
140
-
141
-
142
-
143
-
144
-
145
-
 146
146 -
 147
147 -
 148
148 -
 149
149 -
 150
150 -
 151
151 -
 152
152 -
 153
153 -
 154
154 -
 155
155 -
 156
156 -
157
-
158
-
159
-
160
-
161
-
162
-
163
-
164
-
165
-
166
-
167
-
168
-
169
-
170
-
171
-
172
-
173
-
174
-
175
-
176
-
177
-
178
-
179
-
180
-
181
-
182
-
183
-
184
-
185
-
186
-
187
-
188
-
189
-
190
-
191
-
192
-
193
-
194
-
195
-
196
-
197
-
198
-
199
-
200
-
201
-
202
-
203
-
204
-
205
-
206
-
207
-
208
-
209
-
210
-
211
-
212
-
213
-
214
-
215
-
216
-
217
-
218
-
219
-
220
-
221
-
222
 |
 |