Epson PowerLite 1825 User's Guide - Page 130
Presenting Scenarios, Controlling Your Scenario
 |
View all Epson PowerLite 1825 manuals
Add to My Manuals
Save this manual to your list of manuals |
Page 130 highlights
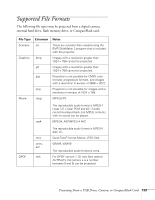
note Your files may take up more than one screen. If so, use the Page up and Page down buttons on the remote control to view all your files. note Even if your scenario is set to change slides automatically, you can still change slides manually as described here. Presenting Scenarios Before you begin, connect the USB drive (see page 52) or insert the CompactFlash card containing the scenario to your projector (see page 53). Then follow these steps to present your scenario: 1. Turn on the projector, if it's not already on. ■ If your scenario is set to autorun, it will start as soon as the projector warms up. ■ If your scenario is not set to autorun, you need to start it manually. Continue with the following steps. 2. Select EasyMP as the source by pressing the EasyMP button on the remote control. JPEG files are displayed as thumbnails. Other files or folders are displayed as icons. A scenario icon identifies a scenario file. 3. Use the pointer button on the remote control to highlight your scenario file and press Enter. In a moment, your scenario begins playing. Controlling Your Scenario While your scenario is running, use the remote control as follows: ■ Press Enter or Page down to display the next animation, slide, or image, or to begin playing a movie. ■ Press Page up to display the previous slide or image, or to replay a movie. ■ Press the appropriate side of the pointer button to rotate a slide or image on the screen. ■ To exit the scenario at any point, press the Esc button. Select Exit and press the Enter button. 130 Presenting From a USB Drive, Camera, or CompactFlash Card
-
 1
1 -
2
-
3
-
4
-
5
-
6
-
7
-
8
-
9
-
10
-
11
-
12
-
13
-
14
-
15
-
16
-
17
-
18
-
19
-
20
-
21
-
22
-
23
-
24
-
25
-
26
-
27
-
28
-
29
-
30
-
31
-
32
-
33
-
34
-
35
-
36
-
37
-
38
-
39
-
40
-
41
-
42
-
43
-
44
-
45
-
46
-
47
-
48
-
49
-
50
-
51
-
52
-
53
-
54
-
55
-
56
-
57
-
58
-
59
-
60
-
61
-
62
-
63
-
64
-
65
-
66
-
67
-
68
-
69
-
70
-
71
-
72
-
73
-
74
-
75
-
76
-
77
-
78
-
79
-
80
-
81
-
82
-
83
-
84
-
85
-
86
-
87
-
88
-
89
-
90
-
91
-
92
-
93
-
94
-
95
-
96
-
97
-
98
-
99
-
100
-
101
-
102
-
103
-
104
-
105
-
106
-
107
-
108
-
109
-
110
-
111
-
112
-
113
-
114
-
115
-
116
-
117
-
118
-
119
-
120
-
121
-
122
-
123
-
124
-
 125
125 -
 126
126 -
 127
127 -
 128
128 -
 129
129 -
 130
130 -
 131
131 -
 132
132 -
 133
133 -
 134
134 -
 135
135 -
136
-
137
-
138
-
139
-
140
-
141
-
142
-
143
-
144
-
145
-
146
-
147
-
148
-
149
-
150
-
151
-
152
-
153
-
154
-
155
-
156
-
157
-
158
-
159
-
160
-
161
-
162
-
163
-
164
-
165
-
166
-
167
-
168
-
169
-
170
-
171
-
172
-
173
-
174
-
175
-
176
-
177
-
178
-
179
-
180
-
181
-
182
-
183
-
184
-
185
-
186
-
187
-
188
-
189
-
190
-
191
-
192
-
193
-
194
-
195
-
196
-
197
-
198
-
199
-
200
-
201
-
202
-
203
-
204
-
205
-
206
-
207
-
208
-
209
-
210
-
211
-
212
-
213
-
214
-
215
-
216
-
217
-
218
-
219
-
220
-
221
-
222
 |
 |