Epson PowerLite 1825 User's Guide - Page 150
Standby Mode, Network On, USB Type B, Easy MP, Wireless, Mouse, Projector ID, Multi-screen
 |
View all Epson PowerLite 1825 manuals
Add to My Manuals
Save this manual to your list of manuals |
Page 150 highlights
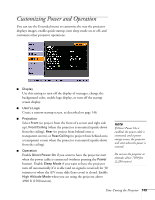
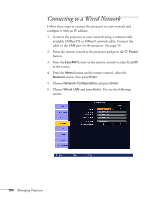
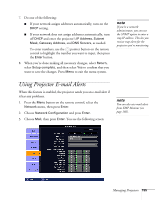
■ Standby Mode Select Network On to enable the projector to be monitored over a network when it is in standby mode (the power light is orange). ■ USB Type B Select Easy MP to project your computer's display through the projector's Type B USB port (see page 41). Choose Wireless Mouse if you want to be able to use the remote as a wireless mouse for a USB-connected computer (see page 42). ■ Projector ID Lets you assign a numeric ID to each projector. When you are using multiple projectors, you can use the ID to select the one you want to operate with the remote control. See page 36 for instructions. ■ Multi-screen Use this option if you want to color-match two or more projectors that are being used to display images near each other, or you are using the multi-screen feature to project from one source (one image) with multiple projectors (see page 98). You can make image adjustments at each of five adjustment levels. First choose an Adjustment Level and then adjust the settings for each level: Brightness Correct. to adjust the brightness, and Color Correct. to adjust the balance between red and green, or blue and yellow. See page 151 for more information about multi-screen color adjustment. ■ Language Select from 20 languages to be used for the projector menus. 150 Fine-Tuning the Projector
-
 1
1 -
2
-
3
-
4
-
5
-
6
-
7
-
8
-
9
-
10
-
11
-
12
-
13
-
14
-
15
-
16
-
17
-
18
-
19
-
20
-
21
-
22
-
23
-
24
-
25
-
26
-
27
-
28
-
29
-
30
-
31
-
32
-
33
-
34
-
35
-
36
-
37
-
38
-
39
-
40
-
41
-
42
-
43
-
44
-
45
-
46
-
47
-
48
-
49
-
50
-
51
-
52
-
53
-
54
-
55
-
56
-
57
-
58
-
59
-
60
-
61
-
62
-
63
-
64
-
65
-
66
-
67
-
68
-
69
-
70
-
71
-
72
-
73
-
74
-
75
-
76
-
77
-
78
-
79
-
80
-
81
-
82
-
83
-
84
-
85
-
86
-
87
-
88
-
89
-
90
-
91
-
92
-
93
-
94
-
95
-
96
-
97
-
98
-
99
-
100
-
101
-
102
-
103
-
104
-
105
-
106
-
107
-
108
-
109
-
110
-
111
-
112
-
113
-
114
-
115
-
116
-
117
-
118
-
119
-
120
-
121
-
122
-
123
-
124
-
125
-
126
-
127
-
128
-
129
-
130
-
131
-
132
-
133
-
134
-
135
-
136
-
137
-
138
-
139
-
140
-
141
-
142
-
143
-
144
-
 145
145 -
 146
146 -
 147
147 -
 148
148 -
 149
149 -
 150
150 -
 151
151 -
 152
152 -
 153
153 -
 154
154 -
 155
155 -
156
-
157
-
158
-
159
-
160
-
161
-
162
-
163
-
164
-
165
-
166
-
167
-
168
-
169
-
170
-
171
-
172
-
173
-
174
-
175
-
176
-
177
-
178
-
179
-
180
-
181
-
182
-
183
-
184
-
185
-
186
-
187
-
188
-
189
-
190
-
191
-
192
-
193
-
194
-
195
-
196
-
197
-
198
-
199
-
200
-
201
-
202
-
203
-
204
-
205
-
206
-
207
-
208
-
209
-
210
-
211
-
212
-
213
-
214
-
215
-
216
-
217
-
218
-
219
-
220
-
221
-
222
 |
 |