Epson PowerLite 1825 User's Guide - Page 120
Building a Scenario from Different Files
 |
View all Epson PowerLite 1825 manuals
Add to My Manuals
Save this manual to your list of manuals |
Page 120 highlights
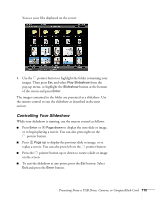
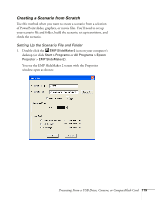
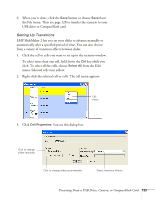
note The scenario name you enter is also the name of the folder for your scenario on your hard drive. note You can also use the instructions in this section to add files to an existing scenario. 2. Type a name for your scenario file and folder that's easy to remember, using up to eight capital letters and numbers. Then select from the following options: ■ The default location for the scenario file and folder is in the \Program Files\EMP SlideMaker2 folder. Click Browse to choose a new location. ■ Click Configure BGM(W) to play an audio file during the scenario. A selection screen appears letting you choose a .WAV file. After you select the file you want, click the arrow button to the right of the option to play it. ■ The Background Color appears around images that don't fill the entire screen area. Select a new color, if desired. ■ Select the Image Quality for imported PowerPoint slides. Higher-quality images look better on the screen but may take longer to appear. 3. Click OK. You see the EMP SlideMaker 2 screen. Continue with the instructions in the next section to build your scenario. Building a Scenario from Different Files You can build your scenario from any of the following file types, either alone or in combination with other file types: ■ PowerPoint slides, version 2000 through 2003 (file names have PPT extension) ■ JPEG files (with JPG extension) ■ Bitmap files (with BMP or DIB extension) ■ Movie files (with MPG, MP4, WMV or ASF extensions); MPG files must be MPEG2 or MPEG4 (MPEG1 is not supported) 120 Presenting From a USB Drive, Camera, or CompactFlash Card
-
 1
1 -
2
-
3
-
4
-
5
-
6
-
7
-
8
-
9
-
10
-
11
-
12
-
13
-
14
-
15
-
16
-
17
-
18
-
19
-
20
-
21
-
22
-
23
-
24
-
25
-
26
-
27
-
28
-
29
-
30
-
31
-
32
-
33
-
34
-
35
-
36
-
37
-
38
-
39
-
40
-
41
-
42
-
43
-
44
-
45
-
46
-
47
-
48
-
49
-
50
-
51
-
52
-
53
-
54
-
55
-
56
-
57
-
58
-
59
-
60
-
61
-
62
-
63
-
64
-
65
-
66
-
67
-
68
-
69
-
70
-
71
-
72
-
73
-
74
-
75
-
76
-
77
-
78
-
79
-
80
-
81
-
82
-
83
-
84
-
85
-
86
-
87
-
88
-
89
-
90
-
91
-
92
-
93
-
94
-
95
-
96
-
97
-
98
-
99
-
100
-
101
-
102
-
103
-
104
-
105
-
106
-
107
-
108
-
109
-
110
-
111
-
112
-
113
-
114
-
 115
115 -
 116
116 -
 117
117 -
 118
118 -
 119
119 -
 120
120 -
 121
121 -
 122
122 -
 123
123 -
 124
124 -
 125
125 -
126
-
127
-
128
-
129
-
130
-
131
-
132
-
133
-
134
-
135
-
136
-
137
-
138
-
139
-
140
-
141
-
142
-
143
-
144
-
145
-
146
-
147
-
148
-
149
-
150
-
151
-
152
-
153
-
154
-
155
-
156
-
157
-
158
-
159
-
160
-
161
-
162
-
163
-
164
-
165
-
166
-
167
-
168
-
169
-
170
-
171
-
172
-
173
-
174
-
175
-
176
-
177
-
178
-
179
-
180
-
181
-
182
-
183
-
184
-
185
-
186
-
187
-
188
-
189
-
190
-
191
-
192
-
193
-
194
-
195
-
196
-
197
-
198
-
199
-
200
-
201
-
202
-
203
-
204
-
205
-
206
-
207
-
208
-
209
-
210
-
211
-
212
-
213
-
214
-
215
-
216
-
217
-
218
-
219
-
220
-
221
-
222
 |
 |
