Epson PowerLite 1825 User's Guide - Page 202
Installing the Software on a Mac
 |
View all Epson PowerLite 1825 manuals
Add to My Manuals
Save this manual to your list of manuals |
Page 202 highlights
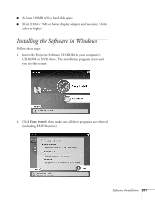
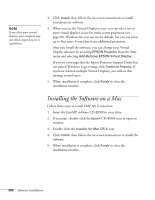
note If you select more virtual displays, your computer may slow down depending on its capabilities. 3. Click Install, then follow the on-screen instructions to install your projector software. 4. When you see the Virtual Display screen, you can select one or more virtual displays to use for multi-screen projection (see page 98). Windows lets you use two by default, but you can select up to four more if you plan to use additional projectors. After you install the software, you can change your Virtual Display selection by accessing EPSON Projector from the Start menu and selecting Add-Remove EPSON Virtual Display. If you see a message that the Epson Projector Support Driver has not passed Windows Logo testing, click Continue Anyway. If you have selected multiple Virtual Displays, you will see this message several times. 5. When installation is complete, click Finish to close the installation window. Installing the Software on a Mac Follow these steps to install EMP NS Connection: 1. Insert the EasyMP software CD-ROM in your drive. 2. If necessary, double-click the Epson CD-ROM icon to open its window. 3. Double-click the Installer for Mac OS X icon. 4. Click Install, then follow the on-screen instructions to install the software. 5. When installation is complete, click Finish to close the installation window. 202 Software Installation
-
 1
1 -
2
-
3
-
4
-
5
-
6
-
7
-
8
-
9
-
10
-
11
-
12
-
13
-
14
-
15
-
16
-
17
-
18
-
19
-
20
-
21
-
22
-
23
-
24
-
25
-
26
-
27
-
28
-
29
-
30
-
31
-
32
-
33
-
34
-
35
-
36
-
37
-
38
-
39
-
40
-
41
-
42
-
43
-
44
-
45
-
46
-
47
-
48
-
49
-
50
-
51
-
52
-
53
-
54
-
55
-
56
-
57
-
58
-
59
-
60
-
61
-
62
-
63
-
64
-
65
-
66
-
67
-
68
-
69
-
70
-
71
-
72
-
73
-
74
-
75
-
76
-
77
-
78
-
79
-
80
-
81
-
82
-
83
-
84
-
85
-
86
-
87
-
88
-
89
-
90
-
91
-
92
-
93
-
94
-
95
-
96
-
97
-
98
-
99
-
100
-
101
-
102
-
103
-
104
-
105
-
106
-
107
-
108
-
109
-
110
-
111
-
112
-
113
-
114
-
115
-
116
-
117
-
118
-
119
-
120
-
121
-
122
-
123
-
124
-
125
-
126
-
127
-
128
-
129
-
130
-
131
-
132
-
133
-
134
-
135
-
136
-
137
-
138
-
139
-
140
-
141
-
142
-
143
-
144
-
145
-
146
-
147
-
148
-
149
-
150
-
151
-
152
-
153
-
154
-
155
-
156
-
157
-
158
-
159
-
160
-
161
-
162
-
163
-
164
-
165
-
166
-
167
-
168
-
169
-
170
-
171
-
172
-
173
-
174
-
175
-
176
-
177
-
178
-
179
-
180
-
181
-
182
-
183
-
184
-
185
-
186
-
187
-
188
-
189
-
190
-
191
-
192
-
193
-
194
-
195
-
196
-
 197
197 -
 198
198 -
 199
199 -
 200
200 -
 201
201 -
 202
202 -
 203
203 -
 204
204 -
 205
205 -
 206
206 -
 207
207 -
208
-
209
-
210
-
211
-
212
-
213
-
214
-
215
-
216
-
217
-
218
-
219
-
220
-
221
-
222
 |
 |