Epson PowerLite 1825 User's Guide - Page 117
Creating a Scenario
 |
View all Epson PowerLite 1825 manuals
Add to My Manuals
Save this manual to your list of manuals |
Page 117 highlights
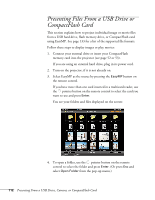
■ Screen switching time Sets the display time for each image. Choose No if you want to change slides manually. ■ Effect Lets you choose from various transitions between slides, such as Dissolve or Wipe. 4. When you're done, highlight OK and press Enter. Your changes are permanently saved with each folder-even if you turn off the projector or disconnect the drive or camera. Creating a Scenario A scenario is a combination of images, movies, and/or audio files that you can present from a USB drive. The easiest way to create a scenario is to drag and drop a PowerPoint file on the EMP SlideMaker2 icon on your desktop. This automatically converts the file to a scenario that you can save to the drive. Use this method if you have an existing PowerPoint presentation that you want to transfer to the projector. If you prefer, you can create a scenario from scratch by combining a selection of PowerPoint slides, other graphics, and even movies (see page 119). note To create a scenario, you need a USB drive connected to your computer. Also make sure you've installed the EMP SlideMaker software (available for Windows only), as described on page 199. Presenting From a USB Drive, Camera, or CompactFlash Card 117
-
 1
1 -
2
-
3
-
4
-
5
-
6
-
7
-
8
-
9
-
10
-
11
-
12
-
13
-
14
-
15
-
16
-
17
-
18
-
19
-
20
-
21
-
22
-
23
-
24
-
25
-
26
-
27
-
28
-
29
-
30
-
31
-
32
-
33
-
34
-
35
-
36
-
37
-
38
-
39
-
40
-
41
-
42
-
43
-
44
-
45
-
46
-
47
-
48
-
49
-
50
-
51
-
52
-
53
-
54
-
55
-
56
-
57
-
58
-
59
-
60
-
61
-
62
-
63
-
64
-
65
-
66
-
67
-
68
-
69
-
70
-
71
-
72
-
73
-
74
-
75
-
76
-
77
-
78
-
79
-
80
-
81
-
82
-
83
-
84
-
85
-
86
-
87
-
88
-
89
-
90
-
91
-
92
-
93
-
94
-
95
-
96
-
97
-
98
-
99
-
100
-
101
-
102
-
103
-
104
-
105
-
106
-
107
-
108
-
109
-
110
-
111
-
 112
112 -
 113
113 -
 114
114 -
 115
115 -
 116
116 -
 117
117 -
 118
118 -
 119
119 -
 120
120 -
 121
121 -
 122
122 -
123
-
124
-
125
-
126
-
127
-
128
-
129
-
130
-
131
-
132
-
133
-
134
-
135
-
136
-
137
-
138
-
139
-
140
-
141
-
142
-
143
-
144
-
145
-
146
-
147
-
148
-
149
-
150
-
151
-
152
-
153
-
154
-
155
-
156
-
157
-
158
-
159
-
160
-
161
-
162
-
163
-
164
-
165
-
166
-
167
-
168
-
169
-
170
-
171
-
172
-
173
-
174
-
175
-
176
-
177
-
178
-
179
-
180
-
181
-
182
-
183
-
184
-
185
-
186
-
187
-
188
-
189
-
190
-
191
-
192
-
193
-
194
-
195
-
196
-
197
-
198
-
199
-
200
-
201
-
202
-
203
-
204
-
205
-
206
-
207
-
208
-
209
-
210
-
211
-
212
-
213
-
214
-
215
-
216
-
217
-
218
-
219
-
220
-
221
-
222
 |
 |