Epson PowerLite 1825 User's Guide - Page 169
Transferring Files by SMB
 |
View all Epson PowerLite 1825 manuals
Add to My Manuals
Save this manual to your list of manuals |
Page 169 highlights
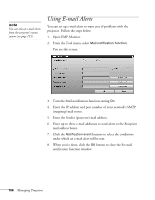
4. Select one of the menu options listed on the left, then change any of the settings as needed. These settings correspond to those found in the projector's menu system. You cannot change the following settings using a web browser: ■ Pointer in the Settings menu ■ User's Logo, High Altitude Mode, and Language in the Extended menu ■ Reset All and Reset Lamp Hours in the Reset menu Use the controls at the bottom of the screen just as you would the corresponding remote control buttons. Choose a source, stop the action, turn off the picture and sound, or turn the projector's power on or off. Transferring Files by SMB If your projector is connected to a network as described on page 154, you can send files over the network to a CompactFlash card inserted in the projector (see page 53). Then you can use the projector's PC Free feature to present images and movies. On a Windows PC, you can use SMB (Server Message Block) to send files to the projector, as described below. On a Macintosh, you can connect to the projector using the Finder. In Windows, follow these steps: 1. Open Windows Explorer. 2. Enter the IP address of the projector in the Address field (for example, 192.168.100.100). note To send files to a projector when it's in standby mode (plugged in but not turned on), you must select Network On as the Standby Mode setting in the projector's Extended menu (see page 150). Managing Projectors 169
-
 1
1 -
2
-
3
-
4
-
5
-
6
-
7
-
8
-
9
-
10
-
11
-
12
-
13
-
14
-
15
-
16
-
17
-
18
-
19
-
20
-
21
-
22
-
23
-
24
-
25
-
26
-
27
-
28
-
29
-
30
-
31
-
32
-
33
-
34
-
35
-
36
-
37
-
38
-
39
-
40
-
41
-
42
-
43
-
44
-
45
-
46
-
47
-
48
-
49
-
50
-
51
-
52
-
53
-
54
-
55
-
56
-
57
-
58
-
59
-
60
-
61
-
62
-
63
-
64
-
65
-
66
-
67
-
68
-
69
-
70
-
71
-
72
-
73
-
74
-
75
-
76
-
77
-
78
-
79
-
80
-
81
-
82
-
83
-
84
-
85
-
86
-
87
-
88
-
89
-
90
-
91
-
92
-
93
-
94
-
95
-
96
-
97
-
98
-
99
-
100
-
101
-
102
-
103
-
104
-
105
-
106
-
107
-
108
-
109
-
110
-
111
-
112
-
113
-
114
-
115
-
116
-
117
-
118
-
119
-
120
-
121
-
122
-
123
-
124
-
125
-
126
-
127
-
128
-
129
-
130
-
131
-
132
-
133
-
134
-
135
-
136
-
137
-
138
-
139
-
140
-
141
-
142
-
143
-
144
-
145
-
146
-
147
-
148
-
149
-
150
-
151
-
152
-
153
-
154
-
155
-
156
-
157
-
158
-
159
-
160
-
161
-
162
-
163
-
 164
164 -
 165
165 -
 166
166 -
 167
167 -
 168
168 -
 169
169 -
 170
170 -
 171
171 -
 172
172 -
 173
173 -
 174
174 -
175
-
176
-
177
-
178
-
179
-
180
-
181
-
182
-
183
-
184
-
185
-
186
-
187
-
188
-
189
-
190
-
191
-
192
-
193
-
194
-
195
-
196
-
197
-
198
-
199
-
200
-
201
-
202
-
203
-
204
-
205
-
206
-
207
-
208
-
209
-
210
-
211
-
212
-
213
-
214
-
215
-
216
-
217
-
218
-
219
-
220
-
221
-
222
 |
 |