HP Neoware e90 Neoware Thin Clients running Microsoft® Windows - Page 110
Return, <CR>, Respond With, Key Definition, UserName, Password, Delay 2s, Pause 0.255
 |
View all HP Neoware e90 manuals
Add to My Manuals
Save this manual to your list of manuals |
Page 110 highlights
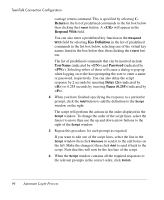
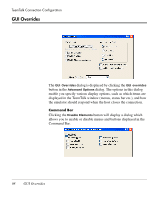
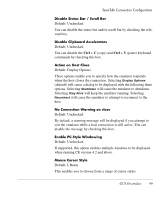
TeemTalk Connection Configuration carriage return command. This is specified by selecting C. Return in the list of predefined commands in the list box below then clicking the Insert button. A will appear in the Respond With field. You can also enter a predefined key function in the Respond With field by selecting Key Definition in the list of predefined commands in the list box below, selecting one of the virtual key names listed in the box below that, then clicking the Insert button. The list of predefined commands that can be inserted include UserName (indicated by ) and Password (indicated by ). Selecting either of these will cause a dialog to pop-up when logging on to the host prompting the user to enter a name or password, respectively. You can also delay the script response by 2 seconds by inserting Delay (2s) (indicated by ) or 0.255 seconds by inserting Pause (0.255) (indicated by ). 4 When you have finished specifying the response to a particular prompt, click the Add button to add the definition to the Script window on the right. The script will perform the actions in the order displayed in the Script window. To change the order of the script lines, select the line(s) to move then use the up and down arrow buttons to the right of the Script window. 5 Repeat this procedure for each prompt as required. If you want to edit one of the script lines, select the line in the Script window then click Remove to send it to the edit boxes on the left. Make the change(s) then click Add to send it back to the script. Note that this will now be the last line of the script. 6 When the Script window contains all the required responses to the relevant prompts in the correct order, click Finish. 94 Automate Login Process
-
 1
1 -
2
-
3
-
4
-
5
-
6
-
7
-
8
-
9
-
10
-
11
-
12
-
13
-
14
-
15
-
16
-
17
-
18
-
19
-
20
-
21
-
22
-
23
-
24
-
25
-
26
-
27
-
28
-
29
-
30
-
31
-
32
-
33
-
34
-
35
-
36
-
37
-
38
-
39
-
40
-
41
-
42
-
43
-
44
-
45
-
46
-
47
-
48
-
49
-
50
-
51
-
52
-
53
-
54
-
55
-
56
-
57
-
58
-
59
-
60
-
61
-
62
-
63
-
64
-
65
-
66
-
67
-
68
-
69
-
70
-
71
-
72
-
73
-
74
-
75
-
76
-
77
-
78
-
79
-
80
-
81
-
82
-
83
-
84
-
85
-
86
-
87
-
88
-
89
-
90
-
91
-
92
-
93
-
94
-
95
-
96
-
97
-
98
-
99
-
100
-
101
-
102
-
103
-
104
-
 105
105 -
 106
106 -
 107
107 -
 108
108 -
 109
109 -
 110
110 -
 111
111 -
 112
112 -
 113
113 -
 114
114 -
 115
115 -
116
-
117
-
118
-
119
-
120
-
121
-
122
-
123
-
124
-
125
-
126
-
127
-
128
-
129
-
130
-
131
-
132
-
133
-
134
-
135
-
136
-
137
-
138
-
139
-
140
-
141
-
142
-
143
-
144
-
145
-
146
-
147
-
148
-
149
-
150
-
151
-
152
-
153
-
154
-
155
-
156
-
157
-
158
-
159
-
160
-
161
-
162
-
163
-
164
-
165
-
166
-
167
-
168
-
169
-
170
-
171
-
172
-
173
-
174
-
175
-
176
-
177
-
178
-
179
-
180
-
181
-
182
-
183
-
184
-
185
-
186
-
187
-
188
-
189
-
190
-
191
-
192
-
193
-
194
-
195
-
196
-
197
-
198
-
199
-
200
-
201
-
202
-
203
-
204
-
205
-
206
-
207
-
208
-
209
-
210
-
211
-
212
-
213
-
214
-
215
-
216
-
217
-
218
-
219
-
220
-
221
-
222
-
223
-
224
-
225
-
226
-
227
-
228
 |
 |