HP Neoware e90 Neoware Thin Clients running Microsoft® Windows - Page 112
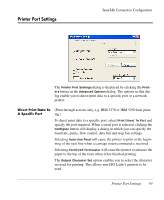
Direct Print Data To A Network Printer
 |
View all HP Neoware e90 manuals
Add to My Manuals
Save this manual to your list of manuals |
Page 112 highlights
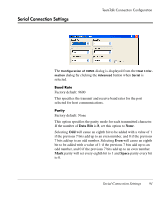
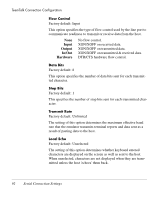
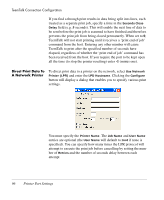
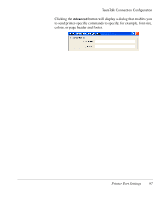
TeemTalk Connection Configuration If you find a through print results in data being split into lines, each treated as a separate print job, specify a time in the Seconds Close Delay field (e.g. 5 seconds). This will enable the next line of data to be sent before the print job is assumed to have finished and therefore prevents the print job from being closed prematurely. When set to 0, TeemTalk will not start printing until it receives a 'print end of job' command from the host. Entering any other number will cause TeemTalk to print after the specified number of seconds have elapsed, regardless of whether the 'print end of job' command has been received from the host. If you require the port to be kept open all the time (to stop the printer resetting) enter -1 (minus one). Direct Print Data To A Network Printer To direct print data to a printer on the network, select Use Network Printer (LPR) and enter the LPD Hostname. Clicking the Configure button will display a dialog that enables you to specify various print settings. You must specify the Printer Name. The Job Name and User Name entries are optional (the User Name will default to root if none is specified). You can specify how many times the LPR protocol will attempt to execute the print job before cancelling by setting the number of Retries and the number of seconds delay between each attempt. 96 Printer Port Settings
-
 1
1 -
2
-
3
-
4
-
5
-
6
-
7
-
8
-
9
-
10
-
11
-
12
-
13
-
14
-
15
-
16
-
17
-
18
-
19
-
20
-
21
-
22
-
23
-
24
-
25
-
26
-
27
-
28
-
29
-
30
-
31
-
32
-
33
-
34
-
35
-
36
-
37
-
38
-
39
-
40
-
41
-
42
-
43
-
44
-
45
-
46
-
47
-
48
-
49
-
50
-
51
-
52
-
53
-
54
-
55
-
56
-
57
-
58
-
59
-
60
-
61
-
62
-
63
-
64
-
65
-
66
-
67
-
68
-
69
-
70
-
71
-
72
-
73
-
74
-
75
-
76
-
77
-
78
-
79
-
80
-
81
-
82
-
83
-
84
-
85
-
86
-
87
-
88
-
89
-
90
-
91
-
92
-
93
-
94
-
95
-
96
-
97
-
98
-
99
-
100
-
101
-
102
-
103
-
104
-
105
-
106
-
 107
107 -
 108
108 -
 109
109 -
 110
110 -
 111
111 -
 112
112 -
 113
113 -
 114
114 -
 115
115 -
 116
116 -
 117
117 -
118
-
119
-
120
-
121
-
122
-
123
-
124
-
125
-
126
-
127
-
128
-
129
-
130
-
131
-
132
-
133
-
134
-
135
-
136
-
137
-
138
-
139
-
140
-
141
-
142
-
143
-
144
-
145
-
146
-
147
-
148
-
149
-
150
-
151
-
152
-
153
-
154
-
155
-
156
-
157
-
158
-
159
-
160
-
161
-
162
-
163
-
164
-
165
-
166
-
167
-
168
-
169
-
170
-
171
-
172
-
173
-
174
-
175
-
176
-
177
-
178
-
179
-
180
-
181
-
182
-
183
-
184
-
185
-
186
-
187
-
188
-
189
-
190
-
191
-
192
-
193
-
194
-
195
-
196
-
197
-
198
-
199
-
200
-
201
-
202
-
203
-
204
-
205
-
206
-
207
-
208
-
209
-
210
-
211
-
212
-
213
-
214
-
215
-
216
-
217
-
218
-
219
-
220
-
221
-
222
-
223
-
224
-
225
-
226
-
227
-
228
 |
 |
