HP Neoware e90 Neoware Thin Clients running Microsoft® Windows - Page 210
Thin Client Configuration for LPR/LPD Printing, Double-click
 |
View all HP Neoware e90 manuals
Add to My Manuals
Save this manual to your list of manuals |
Page 210 highlights
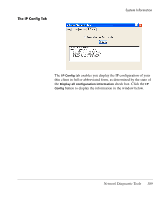
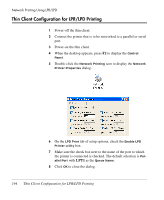
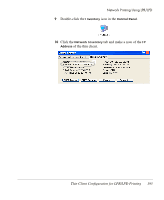
Network Printing Using LPR/LPD Thin Client Configuration for LPR/LPD Printing 1 Power-off the thin client. 2 Connect the printer that is to be networked to a parallel or serial port. 3 Power-on the thin client. 4 When the desktop appears, press F2 to display the Control Panel. 5 Double-click the Network Printing icon to display the Network Printer Properties dialog.. 6 On the LPD Print tab of setup options, check the Enable LPD Printer utility box. 7 Make sure the check box next to the name of the port to which the printer is connected is checked. The default selection is Parallel Port with LPT1 as the Queue Name. 8 Click OK to close the dialog. 194 Thin Client Configuration for LPR/LPD Printing
-
 1
1 -
2
-
3
-
4
-
5
-
6
-
7
-
8
-
9
-
10
-
11
-
12
-
13
-
14
-
15
-
16
-
17
-
18
-
19
-
20
-
21
-
22
-
23
-
24
-
25
-
26
-
27
-
28
-
29
-
30
-
31
-
32
-
33
-
34
-
35
-
36
-
37
-
38
-
39
-
40
-
41
-
42
-
43
-
44
-
45
-
46
-
47
-
48
-
49
-
50
-
51
-
52
-
53
-
54
-
55
-
56
-
57
-
58
-
59
-
60
-
61
-
62
-
63
-
64
-
65
-
66
-
67
-
68
-
69
-
70
-
71
-
72
-
73
-
74
-
75
-
76
-
77
-
78
-
79
-
80
-
81
-
82
-
83
-
84
-
85
-
86
-
87
-
88
-
89
-
90
-
91
-
92
-
93
-
94
-
95
-
96
-
97
-
98
-
99
-
100
-
101
-
102
-
103
-
104
-
105
-
106
-
107
-
108
-
109
-
110
-
111
-
112
-
113
-
114
-
115
-
116
-
117
-
118
-
119
-
120
-
121
-
122
-
123
-
124
-
125
-
126
-
127
-
128
-
129
-
130
-
131
-
132
-
133
-
134
-
135
-
136
-
137
-
138
-
139
-
140
-
141
-
142
-
143
-
144
-
145
-
146
-
147
-
148
-
149
-
150
-
151
-
152
-
153
-
154
-
155
-
156
-
157
-
158
-
159
-
160
-
161
-
162
-
163
-
164
-
165
-
166
-
167
-
168
-
169
-
170
-
171
-
172
-
173
-
174
-
175
-
176
-
177
-
178
-
179
-
180
-
181
-
182
-
183
-
184
-
185
-
186
-
187
-
188
-
189
-
190
-
191
-
192
-
193
-
194
-
195
-
196
-
197
-
198
-
199
-
200
-
201
-
202
-
203
-
204
-
 205
205 -
 206
206 -
 207
207 -
 208
208 -
 209
209 -
 210
210 -
 211
211 -
 212
212 -
 213
213 -
 214
214 -
 215
215 -
216
-
217
-
218
-
219
-
220
-
221
-
222
-
223
-
224
-
225
-
226
-
227
-
228
 |
 |
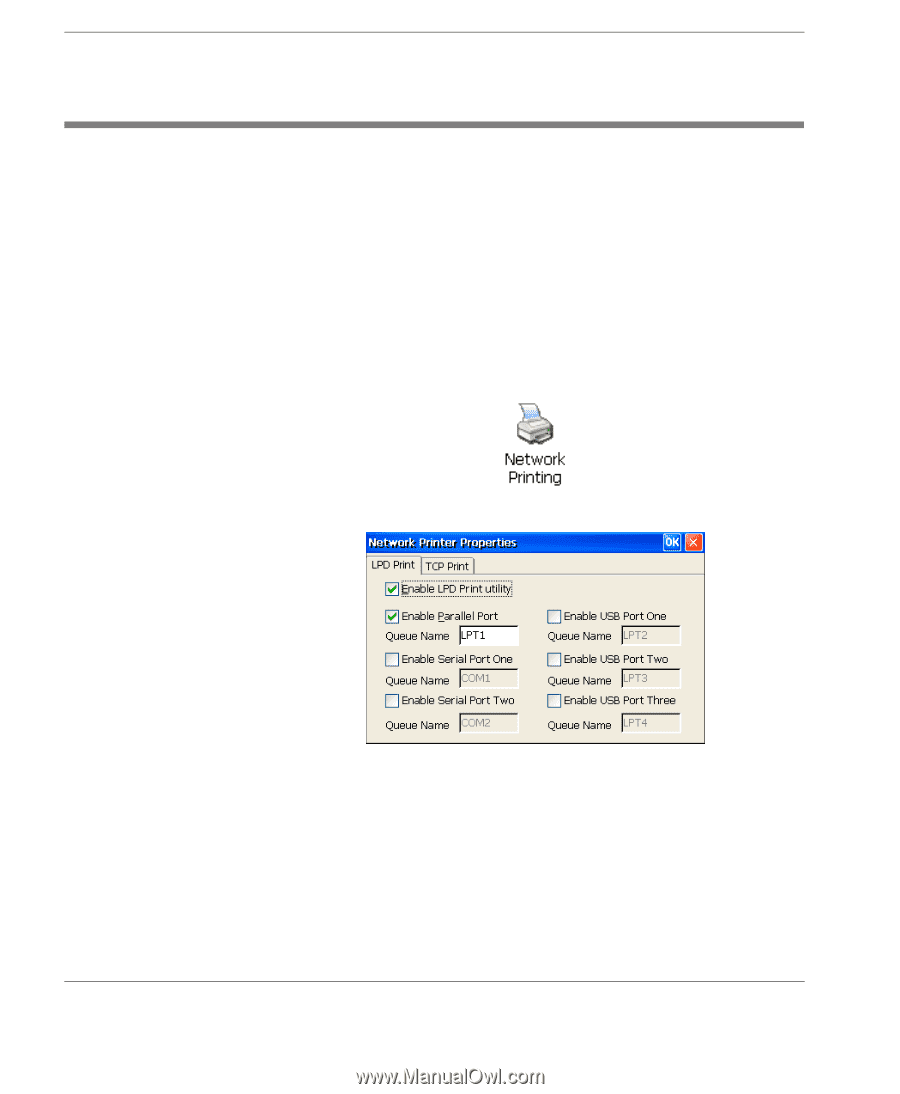
Network Printing Using LPR/LPD
194
Thin Client Configuration for LPR/LPD Printing
Thin Client Configuration for LPR/LPD Printing
1
Power-off the thin client.
2
Connect the printer that is to be networked to a parallel or serial
port.
3
Power-on the thin client.
4
When the desktop appears, press
F2
to display the
Control
Panel
.
5
Double-click the
Network Printing
icon to display the
Network
Printer Properties
dialog..
6
On the
LPD Print
tab of setup options, check the
Enable LPD
Printer utility
box.
7
Make sure the check box next to the name of the port to which
the printer is connected is checked. The default selection is
Par-
allel Port
with
LPT1
as the
Queue Name
.
8
Click
OK
to close the dialog.