HP NetServer AA 4000 HP NetServer AA 6200 Solution Release 3.0 Administrator&a - Page 252
Replacing a Failed Mirrored Disk, Before proceeding, make sure you are properly grounded
 |
View all HP NetServer AA 4000 manuals
Add to My Manuals
Save this manual to your list of manuals |
Page 252 highlights
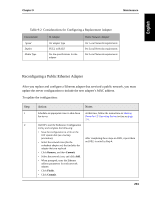
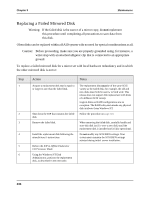
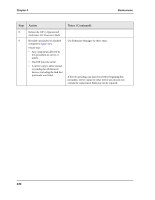
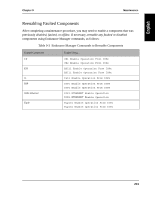
Chapter 9 Maintenance Replacing a Failed Mirrored Disk Warning: If the failed disk is the source of a mirror copy, do not implement this procedure until completing all precautions to save data from this disk. Often disks can be replaced within a RAID system with no need for special considerations at all. Caution: Before proceeding, make sure you are properly grounded using, for instance, a wrist strap with an attached alligator clip that is connected to an appropriate ground. To replace a failed mirrored disk for a mirror set with local hardware redundancy and in which the other mirrored disk is active: Step 1 2 3 4 5 6 Action Acquire a replacement disk that is equal to or larger in size than the failed disk. Shut down the IOP that contains the failed disk. Remove the failed disk. Install the replacement disk following the manufacturer's instructions. Reboot the IOP in Offline Endurance I/O Processor Mode. Using the Windows NT Disk Administrator, partition the replacement disk, as described in the next table. Notes The replacement disk must be of the same SCSI variety as the failed disk; for example, the old and new disks must both be narrow or both wide. This release does not support disk replacement with disks of a different SCSI variety. Logical disks on RAID configurations are an exception. The RAID subsystem masks any physical disk attributes from Windows NT. Follow the procedure on page 210. When removing the failed disk, carefully handle and store this disk (as if it were a new disk) until the replacement disk is installed and is fully operational. Do not modify any SCSI BIOS settings. Your system must maintain the SCSI BIOS settings selected during initial server installation. 236
-
 1
1 -
2
-
3
-
4
-
5
-
6
-
7
-
8
-
9
-
10
-
11
-
12
-
13
-
14
-
15
-
16
-
17
-
18
-
19
-
20
-
21
-
22
-
23
-
24
-
25
-
26
-
27
-
28
-
29
-
30
-
31
-
32
-
33
-
34
-
35
-
36
-
37
-
38
-
39
-
40
-
41
-
42
-
43
-
44
-
45
-
46
-
47
-
48
-
49
-
50
-
51
-
52
-
53
-
54
-
55
-
56
-
57
-
58
-
59
-
60
-
61
-
62
-
63
-
64
-
65
-
66
-
67
-
68
-
69
-
70
-
71
-
72
-
73
-
74
-
75
-
76
-
77
-
78
-
79
-
80
-
81
-
82
-
83
-
84
-
85
-
86
-
87
-
88
-
89
-
90
-
91
-
92
-
93
-
94
-
95
-
96
-
97
-
98
-
99
-
100
-
101
-
102
-
103
-
104
-
105
-
106
-
107
-
108
-
109
-
110
-
111
-
112
-
113
-
114
-
115
-
116
-
117
-
118
-
119
-
120
-
121
-
122
-
123
-
124
-
125
-
126
-
127
-
128
-
129
-
130
-
131
-
132
-
133
-
134
-
135
-
136
-
137
-
138
-
139
-
140
-
141
-
142
-
143
-
144
-
145
-
146
-
147
-
148
-
149
-
150
-
151
-
152
-
153
-
154
-
155
-
156
-
157
-
158
-
159
-
160
-
161
-
162
-
163
-
164
-
165
-
166
-
167
-
168
-
169
-
170
-
171
-
172
-
173
-
174
-
175
-
176
-
177
-
178
-
179
-
180
-
181
-
182
-
183
-
184
-
185
-
186
-
187
-
188
-
189
-
190
-
191
-
192
-
193
-
194
-
195
-
196
-
197
-
198
-
199
-
200
-
201
-
202
-
203
-
204
-
205
-
206
-
207
-
208
-
209
-
210
-
211
-
212
-
213
-
214
-
215
-
216
-
217
-
218
-
219
-
220
-
221
-
222
-
223
-
224
-
225
-
226
-
227
-
228
-
229
-
230
-
231
-
232
-
233
-
234
-
235
-
236
-
237
-
238
-
239
-
240
-
241
-
242
-
243
-
244
-
245
-
246
-
 247
247 -
 248
248 -
 249
249 -
 250
250 -
 251
251 -
 252
252 -
 253
253 -
 254
254 -
 255
255 -
 256
256 -
 257
257 -
258
-
259
-
260
-
261
-
262
-
263
-
264
-
265
-
266
-
267
-
268
-
269
-
270
-
271
-
272
-
273
-
274
-
275
-
276
-
277
-
278
-
279
-
280
-
281
 |
 |
