Oki MB471 Users Manual Basic - Page 108
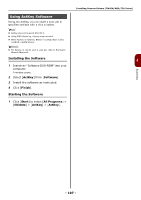
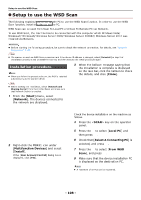
Setup to use the WSD Scan, Installation procedure
 |
View all Oki MB471 manuals
Add to My Manuals
Save this manual to your list of manuals |
Page 108 highlights
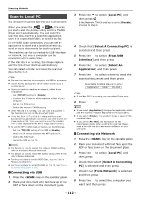
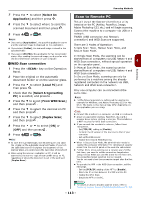
Setup to use the WSD Scan Setup to use the WSD Scan The following explains how to set up the PC to use the WSD Scan function. In order to use the WSD Scan function, install this device on the PC. WSD Scan can be used from Scan To Local PC and Scan To Remote PC via Network. To use WSD Scan, the machine has to be connected with the computer which Windows Vista/ Windows7/ Windows8/ Windows Server 2008/ Windows Server 2008R2/ Windows Server 2012 was installed via Network. Reference Before starting the following procedure, be sure to check the network connection. For details, see "Network Connection" P. 47. Note If a scanner is used via WSD Scan connection and if the device IP address is changed, select [Uninstall] in step 2 of Installation procedure and uninstall the scanner, and then execute the install procedure again. Installation procedure Memo When you follow the procedure below, the WIA is installed automatically as the scanner driver. 3 When the balloon message saying that the installation is complete is displayed on the task bar, click the balloon to check the details, and click [Close]. Note Before starting the installation, select [Network and Sharing Center] from the Control Panel and make sure that Network Search is enabled. 1 From the [Start] menu, select [Network]. The devices connected to the network are displayed. 2 Right-click the MB491 icon under [Multifunction Devices] and select [Install]. If the [User Account Control] dialog box is displayed, click [Yes]. Check the device installation on the machine as follows. 4 Press the key on the operator panel. 5 Press the to select [Local PC] and then press . OK 6 Check that [Select A Connecting PC] is selected, and press . OK 7 Press the to select [From WSD Scan], and press . OK 8 Make sure that the device installation PC is displayed as the destination PC. Memo A maximum of 50 PCs can be registered. - 108 -
-
 1
1 -
2
-
3
-
4
-
5
-
6
-
7
-
8
-
9
-
10
-
11
-
12
-
13
-
14
-
15
-
16
-
17
-
18
-
19
-
20
-
21
-
22
-
23
-
24
-
25
-
26
-
27
-
28
-
29
-
30
-
31
-
32
-
33
-
34
-
35
-
36
-
37
-
38
-
39
-
40
-
41
-
42
-
43
-
44
-
45
-
46
-
47
-
48
-
49
-
50
-
51
-
52
-
53
-
54
-
55
-
56
-
57
-
58
-
59
-
60
-
61
-
62
-
63
-
64
-
65
-
66
-
67
-
68
-
69
-
70
-
71
-
72
-
73
-
74
-
75
-
76
-
77
-
78
-
79
-
80
-
81
-
82
-
83
-
84
-
85
-
86
-
87
-
88
-
89
-
90
-
91
-
92
-
93
-
94
-
95
-
96
-
97
-
98
-
99
-
100
-
101
-
102
-
 103
103 -
 104
104 -
 105
105 -
 106
106 -
 107
107 -
 108
108 -
 109
109 -
 110
110 -
 111
111 -
 112
112 -
 113
113 -
114
-
115
-
116
-
117
-
118
-
119
-
120
-
121
-
122
-
123
-
124
-
125
-
126
-
127
-
128
-
129
-
130
-
131
-
132
-
133
-
134
-
135
-
136
-
137
-
138
-
139
-
140
-
141
-
142
-
143
-
144
-
145
-
146
-
147
-
148
-
149
-
150
-
151
-
152
-
153
-
154
-
155
-
156
-
157
-
158
-
159
-
160
-
161
-
162
-
163
-
164
-
165
-
166
-
167
-
168
-
169
-
170
-
171
-
172
-
173
-
174
-
175
-
176
-
177
-
178
-
179
-
180
-
181
-
182
-
183
-
184
-
185
-
186
-
187
-
188
-
189
-
190
-
191
-
192
-
193
-
194
-
195
-
196
-
197
-
198
-
199
-
200
-
201
-
202
-
203
 |
 |
