Oki MB471 Users Manual Basic - Page 113
Scan to Remote PC, WSD Scan connection
 |
View all Oki MB471 manuals
Add to My Manuals
Save this manual to your list of manuals |
Page 113 highlights
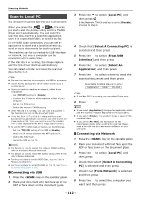
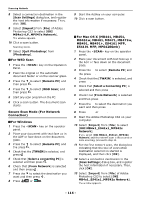
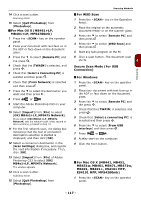
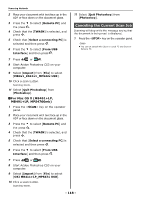
Scanning Methods Scanning 7 Press the to select [Select An Application] and then press . OK 8 Press the to select where to send the scanned document and then press . OK 9 Press or . MONO COLOR Memo If you select [Application], the specified application starts and the scanned image is displayed on the application. If you select [Folder], the scanned image is saved in the specified folder. If you select [PC-FAX], the application for fax transmission starts. After sending the scanned image, send your fax with the fax transmission software on your computer. WSD Scan connection 1 Press the key on the Operation Panel. 2 Place the original on the automatic document feeder or on the scanner glass. 3 Press the to select [Local PC] and then press . OK 4 Check that the [Select A Connecting PC] is selected, and press . OK 5 Press the to select [From WSD Scan] and then press . OK 6 Press the to select the destination PC and then press . OK 7 Press the to select [Duplex Scan] and then press . OK 8 Press the or to select [ON] or [OFF] and then press . OK 9 Press or . MONO COLOR Memo To start the dual-sided scan, turn its setting On and place the original on the automatic document feeder. If you turn the dual-sided scan On but place the document on the scanner glass, you cannot scan the dual sides of document. When using the scanner application on PC, it will be scanned by the scanner type of scan profile setup on PC, regardless of where the document is set or the setting of [Duplex Scan]. Scan to Remote PC This will launch the Scanner driver from a utility installed on the PC (ActKey, PaperPort, Image, Adobe Photoshop CS3, etc.) and will begin scanning. Connect the machine to a computer via USB or a network. TWAIN (USB connection and Network connection) and WSD Scan are supported. There are 3 Modes of Operation: Simple Scan Mode, Manual Scan Mode, and Secure Scan Mode. In Simple Scan Mode, the scanning can be 4 started from all computers via USB, Network and WSD Scan connection, without special operation on the operator panel. In Manual Scan Mode, the scanning can be started from all computers via USB, Network and WSD Scan connection. In Secure Scan Mode, scanning can only be performed by a machine among the already registered computers in the network via USB, Network and WSD Scan connection. Only one computer can be connected at the same time. Memo For the following procedure, ActKey will be used as an example for Windows, and Adobe Photoshop CS3 for Mac OS X. The items in this manual may differ depending on the application you are using. Note Connect the machine to a computer via USB or a network. Install an application (ActKey, PaperPort, etc.) and a scanner driver before starting a scan job. This installation is NOT required for WSD Scan connection. If you connect the machine to network, follow these instructions. - Set [TCP/IP] setting to [Enable]. - Conform the IP version of the machine to that of your computer. - Set up the DNS server. - Enable the network TWAIN setting. When in Secure Scan Mode, the administrator needs to register the computer information for carrying out security scans from the control panel or the web site beforehand. For Mac OS X, when carrying out a network scan for the first time, you need to set the connection target when using a driver. When you use the driver for the first time, the connection target selection tool will launch. You do not need to set the connection target after the first time. To operate the MFP in the WSD Scan connection, set the followings. - Set the [TCP/IP] setting of the MFP to [Enable]. - Match the IP version between the MFP and the PC. - Enable the WSD Scan. - Install the MFP on the PC. Reference For details on how to install a scanner driver, refer to "Installing Scanner Drivers (TWAIN/WIA/ICA Driver)" P. 104. - 113 -
-
 1
1 -
2
-
3
-
4
-
5
-
6
-
7
-
8
-
9
-
10
-
11
-
12
-
13
-
14
-
15
-
16
-
17
-
18
-
19
-
20
-
21
-
22
-
23
-
24
-
25
-
26
-
27
-
28
-
29
-
30
-
31
-
32
-
33
-
34
-
35
-
36
-
37
-
38
-
39
-
40
-
41
-
42
-
43
-
44
-
45
-
46
-
47
-
48
-
49
-
50
-
51
-
52
-
53
-
54
-
55
-
56
-
57
-
58
-
59
-
60
-
61
-
62
-
63
-
64
-
65
-
66
-
67
-
68
-
69
-
70
-
71
-
72
-
73
-
74
-
75
-
76
-
77
-
78
-
79
-
80
-
81
-
82
-
83
-
84
-
85
-
86
-
87
-
88
-
89
-
90
-
91
-
92
-
93
-
94
-
95
-
96
-
97
-
98
-
99
-
100
-
101
-
102
-
103
-
104
-
105
-
106
-
107
-
 108
108 -
 109
109 -
 110
110 -
 111
111 -
 112
112 -
 113
113 -
 114
114 -
 115
115 -
 116
116 -
 117
117 -
 118
118 -
119
-
120
-
121
-
122
-
123
-
124
-
125
-
126
-
127
-
128
-
129
-
130
-
131
-
132
-
133
-
134
-
135
-
136
-
137
-
138
-
139
-
140
-
141
-
142
-
143
-
144
-
145
-
146
-
147
-
148
-
149
-
150
-
151
-
152
-
153
-
154
-
155
-
156
-
157
-
158
-
159
-
160
-
161
-
162
-
163
-
164
-
165
-
166
-
167
-
168
-
169
-
170
-
171
-
172
-
173
-
174
-
175
-
176
-
177
-
178
-
179
-
180
-
181
-
182
-
183
-
184
-
185
-
186
-
187
-
188
-
189
-
190
-
191
-
192
-
193
-
194
-
195
-
196
-
197
-
198
-
199
-
200
-
201
-
202
-
203
 |
 |