Oki MB471 Users Manual Basic - Page 22
Installing Options, Installing a Second Tray Unit (MB461, MB461+LP, MB471, ES4161 MFP, MPS4200mb
 |
View all Oki MB471 manuals
Add to My Manuals
Save this manual to your list of manuals |
Page 22 highlights
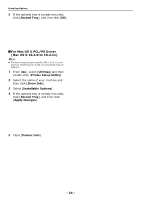
Installing Options Installing Options This section explains how to install options on your machine. The following options are available: Second tray unit (MB461, MB461+LP, MB471, MB471w, MB491, MB491+, MB491+LP, ES4161 MFP, ES4191 MFP, MPS4200mb, MPS4700mb only) Note Be sure to hold down the power switch for about a second to turn off the power and unplug the AC cable and Ethernet or USB cable before installing options. Installing options while your machine is turned on may damage your machine and options. Reference For details on the location of each component of the machine, refer to "Names of Components" P. 15. Installing a Second Tray Unit (MB461, MB461+LP, MB471, MB471w, MB491, MB491+, MB491+LP, ES4161 MFP, ES4191 MFP, MPS4200mb, MPS4700mb only) Install an optional second tray unit (tray 2) when you want to increase the paper capacity of your machine. After installation, you need to configure the printer driver settings. 2 Lift your machine and align the three pins of the second tray unit with the holes at the bottom of your machine. Model Number : N22204A Reference For the specification of the second tray unit (Tray2), refer to "Loading Paper" P. 32. Installation 1 Hold down the power switch for about a second to turn off the power, and then unplug the AC cable and the Ethernet or USB cable. Reference "Turning Off Your Machine" P. 20 3 Place your machine on the second tray unit gently. 4 Attach the lock parts. 5 Plug the AC cable and Ethernet or USB cable into your machine, and then push the power switch. - 22 -
-
 1
1 -
2
-
3
-
4
-
5
-
6
-
7
-
8
-
9
-
10
-
11
-
12
-
13
-
14
-
15
-
16
-
 17
17 -
 18
18 -
 19
19 -
 20
20 -
 21
21 -
 22
22 -
 23
23 -
 24
24 -
 25
25 -
 26
26 -
 27
27 -
28
-
29
-
30
-
31
-
32
-
33
-
34
-
35
-
36
-
37
-
38
-
39
-
40
-
41
-
42
-
43
-
44
-
45
-
46
-
47
-
48
-
49
-
50
-
51
-
52
-
53
-
54
-
55
-
56
-
57
-
58
-
59
-
60
-
61
-
62
-
63
-
64
-
65
-
66
-
67
-
68
-
69
-
70
-
71
-
72
-
73
-
74
-
75
-
76
-
77
-
78
-
79
-
80
-
81
-
82
-
83
-
84
-
85
-
86
-
87
-
88
-
89
-
90
-
91
-
92
-
93
-
94
-
95
-
96
-
97
-
98
-
99
-
100
-
101
-
102
-
103
-
104
-
105
-
106
-
107
-
108
-
109
-
110
-
111
-
112
-
113
-
114
-
115
-
116
-
117
-
118
-
119
-
120
-
121
-
122
-
123
-
124
-
125
-
126
-
127
-
128
-
129
-
130
-
131
-
132
-
133
-
134
-
135
-
136
-
137
-
138
-
139
-
140
-
141
-
142
-
143
-
144
-
145
-
146
-
147
-
148
-
149
-
150
-
151
-
152
-
153
-
154
-
155
-
156
-
157
-
158
-
159
-
160
-
161
-
162
-
163
-
164
-
165
-
166
-
167
-
168
-
169
-
170
-
171
-
172
-
173
-
174
-
175
-
176
-
177
-
178
-
179
-
180
-
181
-
182
-
183
-
184
-
185
-
186
-
187
-
188
-
189
-
190
-
191
-
192
-
193
-
194
-
195
-
196
-
197
-
198
-
199
-
200
-
201
-
202
-
203
 |
 |
