Oki MB471 Users Manual Basic - Page 111
Scan to Network PC, Scan to USB Memory, Network PC, Select Profile, USB Memory
 |
View all Oki MB471 manuals
Add to My Manuals
Save this manual to your list of manuals |
Page 111 highlights
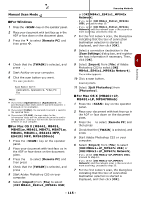
Scanning Scan to Network PC You can send a scanned document to a server on the network. The document is scanned and converted to a PDF, JPEG, TIFF, or XPS file. The factory default setting is PDF. Note Check that the machine is connected to the network. It is necessary to set up Scan To Network PC in advance. Reference For the Scan To Network PC setup, please refer to "Setting Up Scan To Network PC" P. 68. 1 Press the key on the operator panel. 2 Place your document with text face up in the ADF or face down on the document glass. 3 Press the to select [Network PC] and then press . OK Scanning Methods Scan to USB Memory You can save the scanned document in a USB memory. Reference For the specifications of USB memory that you can use, please refer to "Print From USB Memory Specifications" P. 188. 1 Press the key on the operator panel. 2 Place your document with text face up in the ADF or face down on the document glass. 3 Insert the USB memory into the USB memory interface of the machine. 4 4 Check that [Select Profile] is selected and then press . OK 5 Press the press . OK to select a profile and then 6 Press or . MONO COLOR Note Insert the USB memory into the USB port straight. If it is not inserted with the correct angle, the USB port may be damaged. 4 Press the to select [USB Memory] and then press . OK 5 Press the to scanning settings if necessary. 6 Press or . MONO COLOR 7 Remove the USB memory from the port after the message is displayed indicating that it is OK to remove the USB memory. - 111 -
-
 1
1 -
2
-
3
-
4
-
5
-
6
-
7
-
8
-
9
-
10
-
11
-
12
-
13
-
14
-
15
-
16
-
17
-
18
-
19
-
20
-
21
-
22
-
23
-
24
-
25
-
26
-
27
-
28
-
29
-
30
-
31
-
32
-
33
-
34
-
35
-
36
-
37
-
38
-
39
-
40
-
41
-
42
-
43
-
44
-
45
-
46
-
47
-
48
-
49
-
50
-
51
-
52
-
53
-
54
-
55
-
56
-
57
-
58
-
59
-
60
-
61
-
62
-
63
-
64
-
65
-
66
-
67
-
68
-
69
-
70
-
71
-
72
-
73
-
74
-
75
-
76
-
77
-
78
-
79
-
80
-
81
-
82
-
83
-
84
-
85
-
86
-
87
-
88
-
89
-
90
-
91
-
92
-
93
-
94
-
95
-
96
-
97
-
98
-
99
-
100
-
101
-
102
-
103
-
104
-
105
-
 106
106 -
 107
107 -
 108
108 -
 109
109 -
 110
110 -
 111
111 -
 112
112 -
 113
113 -
 114
114 -
 115
115 -
 116
116 -
117
-
118
-
119
-
120
-
121
-
122
-
123
-
124
-
125
-
126
-
127
-
128
-
129
-
130
-
131
-
132
-
133
-
134
-
135
-
136
-
137
-
138
-
139
-
140
-
141
-
142
-
143
-
144
-
145
-
146
-
147
-
148
-
149
-
150
-
151
-
152
-
153
-
154
-
155
-
156
-
157
-
158
-
159
-
160
-
161
-
162
-
163
-
164
-
165
-
166
-
167
-
168
-
169
-
170
-
171
-
172
-
173
-
174
-
175
-
176
-
177
-
178
-
179
-
180
-
181
-
182
-
183
-
184
-
185
-
186
-
187
-
188
-
189
-
190
-
191
-
192
-
193
-
194
-
195
-
196
-
197
-
198
-
199
-
200
-
201
-
202
-
203
 |
 |
