Oki MB471 Users Manual Basic - Page 121
Registering Network Scan Destinations, Registering and Editing, Deleting
 |
View all Oki MB471 manuals
Add to My Manuals
Save this manual to your list of manuals |
Page 121 highlights
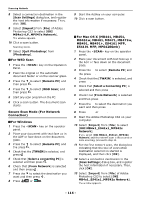
Scanning Registering Network Scan Destinations Registering Network Scan Destinations This section explains how to register a PC connected to the Network. You can register locations on a network to which you can scan documents. Memo You can also register network-connected PCs with ActKey in Network Configuration. You can register or delete networkconnected PCs with Network Configuration; however, you cannot edit them. For details, refer to User's Manual Advanced. Registering and Editing Reference For details on how to enter text, refer to "Entering Text Using the Operator Panel" P. 27. 1 Press the key on the operator panel. 2 Press the to select [Network Scan Destination] and then press . OK 3 Press the to select an IP address or domain name and then press . OK 4 Check that [Register] is selected and then press . OK If editing registered numbers, select [Edit]. 5 Check that [Destination] is selected and then press . OK 6 Enter a destination. A destination up to 16 characters. 7 Select [Enter] and then press . OK 8 Press the to select [Destination Address] and then press . 9 Enter an IP address or a Host PC name. An IP address or a name up to 64 characters. 10 Select [Enter] and then press . OK 11 Press the to select [Port No.] and then press . 12 Enter a port number and then press . OK 13 Press . OK 14 Press the until the top screen is displayed. Deleting 1 Press the key on the operator panel. 2 Press the to select [Network Scan Destination] and then press . OK 4 3 Press the press . OK to select a number and then 4 Press the press . OK to select [Delete] and then 5 Press the or to select [Yes] on the confirmation screen and then press . OK 6 Press the until the top screen is displayed. - 121 -
-
 1
1 -
2
-
3
-
4
-
5
-
6
-
7
-
8
-
9
-
10
-
11
-
12
-
13
-
14
-
15
-
16
-
17
-
18
-
19
-
20
-
21
-
22
-
23
-
24
-
25
-
26
-
27
-
28
-
29
-
30
-
31
-
32
-
33
-
34
-
35
-
36
-
37
-
38
-
39
-
40
-
41
-
42
-
43
-
44
-
45
-
46
-
47
-
48
-
49
-
50
-
51
-
52
-
53
-
54
-
55
-
56
-
57
-
58
-
59
-
60
-
61
-
62
-
63
-
64
-
65
-
66
-
67
-
68
-
69
-
70
-
71
-
72
-
73
-
74
-
75
-
76
-
77
-
78
-
79
-
80
-
81
-
82
-
83
-
84
-
85
-
86
-
87
-
88
-
89
-
90
-
91
-
92
-
93
-
94
-
95
-
96
-
97
-
98
-
99
-
100
-
101
-
102
-
103
-
104
-
105
-
106
-
107
-
108
-
109
-
110
-
111
-
112
-
113
-
114
-
115
-
 116
116 -
 117
117 -
 118
118 -
 119
119 -
 120
120 -
 121
121 -
 122
122 -
 123
123 -
 124
124 -
 125
125 -
 126
126 -
127
-
128
-
129
-
130
-
131
-
132
-
133
-
134
-
135
-
136
-
137
-
138
-
139
-
140
-
141
-
142
-
143
-
144
-
145
-
146
-
147
-
148
-
149
-
150
-
151
-
152
-
153
-
154
-
155
-
156
-
157
-
158
-
159
-
160
-
161
-
162
-
163
-
164
-
165
-
166
-
167
-
168
-
169
-
170
-
171
-
172
-
173
-
174
-
175
-
176
-
177
-
178
-
179
-
180
-
181
-
182
-
183
-
184
-
185
-
186
-
187
-
188
-
189
-
190
-
191
-
192
-
193
-
194
-
195
-
196
-
197
-
198
-
199
-
200
-
201
-
202
-
203
 |
 |
