Canon BJC-85 User manual for the BJC-85 - Page 233
Follow the correct procedure to set paper in the auto sheet feeder
 |
View all Canon BJC-85 manuals
Add to My Manuals
Save this manual to your list of manuals |
Page 233 highlights
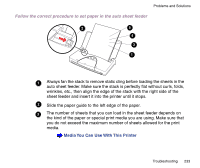
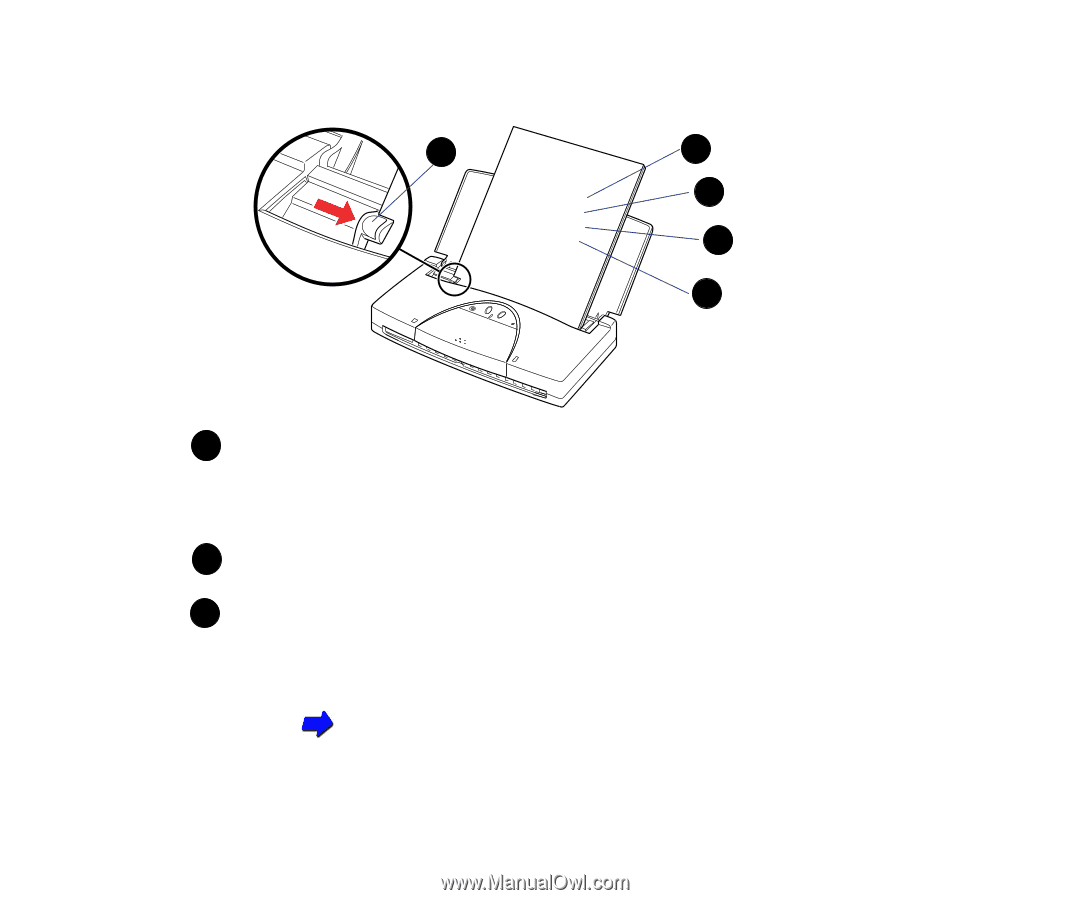
Problems and Solutions Follow the correct procedure to set paper in the auto sheet feeder 2 5 4 3 1 1 Always fan the stack to remove static cling before loading the sheets in the auto sheet feeder. Make sure the stack is perfectly flat without curls, folds, wrinkles, etc., then align the edge of the stack with the right side of the sheet feeder and insert it into the printer until it stops. 2 Slide the paper guide to the left edge of the paper. 3 The number of sheets that you can load in the sheet feeder depends on the kind of the paper or special print media you are using. Make sure that you do not exceed the maximum number of sheets allowed for the print media. Media You Can Use With This Printer Troubleshooting 233
-
 1
1 -
2
-
3
-
4
-
5
-
6
-
7
-
8
-
9
-
10
-
11
-
12
-
13
-
14
-
15
-
16
-
17
-
18
-
19
-
20
-
21
-
22
-
23
-
24
-
25
-
26
-
27
-
28
-
29
-
30
-
31
-
32
-
33
-
34
-
35
-
36
-
37
-
38
-
39
-
40
-
41
-
42
-
43
-
44
-
45
-
46
-
47
-
48
-
49
-
50
-
51
-
52
-
53
-
54
-
55
-
56
-
57
-
58
-
59
-
60
-
61
-
62
-
63
-
64
-
65
-
66
-
67
-
68
-
69
-
70
-
71
-
72
-
73
-
74
-
75
-
76
-
77
-
78
-
79
-
80
-
81
-
82
-
83
-
84
-
85
-
86
-
87
-
88
-
89
-
90
-
91
-
92
-
93
-
94
-
95
-
96
-
97
-
98
-
99
-
100
-
101
-
102
-
103
-
104
-
105
-
106
-
107
-
108
-
109
-
110
-
111
-
112
-
113
-
114
-
115
-
116
-
117
-
118
-
119
-
120
-
121
-
122
-
123
-
124
-
125
-
126
-
127
-
128
-
129
-
130
-
131
-
132
-
133
-
134
-
135
-
136
-
137
-
138
-
139
-
140
-
141
-
142
-
143
-
144
-
145
-
146
-
147
-
148
-
149
-
150
-
151
-
152
-
153
-
154
-
155
-
156
-
157
-
158
-
159
-
160
-
161
-
162
-
163
-
164
-
165
-
166
-
167
-
168
-
169
-
170
-
171
-
172
-
173
-
174
-
175
-
176
-
177
-
178
-
179
-
180
-
181
-
182
-
183
-
184
-
185
-
186
-
187
-
188
-
189
-
190
-
191
-
192
-
193
-
194
-
195
-
196
-
197
-
198
-
199
-
200
-
201
-
202
-
203
-
204
-
205
-
206
-
207
-
208
-
209
-
210
-
211
-
212
-
213
-
214
-
215
-
216
-
217
-
218
-
219
-
220
-
221
-
222
-
223
-
224
-
225
-
226
-
227
-
 228
228 -
 229
229 -
 230
230 -
 231
231 -
 232
232 -
 233
233 -
 234
234 -
 235
235 -
 236
236 -
 237
237 -
 238
238 -
239
-
240
-
241
-
242
-
243
-
244
-
245
-
246
-
247
-
248
-
249
-
250
-
251
-
252
-
253
-
254
-
255
-
256
-
257
-
258
-
259
-
260
-
261
-
262
-
263
-
264
-
265
-
266
-
267
-
268
-
269
-
270
-
271
-
272
-
273
-
274
-
275
-
276
-
277
-
278
-
279
-
280
-
281
-
282
-
283
-
284
-
285
-
286
 |
 |
233
Troubleshooting
Problems and Solutions
Follow the correct procedure to set paper in the auto sheet feeder
Always fan the stack to remove static cling before loading the sheets in the
auto sheet feeder. Make sure the stack is perfectly
fl
at without curls, folds,
wrinkles, etc., then align the edge of the stack with the right side of the
sheet feeder and insert it into the printer until it stops.
Slide the paper guide to the left edge of the paper.
The number of sheets that you can load in the sheet feeder depends on
the kind of the paper or special print media you are using. Make sure that
you do not exceed the maximum number of sheets allowed for the print
media.
Media You Can Use With This Printer
1
2
3
4
5
1
2
3