Canon BJC-85 User manual for the BJC-85 - Page 53
printer is ready for operation when the POWER light remains on. - cleaning print head
 |
View all Canon BJC-85 manuals
Add to My Manuals
Save this manual to your list of manuals |
Page 53 highlights
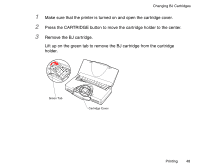
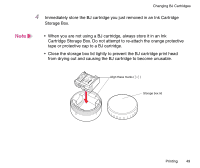
Changing BJ Cartridges 7 Press down on the raised left side of the BJ cartridge until it locks in place. Press Here 8 Close the cartridge cover. 9 Press the CARTRIDGE button. The printer moves the cartridge holder to the home position and automatically starts cleaning the print head. The POWER light flashes during the print head cleaning. Print head cleaning is complete and the printer is ready for operation when the POWER light remains on. Note After installing the BJ cartridge in the holder, it takes about two seconds for the printer to recognize the BJ cartridge. So there may be a slight delay after pressing the CARTRIDGE button. Printing 53
-
 1
1 -
2
-
3
-
4
-
5
-
6
-
7
-
8
-
9
-
10
-
11
-
12
-
13
-
14
-
15
-
16
-
17
-
18
-
19
-
20
-
21
-
22
-
23
-
24
-
25
-
26
-
27
-
28
-
29
-
30
-
31
-
32
-
33
-
34
-
35
-
36
-
37
-
38
-
39
-
40
-
41
-
42
-
43
-
44
-
45
-
46
-
47
-
 48
48 -
 49
49 -
 50
50 -
 51
51 -
 52
52 -
 53
53 -
 54
54 -
 55
55 -
 56
56 -
 57
57 -
 58
58 -
59
-
60
-
61
-
62
-
63
-
64
-
65
-
66
-
67
-
68
-
69
-
70
-
71
-
72
-
73
-
74
-
75
-
76
-
77
-
78
-
79
-
80
-
81
-
82
-
83
-
84
-
85
-
86
-
87
-
88
-
89
-
90
-
91
-
92
-
93
-
94
-
95
-
96
-
97
-
98
-
99
-
100
-
101
-
102
-
103
-
104
-
105
-
106
-
107
-
108
-
109
-
110
-
111
-
112
-
113
-
114
-
115
-
116
-
117
-
118
-
119
-
120
-
121
-
122
-
123
-
124
-
125
-
126
-
127
-
128
-
129
-
130
-
131
-
132
-
133
-
134
-
135
-
136
-
137
-
138
-
139
-
140
-
141
-
142
-
143
-
144
-
145
-
146
-
147
-
148
-
149
-
150
-
151
-
152
-
153
-
154
-
155
-
156
-
157
-
158
-
159
-
160
-
161
-
162
-
163
-
164
-
165
-
166
-
167
-
168
-
169
-
170
-
171
-
172
-
173
-
174
-
175
-
176
-
177
-
178
-
179
-
180
-
181
-
182
-
183
-
184
-
185
-
186
-
187
-
188
-
189
-
190
-
191
-
192
-
193
-
194
-
195
-
196
-
197
-
198
-
199
-
200
-
201
-
202
-
203
-
204
-
205
-
206
-
207
-
208
-
209
-
210
-
211
-
212
-
213
-
214
-
215
-
216
-
217
-
218
-
219
-
220
-
221
-
222
-
223
-
224
-
225
-
226
-
227
-
228
-
229
-
230
-
231
-
232
-
233
-
234
-
235
-
236
-
237
-
238
-
239
-
240
-
241
-
242
-
243
-
244
-
245
-
246
-
247
-
248
-
249
-
250
-
251
-
252
-
253
-
254
-
255
-
256
-
257
-
258
-
259
-
260
-
261
-
262
-
263
-
264
-
265
-
266
-
267
-
268
-
269
-
270
-
271
-
272
-
273
-
274
-
275
-
276
-
277
-
278
-
279
-
280
-
281
-
282
-
283
-
284
-
285
-
286
 |
 |
53
Printing
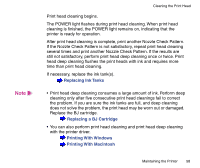
Changing BJ Cartridges
7
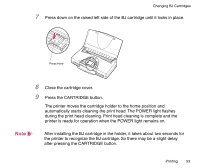
Press down on the raised left side of the BJ cartridge until it locks in place.
8
Close the cartridge cover.
9
Press the CARTRIDGE button.
The printer moves the cartridge holder to the home position and
automatically starts cleaning the print head. The POWER light
fl
ashes
during the print head cleaning. Print head cleaning is complete and the
printer is ready for operation when the POWER light remains on.
After installing the BJ cartridge in the holder, it takes about two seconds for
the printer to recognize the BJ cartridge. So there may be a slight delay
after pressing the CARTRIDGE button.
Press Here
Note