Xerox DC240 DocuColor 240/250 Training and Information Guide in PDF format. - Page 106
Paper tray Attributes and Image Quality, Settings/System Settings/Common Settings
 |
View all Xerox DC240 manuals
Add to My Manuals
Save this manual to your list of manuals |
Page 106 highlights
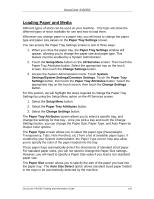
DocuColor 240/250 Paper tray Attributes and Image Quality Whenever you change paper in a paper tray, you will need to change the paper type and paper size values on the Paper Tray Settings screen. You can access the Paper Tray Settings screen in one of three ways: 1. When you close the paper tray, the Paper Tray Settings window will appear, allowing you to change the paper size and paper type. This feature must be enabled by a System Administrator. 2. Touch the Setup Menu button on the All Services screen. Then touch the Paper Tray Attributes button. Select the appropriate tray on the touch screen, then touch the Change Settings button. 3. Access the System Administration menu. Touch System Settings/System Settings/Common Settings. Touch the Paper Tray Settings button, then touch the Paper Tray Attributes button. Select the appropriate tray on the touch screen, then touch the Change Settings button. It is also important to change the Image Quality settings for specific paper you may be using. Access the Image Quality settings for Paper via the following path: 1. Press the Log In/Out button. 2. Input Password and select Confirm. 3. Select System Settings. 4. Select System Settings. 5. Select Common Settings. 6. Select Paper Tray Settings. 7. Select Image Quality. The Image Quality screen allows you to select and change the settings for a each of the papers listed to optimize image quality. To change the settings for a specific paper, select the paper in the list, then touch the Change Settings button. DocuColor 240/250 Training and Information Guide 106
-
 1
1 -
2
-
3
-
4
-
5
-
6
-
7
-
8
-
9
-
10
-
11
-
12
-
13
-
14
-
15
-
16
-
17
-
18
-
19
-
20
-
21
-
22
-
23
-
24
-
25
-
26
-
27
-
28
-
29
-
30
-
31
-
32
-
33
-
34
-
35
-
36
-
37
-
38
-
39
-
40
-
41
-
42
-
43
-
44
-
45
-
46
-
47
-
48
-
49
-
50
-
51
-
52
-
53
-
54
-
55
-
56
-
57
-
58
-
59
-
60
-
61
-
62
-
63
-
64
-
65
-
66
-
67
-
68
-
69
-
70
-
71
-
72
-
73
-
74
-
75
-
76
-
77
-
78
-
79
-
80
-
81
-
82
-
83
-
84
-
85
-
86
-
87
-
88
-
89
-
90
-
91
-
92
-
93
-
94
-
95
-
96
-
97
-
98
-
99
-
100
-
 101
101 -
 102
102 -
 103
103 -
 104
104 -
 105
105 -
 106
106 -
 107
107 -
 108
108 -
 109
109 -
 110
110 -
 111
111 -
112
-
113
-
114
-
115
-
116
-
117
-
118
-
119
-
120
-
121
-
122
-
123
-
124
-
125
-
126
-
127
-
128
-
129
-
130
-
131
-
132
-
133
-
134
-
135
-
136
-
137
-
138
-
139
-
140
-
141
-
142
-
143
-
144
-
145
-
146
-
147
-
148
-
149
-
150
-
151
-
152
-
153
-
154
-
155
-
156
-
157
-
158
-
159
-
160
-
161
-
162
-
163
-
164
-
165
-
166
-
167
-
168
-
169
-
170
-
171
-
172
-
173
-
174
-
175
-
176
-
177
-
178
-
179
-
180
-
181
-
182
-
183
-
184
-
185
-
186
-
187
-
188
-
189
-
190
-
191
 |
 |
