Xerox DC240 DocuColor 240/250 Training and Information Guide in PDF format. - Page 155
Replacing the Waste Toner Container, Close the Front Door.
 |
View all Xerox DC240 manuals
Add to My Manuals
Save this manual to your list of manuals |
Page 155 highlights
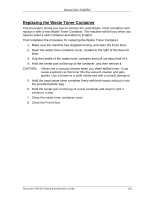
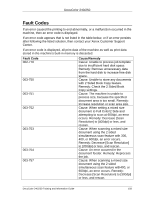
DocuColor 240/250 Replacing the Waste Toner Container This procedure shows you how to remove the used Waste Toner Container and replace it with a new Waste Toner Container. The machine will tell you when you need to order a new Container and when to install it. That completes the procedure for replacing the Waste Toner Container. 1. Make sure the machine has stopped running, and open the Front Door. 2. Open the waste toner container cover, located to the right of the Area #2 lever. 3. Grip the handle of the waste toner container and pull out about half of it. 4. Hold the center part on the top of the container, and then remove it. CAUTION: Never use a vacuum cleaner when you clean spilled toner. It can cause explosion as the toner fills the vacuum cleaner and gets sparks. Use a broom or a cloth moistened with a neutral detergent. 5. Hold the used waste toner container firmly with both hands and put it into the provided plastic bag. 6. Hold the center part on the top of a new container and insert it until it comes to a stop. 7. Close the waste toner container cover. 8. Close the Front Door. DocuColor 240/250 Training and Information Guide 155
-
 1
1 -
2
-
3
-
4
-
5
-
6
-
7
-
8
-
9
-
10
-
11
-
12
-
13
-
14
-
15
-
16
-
17
-
18
-
19
-
20
-
21
-
22
-
23
-
24
-
25
-
26
-
27
-
28
-
29
-
30
-
31
-
32
-
33
-
34
-
35
-
36
-
37
-
38
-
39
-
40
-
41
-
42
-
43
-
44
-
45
-
46
-
47
-
48
-
49
-
50
-
51
-
52
-
53
-
54
-
55
-
56
-
57
-
58
-
59
-
60
-
61
-
62
-
63
-
64
-
65
-
66
-
67
-
68
-
69
-
70
-
71
-
72
-
73
-
74
-
75
-
76
-
77
-
78
-
79
-
80
-
81
-
82
-
83
-
84
-
85
-
86
-
87
-
88
-
89
-
90
-
91
-
92
-
93
-
94
-
95
-
96
-
97
-
98
-
99
-
100
-
101
-
102
-
103
-
104
-
105
-
106
-
107
-
108
-
109
-
110
-
111
-
112
-
113
-
114
-
115
-
116
-
117
-
118
-
119
-
120
-
121
-
122
-
123
-
124
-
125
-
126
-
127
-
128
-
129
-
130
-
131
-
132
-
133
-
134
-
135
-
136
-
137
-
138
-
139
-
140
-
141
-
142
-
143
-
144
-
145
-
146
-
147
-
148
-
149
-
 150
150 -
 151
151 -
 152
152 -
 153
153 -
 154
154 -
 155
155 -
 156
156 -
 157
157 -
 158
158 -
 159
159 -
 160
160 -
161
-
162
-
163
-
164
-
165
-
166
-
167
-
168
-
169
-
170
-
171
-
172
-
173
-
174
-
175
-
176
-
177
-
178
-
179
-
180
-
181
-
182
-
183
-
184
-
185
-
186
-
187
-
188
-
189
-
190
-
191
 |
 |
