Xerox DC240 DocuColor 240/250 Training and Information Guide in PDF format. - Page 57
Covers, Output, Format, Paper, Tray Settings
 |
View all Xerox DC240 manuals
Add to My Manuals
Save this manual to your list of manuals |
Page 57 highlights
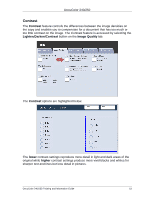
DocuColor 240/250 Covers The Covers feature allows you to automatically add covers to your copied sets using stock from a different tray. For example you can add colored stock, card or transparencies to your copied sets to add a professional finish to your copy job. There are numerous cover options, including: • Front only • Back only • Front and Back • Covers can be printed inside and out Select the paper tray you want to use for the main body of the copies. The Covers feature is not available if the Auto paper supply option is selected. Then load the cover stock into another paper tray. As a rule, load your cover stock in the same orientation as the paper you are using for the body of your copies. This feature can be accessed by touching the Covers button on the Output Format tab. The Covers screen is shown below. Once you have selected your Front and Back Cover options, select the Paper Tray Settings button. From this screen you can select the tray that contains the cover stock. Save all the selections you have made and the machine will be enabled to add covers to your copy job. DocuColor 240/250 Training and Information Guide 57
-
 1
1 -
2
-
3
-
4
-
5
-
6
-
7
-
8
-
9
-
10
-
11
-
12
-
13
-
14
-
15
-
16
-
17
-
18
-
19
-
20
-
21
-
22
-
23
-
24
-
25
-
26
-
27
-
28
-
29
-
30
-
31
-
32
-
33
-
34
-
35
-
36
-
37
-
38
-
39
-
40
-
41
-
42
-
43
-
44
-
45
-
46
-
47
-
48
-
49
-
50
-
51
-
 52
52 -
 53
53 -
 54
54 -
 55
55 -
 56
56 -
 57
57 -
 58
58 -
 59
59 -
 60
60 -
 61
61 -
 62
62 -
63
-
64
-
65
-
66
-
67
-
68
-
69
-
70
-
71
-
72
-
73
-
74
-
75
-
76
-
77
-
78
-
79
-
80
-
81
-
82
-
83
-
84
-
85
-
86
-
87
-
88
-
89
-
90
-
91
-
92
-
93
-
94
-
95
-
96
-
97
-
98
-
99
-
100
-
101
-
102
-
103
-
104
-
105
-
106
-
107
-
108
-
109
-
110
-
111
-
112
-
113
-
114
-
115
-
116
-
117
-
118
-
119
-
120
-
121
-
122
-
123
-
124
-
125
-
126
-
127
-
128
-
129
-
130
-
131
-
132
-
133
-
134
-
135
-
136
-
137
-
138
-
139
-
140
-
141
-
142
-
143
-
144
-
145
-
146
-
147
-
148
-
149
-
150
-
151
-
152
-
153
-
154
-
155
-
156
-
157
-
158
-
159
-
160
-
161
-
162
-
163
-
164
-
165
-
166
-
167
-
168
-
169
-
170
-
171
-
172
-
173
-
174
-
175
-
176
-
177
-
178
-
179
-
180
-
181
-
182
-
183
-
184
-
185
-
186
-
187
-
188
-
189
-
190
-
191
 |
 |
