Xerox DC240 DocuColor 240/250 Training and Information Guide in PDF format. - Page 177
Staple Jams, Hole Punch Jams, Document Feeder Jams, the steps below
 |
View all Xerox DC240 manuals
Add to My Manuals
Save this manual to your list of manuals |
Page 177 highlights
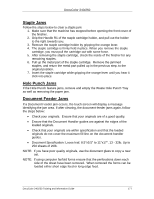
DocuColor 240/250 Staple Jams Follow the steps below to clear a staple jam: 1. Make sure that the machine has stopped before opening the front cover of the finisher. 2. Grip the Handle R1 of the staple cartridge holder, and pull out the holder to the right towards you. 3. Remove the staple cartridge holder by gripping the orange lever. 4. The staple cartridge is firmly held in place. When you remove the staple cartridge, you must pull the cartridge out with some force. 5. After removing the staple cartridge, check the inside of the finisher for any remaining staples. 6. Pull up the metal part of the staple cartridge. Remove the jammed staples, and return the metal part pulled up in the previous step, to the original position. 7. Insert the staple cartridge while gripping the orange lever until you hear it click into place. Hole Punch Jams If the Hole Punch feature jams, remove and empty the Waste Hole Punch Tray as well as removing the paper jam. Document Feeder Jams If a Document Feeder jam occurs, the touch screen will display a message identifying the jam area. If after clearing, the document feeder jams again, follow the steps below: • Check your originals. Ensure that your originals are of a good quality. • Ensure that the Document Handler guides are against the edges of the loaded originals. • Check that your originals are within specification and that the loaded originals do not cover the maximum fill line on the document handler guides. • Document Specification: Loose leaf, 8.5"x5.5" to 11"x17", 13 - 32lb, Up to 250 sheets of 20lb. NOTE: If you have poor quality originals, use the document glass to copy a new set. NOTE: If using computer fanfold forms ensure that the perforations down each side of the sheet have been removed. When removed the forms can be loaded either short edge feed or long edge feed. DocuColor 240/250 Training and Information Guide 177
-
 1
1 -
2
-
3
-
4
-
5
-
6
-
7
-
8
-
9
-
10
-
11
-
12
-
13
-
14
-
15
-
16
-
17
-
18
-
19
-
20
-
21
-
22
-
23
-
24
-
25
-
26
-
27
-
28
-
29
-
30
-
31
-
32
-
33
-
34
-
35
-
36
-
37
-
38
-
39
-
40
-
41
-
42
-
43
-
44
-
45
-
46
-
47
-
48
-
49
-
50
-
51
-
52
-
53
-
54
-
55
-
56
-
57
-
58
-
59
-
60
-
61
-
62
-
63
-
64
-
65
-
66
-
67
-
68
-
69
-
70
-
71
-
72
-
73
-
74
-
75
-
76
-
77
-
78
-
79
-
80
-
81
-
82
-
83
-
84
-
85
-
86
-
87
-
88
-
89
-
90
-
91
-
92
-
93
-
94
-
95
-
96
-
97
-
98
-
99
-
100
-
101
-
102
-
103
-
104
-
105
-
106
-
107
-
108
-
109
-
110
-
111
-
112
-
113
-
114
-
115
-
116
-
117
-
118
-
119
-
120
-
121
-
122
-
123
-
124
-
125
-
126
-
127
-
128
-
129
-
130
-
131
-
132
-
133
-
134
-
135
-
136
-
137
-
138
-
139
-
140
-
141
-
142
-
143
-
144
-
145
-
146
-
147
-
148
-
149
-
150
-
151
-
152
-
153
-
154
-
155
-
156
-
157
-
158
-
159
-
160
-
161
-
162
-
163
-
164
-
165
-
166
-
167
-
168
-
169
-
170
-
171
-
 172
172 -
 173
173 -
 174
174 -
 175
175 -
 176
176 -
 177
177 -
 178
178 -
 179
179 -
 180
180 -
 181
181 -
 182
182 -
183
-
184
-
185
-
186
-
187
-
188
-
189
-
190
-
191
 |
 |