Xerox DC240 DocuColor 240/250 Training and Information Guide in PDF format. - Page 52
Image Quality Presets, Image Quality, Normal, Lively, Bright, Background Suppression
 |
View all Xerox DC240 manuals
Add to My Manuals
Save this manual to your list of manuals |
Page 52 highlights
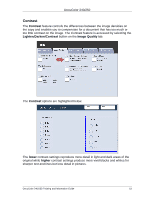
DocuColor 240/250 Image Quality Presets When you choose an Image Quality Preset option, an entire group of associated image quality settings are adjusted to meet your required output. NOTE: If other image quality settings are changed after selecting an Image Quality Preset option, the Image Quality Preset will return to the default setting. The Image Quality Presets screen can be accessed by touching the appropriate button on the Image Quality tab. The Normal settings causes the Auto Exposure, Lighten/Darken, Contrast, Sharpness/Color Saturation, Color Shift, and Color Balance levels to return to their default settings. The Lively setting raises the color saturation to produce fresher images. The Bright setting produces images that have a brighter appearance and enhanced contrast. The Warm setting produces colors that have a slightly low density with more dominant reds. The Cool setting produces blue colors more clearly. The Background Suppression setting reduces or eliminates any background caused by colored paper or newspaper originals. The Auto Contrast setting sharpens the image by adjusting the brightness and hue of the original. Once you have made an Image Quality Preset selection, touch the Save button. DocuColor 240/250 Training and Information Guide 52
-
 1
1 -
2
-
3
-
4
-
5
-
6
-
7
-
8
-
9
-
10
-
11
-
12
-
13
-
14
-
15
-
16
-
17
-
18
-
19
-
20
-
21
-
22
-
23
-
24
-
25
-
26
-
27
-
28
-
29
-
30
-
31
-
32
-
33
-
34
-
35
-
36
-
37
-
38
-
39
-
40
-
41
-
42
-
43
-
44
-
45
-
46
-
 47
47 -
 48
48 -
 49
49 -
 50
50 -
 51
51 -
 52
52 -
 53
53 -
 54
54 -
 55
55 -
 56
56 -
 57
57 -
58
-
59
-
60
-
61
-
62
-
63
-
64
-
65
-
66
-
67
-
68
-
69
-
70
-
71
-
72
-
73
-
74
-
75
-
76
-
77
-
78
-
79
-
80
-
81
-
82
-
83
-
84
-
85
-
86
-
87
-
88
-
89
-
90
-
91
-
92
-
93
-
94
-
95
-
96
-
97
-
98
-
99
-
100
-
101
-
102
-
103
-
104
-
105
-
106
-
107
-
108
-
109
-
110
-
111
-
112
-
113
-
114
-
115
-
116
-
117
-
118
-
119
-
120
-
121
-
122
-
123
-
124
-
125
-
126
-
127
-
128
-
129
-
130
-
131
-
132
-
133
-
134
-
135
-
136
-
137
-
138
-
139
-
140
-
141
-
142
-
143
-
144
-
145
-
146
-
147
-
148
-
149
-
150
-
151
-
152
-
153
-
154
-
155
-
156
-
157
-
158
-
159
-
160
-
161
-
162
-
163
-
164
-
165
-
166
-
167
-
168
-
169
-
170
-
171
-
172
-
173
-
174
-
175
-
176
-
177
-
178
-
179
-
180
-
181
-
182
-
183
-
184
-
185
-
186
-
187
-
188
-
189
-
190
-
191
 |
 |
