Yamaha AW16G Owner's Manual - Page 110
Recording/playing a pad performance
 |
View all Yamaha AW16G manuals
Add to My Manuals
Save this manual to your list of manuals |
Page 110 highlights
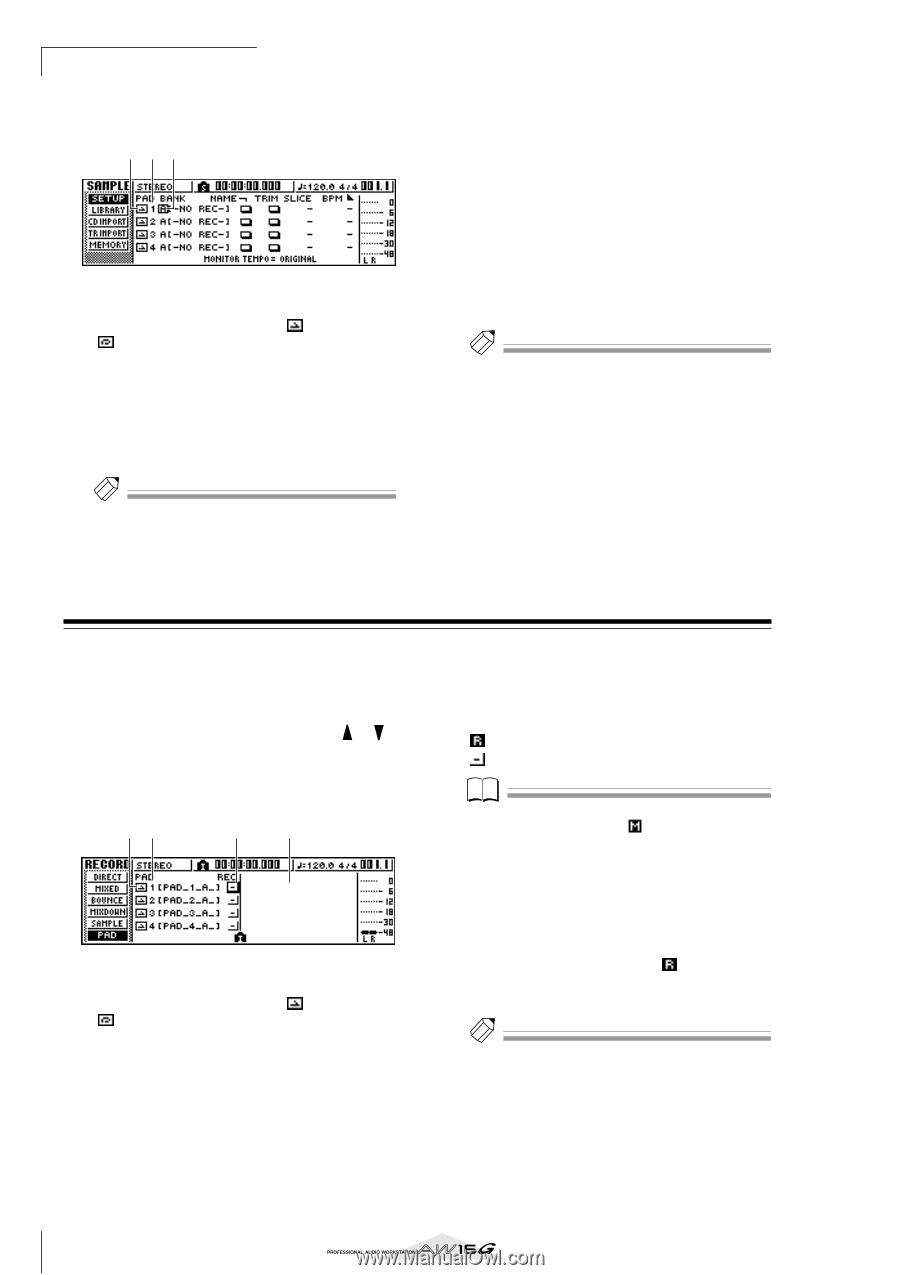
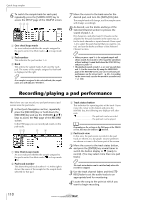
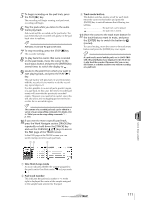
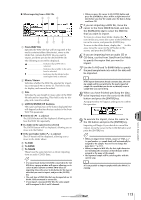
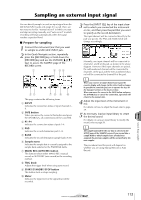
Quick loop sampler 6 To switch the sample bank for each pad, repeatedly press the [SAMPLE EDIT] key to access the SETUP page of the SAMPLE screen. 1 23 1 One shot/loop mode An icon indicates whether the sample assigned to the pad is set to One Shot mode ( ) or Loop mode ( ). B Pad number This indicates the pad number 1-4. C Bank This selects the sample bank (A-D) used by each pad. The name of the sample assigned to that bank is displayed at the right. Tip! If no sample is assigned to the selected bank, the sample name area will indicate [-NO REC-]. 7 Move the cursor to the bank area for the desired pad, and turn the [DATA/JOG] dial. The sample bank will change, and the sample name will change accordingly. 8 As desired, use the knobs and keys of the Selected Channel section to process the sound of pads 1-4. EQ, dynamics, and effect send 1/2 levels can be adjusted for the pad channels in the same way as for the track channels or input channels. Press a pad 1-4 to select the pad channel that you want to control, and use the knobs and keys of the Selected Channel section. Tip! • When you press a pad 1-4, the assigned sample will always sound. If you want to select a pad for operations without making it sound, hold down the [PAD SEL] key and press a pad 1-4. • The playback sounds of pads 1-4 are sent via pad channels 1-4 to the stereo bus. By using the MIXDOWN page of the RECORD screen, you can record your pad performance on the stereo track (→ p. 89). A recording on the stereo track can also be moved to an audio track (→ p. 128). Recording/playing a pad performance Here's how you can record your pad performance (pad events) onto the pad tracks. 1 In the Quick Navigation section, repeatedly press the [RECORD] key or hold down the [RECORD] key and use the CURSOR [ ]/[ ] keys to access the PAD page of the RECORD screen. In the PAD page you can record pad events on the pad tracks. 12 34 1 One Shot/Loop mode An icon indicates whether the sample assigned to the pad is set to One Shot mode ( ) or Loop mode ( ). B Pad track number This shows the pad track number 1-4. At the right is shown the name of the sample for the sample bank selected for that pad. C Track status button This indicates the operating state of the track. If you move the cursor to this button and press the [ENTER] key, the following two displays will alternate. The pad track can be recorded The pad track can be played. Note Depending on the settings in the PAD page of the TRACK screen, this may also indicate (muted). D Pad track view In this area, the pad events recorded in the pad track are shown as a bar graph. Locator positions are shown as icons in the lower part of the screen. 2 Move the cursor to the track status button, and press the [ENTER] key several times to switch the button display to (ready to record). (You may select more than one pad track.) Tip! The track status button can be switched only when the recorder is stopped. 3 Use the track channel faders and the [STEREO] fader to set the audio tracks to an appropriate level for monitoring. 4 Locate the song to the point at which you want to begin recording. 110
-
 1
1 -
2
-
3
-
4
-
5
-
6
-
7
-
8
-
9
-
10
-
11
-
12
-
13
-
14
-
15
-
16
-
17
-
18
-
19
-
20
-
21
-
22
-
23
-
24
-
25
-
26
-
27
-
28
-
29
-
30
-
31
-
32
-
33
-
34
-
35
-
36
-
37
-
38
-
39
-
40
-
41
-
42
-
43
-
44
-
45
-
46
-
47
-
48
-
49
-
50
-
51
-
52
-
53
-
54
-
55
-
56
-
57
-
58
-
59
-
60
-
61
-
62
-
63
-
64
-
65
-
66
-
67
-
68
-
69
-
70
-
71
-
72
-
73
-
74
-
75
-
76
-
77
-
78
-
79
-
80
-
81
-
82
-
83
-
84
-
85
-
86
-
87
-
88
-
89
-
90
-
91
-
92
-
93
-
94
-
95
-
96
-
97
-
98
-
99
-
100
-
101
-
102
-
103
-
104
-
 105
105 -
 106
106 -
 107
107 -
 108
108 -
 109
109 -
 110
110 -
 111
111 -
 112
112 -
 113
113 -
 114
114 -
 115
115 -
116
-
117
-
118
-
119
-
120
-
121
-
122
-
123
-
124
-
125
-
126
-
127
-
128
-
129
-
130
-
131
-
132
-
133
-
134
-
135
-
136
-
137
-
138
-
139
-
140
-
141
-
142
-
143
-
144
-
145
-
146
-
147
-
148
-
149
-
150
-
151
-
152
-
153
-
154
-
155
-
156
-
157
-
158
-
159
-
160
-
161
-
162
-
163
-
164
-
165
-
166
-
167
-
168
-
169
-
170
-
171
-
172
-
173
-
174
-
175
-
176
-
177
-
178
-
179
-
180
-
181
-
182
-
183
-
184
-
185
-
186
-
187
-
188
-
189
-
190
-
191
-
192
-
193
-
194
-
195
-
196
-
197
-
198
-
199
-
200
-
201
-
202
-
203
-
204
-
205
-
206
-
207
-
208
-
209
-
210
-
211
-
212
-
213
-
214
-
215
-
216
-
217
-
218
-
219
 |
 |