Yamaha AW16G Owner's Manual - Page 85
Adjusting the effect send level, PRE/POST, PEAK button, PRE/POST button
 |
View all Yamaha AW16G manuals
Add to My Manuals
Save this manual to your list of manuals |
Page 85 highlights
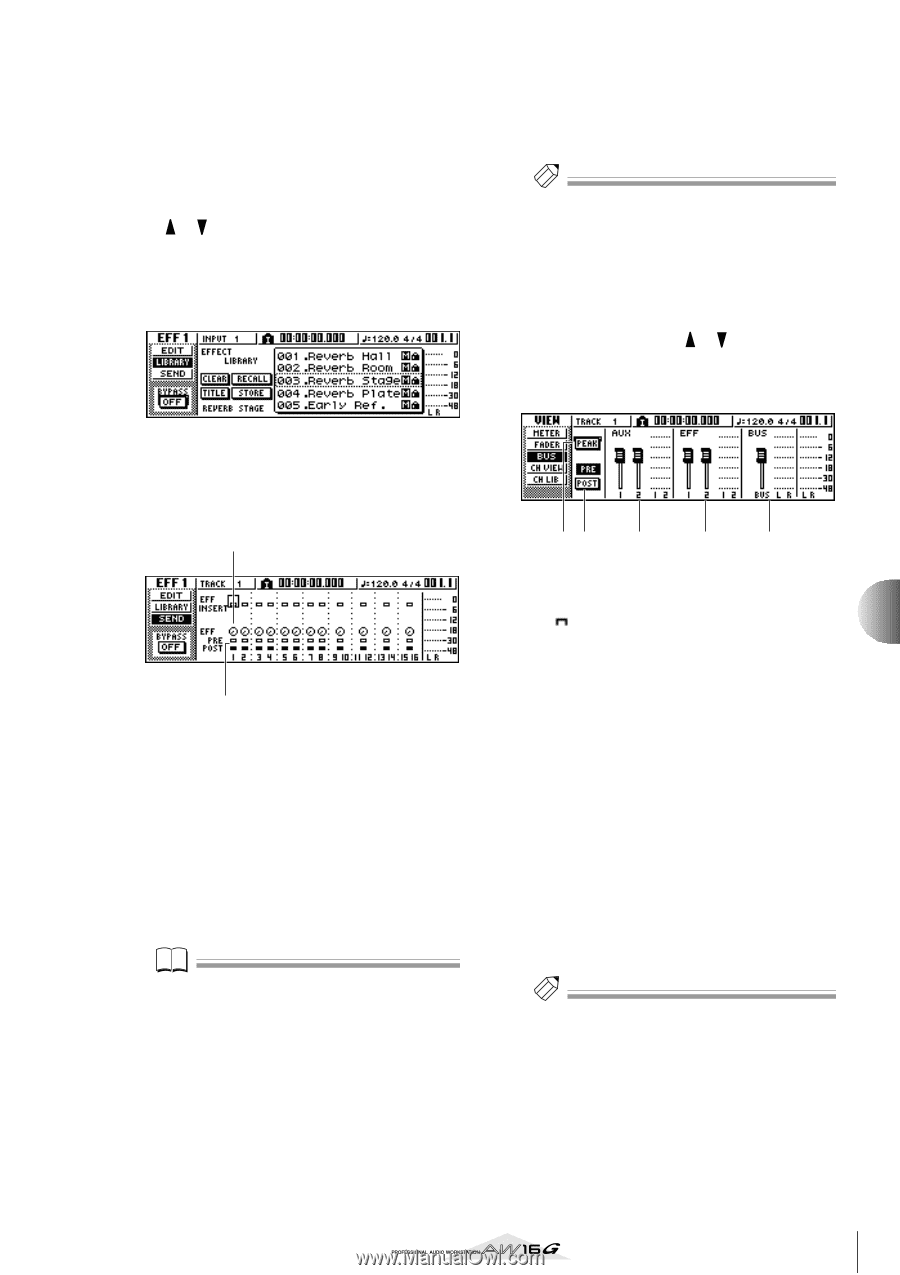
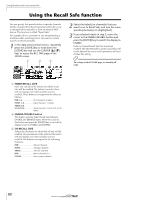
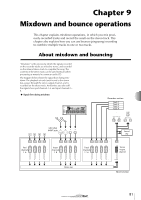
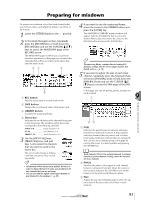
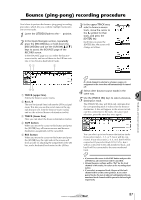
■ Adjusting the effect send level Here's how to load an effect library into internal effect 1, and adjust the level (effect send level) of the signal that is sent from each channel via effect bus 1 to internal effect 1. 1 Repeatedly press the [EFF1] knob or hold down the [EFF1] knob and use the CURSOR [ ]/[ ] keys to access the LIBRARY page of the EFF1 screen. 2 Select the effect library that you want to use, and load it into internal effect 1. In this example, we will select a reverb-type library. 3 Press the [EFF1] knob once to access the SEND page of the EFF1 screen. If insert effect 1 is connected via the mixer section send/return, the following items will be added to the SEND page of the EFF1 screen. 1 2 1 EFF Adjusts the send level of the signal that is sent from each channel to insert effect 1. B PRE/POST Selects the location from which the signal from each channel will be sent to insert effect 1. Move the cursor to this area and press the [ENTER] key to switch between the following two settings. PRE (pre-fader The signal from immediately before the fader will be sent. POST (post-fader) ...... The signal from immediately after the fader will be sent. Note If the page you see is different than shown above, make sure that track channels are selected as the object of your operations. (This is shown in the upper left of the screen.) If input channels/pad channels are selected, press one of the [TRACK SEL] keys. 4 Move the cursor to the PRE/POST field in the screen, and press the [ENTER] key to specify the location from which the signal will be sent from each channel to internal effect 1. Select POST if you want the volume of the effect sound to be affected by the fader position. Select PRE if you want to set the volume of the effect sound independently of the fader position. 5 While you play back the song, move the cursor to the EFF knobs in the screen, and adjust the level of the signal that is sent from each channel to internal effect 1. Tip! Another way of adjusting the send level to internal effect 1 is to press a [TRACK SEL] key to select a track channel, and then turn the [EFF1] knob of the Selected Channel section. This method is convenient if you want to adjust the effect level without displaying a different screen. 6 To adjust the master level of the effect send, repeatedly press the Selected Channel section [VIEW] key or hold down the [VIEW] key and use the CURSOR [ ]/[ ] keys to access the BUS page of the VIEW screen. The BUS page of the VIEW screen lets you use onscreen faders to adjust the master level of each bus. 12 3 4 5 1 PEAK button This is an on/off switch for the peak hold function of the level meters. If this button is on, a peak indicator will show the level meter peaks, and will remain displayed. To reset this indicator, you can temporarily switch the PEAK button off. This setting is shared with the METER page of the VIEW screen. B PRE/POST button This selects whether the level meters of the BUS page will indicate the pre-fader level (PRE) or the post-fader level (POST). This setting is independent from the METER page of the VIEW screen. C AUX D EFF E BUS Use these faders to adjust the master levels of AUX buses 1/2, effect buses 1/2, and the L/R bus. The level of each bus is indicated by the level meters at the right of each fader. 7 Move the cursor to the fader for effect bus 1, and use the [DATA/JOG] dial to raise or lower it. 9 Tip! You can also adjust the level of the return signal that is returned from the internal effect to the mixer section. For details, refer to "Editing the parameters of an internal effect" (→ p. 94). 85 Mixdown and bounce operations
-
 1
1 -
2
-
3
-
4
-
5
-
6
-
7
-
8
-
9
-
10
-
11
-
12
-
13
-
14
-
15
-
16
-
17
-
18
-
19
-
20
-
21
-
22
-
23
-
24
-
25
-
26
-
27
-
28
-
29
-
30
-
31
-
32
-
33
-
34
-
35
-
36
-
37
-
38
-
39
-
40
-
41
-
42
-
43
-
44
-
45
-
46
-
47
-
48
-
49
-
50
-
51
-
52
-
53
-
54
-
55
-
56
-
57
-
58
-
59
-
60
-
61
-
62
-
63
-
64
-
65
-
66
-
67
-
68
-
69
-
70
-
71
-
72
-
73
-
74
-
75
-
76
-
77
-
78
-
79
-
 80
80 -
 81
81 -
 82
82 -
 83
83 -
 84
84 -
 85
85 -
 86
86 -
 87
87 -
 88
88 -
 89
89 -
 90
90 -
91
-
92
-
93
-
94
-
95
-
96
-
97
-
98
-
99
-
100
-
101
-
102
-
103
-
104
-
105
-
106
-
107
-
108
-
109
-
110
-
111
-
112
-
113
-
114
-
115
-
116
-
117
-
118
-
119
-
120
-
121
-
122
-
123
-
124
-
125
-
126
-
127
-
128
-
129
-
130
-
131
-
132
-
133
-
134
-
135
-
136
-
137
-
138
-
139
-
140
-
141
-
142
-
143
-
144
-
145
-
146
-
147
-
148
-
149
-
150
-
151
-
152
-
153
-
154
-
155
-
156
-
157
-
158
-
159
-
160
-
161
-
162
-
163
-
164
-
165
-
166
-
167
-
168
-
169
-
170
-
171
-
172
-
173
-
174
-
175
-
176
-
177
-
178
-
179
-
180
-
181
-
182
-
183
-
184
-
185
-
186
-
187
-
188
-
189
-
190
-
191
-
192
-
193
-
194
-
195
-
196
-
197
-
198
-
199
-
200
-
201
-
202
-
203
-
204
-
205
-
206
-
207
-
208
-
209
-
210
-
211
-
212
-
213
-
214
-
215
-
216
-
217
-
218
-
219
 |
 |