Yamaha AW16G Owner's Manual - Page 91
Initializing a channel, PAN/BALANCE knob
 |
View all Yamaha AW16G manuals
Add to My Manuals
Save this manual to your list of manuals |
Page 91 highlights
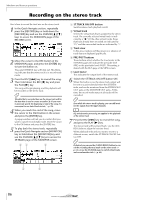
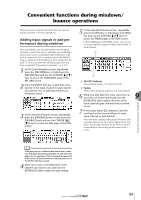
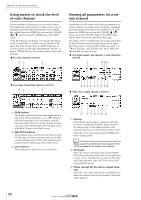
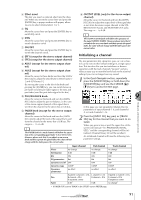
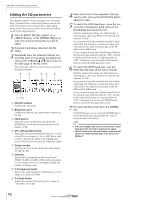
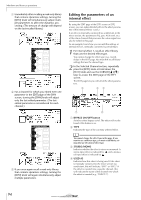
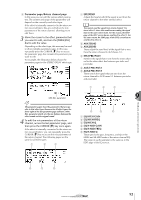
D Effect insert This lets you insert an internal effect into the channel. When you move the cursor here and press the [ENTER] key, a popup window will appear, allowing you to select internal effect 1 or 2. E EQ Move the cursor here and press the [ENTER] key to switch EQ on/off. F DYN Move the cursor here and press the [ENTER] key to switch dynamics on/off. G ON/OFF Move the cursor here and press the [ENTER] key to switch the channel on/off. H EFF1 (except for the stereo output channel) I EFF2 (except for the stereo output channel) J AUX1 (except for the stereo output channel) K AUX2 (except for the stereo output channel) Move the cursor to these knobs and turn the [DATA/ JOG] dial to adjust the send levels to effect buses 1/ 2 and AUX buses 1/2. By moving the cursor to the left of the knob and pressing the [ENTER] key, you can switch between pre-fader (send the pre-fader signal to the bus) and post-fader (send the post-fader signal to the bus). L PAN/BALANCE knob Move the cursor to this knob and turn the [DATA/ JOG] dial to adjust the pan (or balance, in the case of the stereo output channel) of the signal that is sent from the channel to the stereo bus or L/R bus. M FADER knob (except for the stereo output channel) Move the cursor to this knob and turn the [DATA/ JOG] dial to adjust the level of the signal that is sent from the channel to the stereo bus or L/R bus. The range is -∞ to +6 dB. Note The FADER knob of a track channel will follow the operation of the corresponding panel fader 1-8 or 9/10-15/16. However, please note that if you adjust an on-screen knob and then operate the panel fader, the value will not change until the fader passes the current value. N OUTPUT LEVEL (only for the stereo output channel) Move the cursor to this knob and turn the [DATA/ JOG] dial to adjust the output level of the signal that is sent from the stereo output channel to the STEREO/AUX OUT jacks and MONITOR OUT jacks. The range is -∞ to 0 dB. Note The OUTPUT LEVEL knob will follow the operation of the panel [STEREO FADER]. However, please note that if you adjust the on-screen knob and then operate the panel fader, the value will not change until the fader passes the current value. Initializing a channel The mix parameters (EQ, dynamics, pan, etc.) of a channel can be reset to their default settings in a single operation. This function lets you start mixdown or bounce operations with the track channels "zeroed," and provides an easy way to reset the levels back to the nominal setting if you can no longer hear any sound. 1 In the Quick Navigate section, repeatedly press the [MONITOR] key or hold down the [MONITOR] key and use the CURSOR [ ]/ [ ] keys to access the INIT page. In this page you can separately initialize the mix parameters of input channels 1-8, pad channels 1- 4, or track channels 1-16. 2 Press the [INPUT SEL] key, pad, or [TRACK SEL] key for the channel that you want to initialize. When you press a key or pad, the upper line of the screen will indicate "CH.PARAMETER INITIALIZED," and the corresponding channel will be initialized. (Channel library 00 will be recalled.) An initialized channel will have the following mix parameter settings. Input channel Pad channel Phase no change no change Attenuation 0 dB 0 dB EQ ON ON EQ parameters flat flat Dynamics on/off OFF OFF Dynamics type COMP COMP Dynamics parameters no effect no effect Pan Fader If paired: L channel = L16, R channel = R16 If unpaired: center 0 dB* L channel = L16 R channel = R16 0 dB Track channel no change 0 dB ON flat OFF COMP no effect If paired: L channel = L16, R channel = R16 If unpaired: center no change* * If FADER FLIP is set to TRACK in the UTILITY screen PREFER page. 9 Mixdown and bounce operations 91
-
 1
1 -
2
-
3
-
4
-
5
-
6
-
7
-
8
-
9
-
10
-
11
-
12
-
13
-
14
-
15
-
16
-
17
-
18
-
19
-
20
-
21
-
22
-
23
-
24
-
25
-
26
-
27
-
28
-
29
-
30
-
31
-
32
-
33
-
34
-
35
-
36
-
37
-
38
-
39
-
40
-
41
-
42
-
43
-
44
-
45
-
46
-
47
-
48
-
49
-
50
-
51
-
52
-
53
-
54
-
55
-
56
-
57
-
58
-
59
-
60
-
61
-
62
-
63
-
64
-
65
-
66
-
67
-
68
-
69
-
70
-
71
-
72
-
73
-
74
-
75
-
76
-
77
-
78
-
79
-
80
-
81
-
82
-
83
-
84
-
85
-
 86
86 -
 87
87 -
 88
88 -
 89
89 -
 90
90 -
 91
91 -
 92
92 -
 93
93 -
 94
94 -
 95
95 -
 96
96 -
97
-
98
-
99
-
100
-
101
-
102
-
103
-
104
-
105
-
106
-
107
-
108
-
109
-
110
-
111
-
112
-
113
-
114
-
115
-
116
-
117
-
118
-
119
-
120
-
121
-
122
-
123
-
124
-
125
-
126
-
127
-
128
-
129
-
130
-
131
-
132
-
133
-
134
-
135
-
136
-
137
-
138
-
139
-
140
-
141
-
142
-
143
-
144
-
145
-
146
-
147
-
148
-
149
-
150
-
151
-
152
-
153
-
154
-
155
-
156
-
157
-
158
-
159
-
160
-
161
-
162
-
163
-
164
-
165
-
166
-
167
-
168
-
169
-
170
-
171
-
172
-
173
-
174
-
175
-
176
-
177
-
178
-
179
-
180
-
181
-
182
-
183
-
184
-
185
-
186
-
187
-
188
-
189
-
190
-
191
-
192
-
193
-
194
-
195
-
196
-
197
-
198
-
199
-
200
-
201
-
202
-
203
-
204
-
205
-
206
-
207
-
208
-
209
-
210
-
211
-
212
-
213
-
214
-
215
-
216
-
217
-
218
-
219
 |
 |
