Yamaha AW16G Owner's Manual - Page 168
Signal flow when using an external effect processor, Raise the [STEREO] fader to the 0 dB position
 |
View all Yamaha AW16G manuals
Add to My Manuals
Save this manual to your list of manuals |
Page 168 highlights
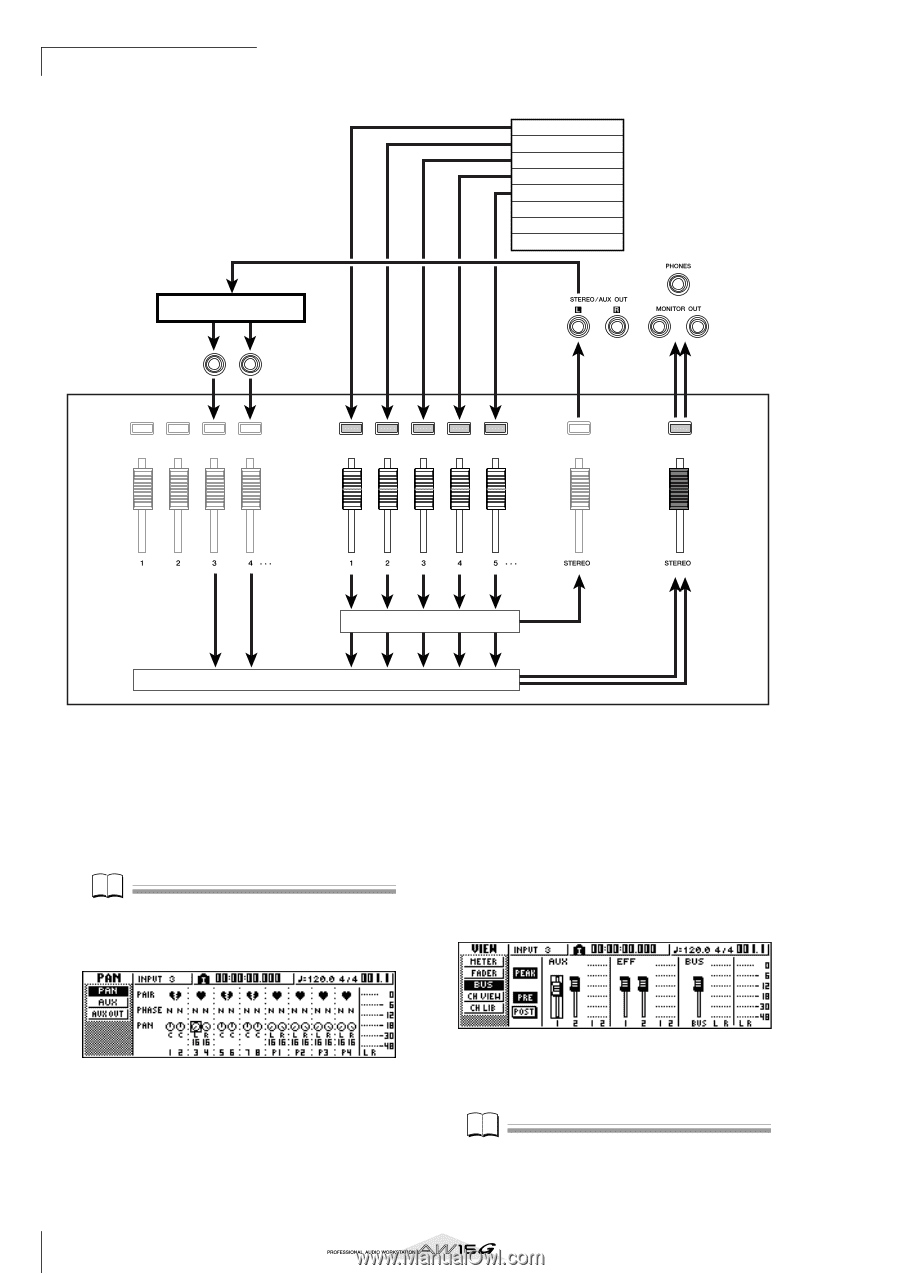
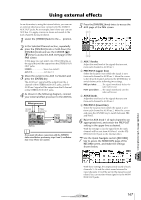
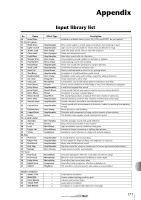
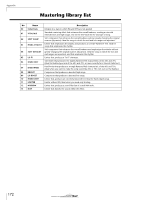
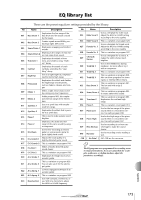
Using the AW16G with external devices ● Signal flow when using an external effect processor Effect processor Recorder section Track 1 Track 2 Track 3 Track 4 Track 5 Track 6 Track 7 Track 8 Input channels Track channels AUX bus 1 master Stereo output channel AUX bus Stereo bus 8 In the Selected Channel section, repeatedly press the [PAN/BAL] knob to access the PAN page of the PAN screen, and spread apart the pan settings of input channels 3/4. The effect sound will be heard in stereo. If desired, you can specify input channels 3/4 as a pair. Note If you use these settings, leave the AUX 1 knob and AUX 2 knob of input channels 3/4 set all the way to the left (-∞ dB). If you raise these levels, the signal will loop, creating oscillation. Mixer section 9 Raise the [STEREO] fader to the 0 dB position, and while playing back the song, adjust the input level of your external effect processor and use the [GAIN] knobs to adjust the input level of input channels 3/4. If desired, return to step 5 and readjust the send level to AUX bus 1 for each track channel. If you want to adjust the AUX bus 1 master level, use the BUS page of the VIEW screen (or the AUX OUT page of the PAN screen). 168 10 In the MIXDOWN page of the RECORD screen, switch the REC button on, and perform the mixdown. Note When you are finished with the mixdown, turn the PAN screen AUX OUT page setting back to its original setting of STEREO.
-
 1
1 -
2
-
3
-
4
-
5
-
6
-
7
-
8
-
9
-
10
-
11
-
12
-
13
-
14
-
15
-
16
-
17
-
18
-
19
-
20
-
21
-
22
-
23
-
24
-
25
-
26
-
27
-
28
-
29
-
30
-
31
-
32
-
33
-
34
-
35
-
36
-
37
-
38
-
39
-
40
-
41
-
42
-
43
-
44
-
45
-
46
-
47
-
48
-
49
-
50
-
51
-
52
-
53
-
54
-
55
-
56
-
57
-
58
-
59
-
60
-
61
-
62
-
63
-
64
-
65
-
66
-
67
-
68
-
69
-
70
-
71
-
72
-
73
-
74
-
75
-
76
-
77
-
78
-
79
-
80
-
81
-
82
-
83
-
84
-
85
-
86
-
87
-
88
-
89
-
90
-
91
-
92
-
93
-
94
-
95
-
96
-
97
-
98
-
99
-
100
-
101
-
102
-
103
-
104
-
105
-
106
-
107
-
108
-
109
-
110
-
111
-
112
-
113
-
114
-
115
-
116
-
117
-
118
-
119
-
120
-
121
-
122
-
123
-
124
-
125
-
126
-
127
-
128
-
129
-
130
-
131
-
132
-
133
-
134
-
135
-
136
-
137
-
138
-
139
-
140
-
141
-
142
-
143
-
144
-
145
-
146
-
147
-
148
-
149
-
150
-
151
-
152
-
153
-
154
-
155
-
156
-
157
-
158
-
159
-
160
-
161
-
162
-
 163
163 -
 164
164 -
 165
165 -
 166
166 -
 167
167 -
 168
168 -
 169
169 -
 170
170 -
 171
171 -
 172
172 -
 173
173 -
174
-
175
-
176
-
177
-
178
-
179
-
180
-
181
-
182
-
183
-
184
-
185
-
186
-
187
-
188
-
189
-
190
-
191
-
192
-
193
-
194
-
195
-
196
-
197
-
198
-
199
-
200
-
201
-
202
-
203
-
204
-
205
-
206
-
207
-
208
-
209
-
210
-
211
-
212
-
213
-
214
-
215
-
216
-
217
-
218
-
219
 |
 |