Yamaha AW16G Owner's Manual - Page 133
Importing from an audio CD or WAV file, Carefully read Copyright Notice
 |
View all Yamaha AW16G manuals
Add to My Manuals
Save this manual to your list of manuals |
Page 133 highlights
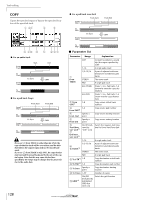
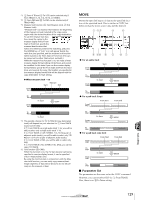
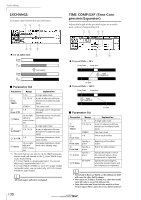
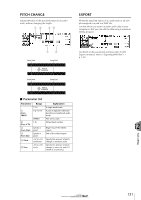
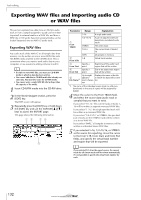
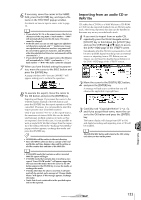
6 If necessary, move the cursor to the NAME field, press the [ENTER] key, and input a file name in the TITLE EDIT popup window. For details on how to input a name, refer to page 24. Note • If you selected Tr1-16 as the export-source, the first six characters of the song name + track number + ".WAV" will automatically become the file name. This name cannot be changed. • In the file name you can use only uppercase alphabetical characters, numerals, and "_" (underscore). Lowercase alphabetical characters used in a song name will be converted to uppercase characters, and all symbols other than alphabetical characters and numerals will be converted to "_". • If you selected SMPL as the export-source, the filename will automatically be "SMPL" + pad number + "_" + bank number + ".WAV." This name cannot be changed. 7 When you have finished setting the parameters, move the cursor to the EXEC button and press the [ENTER] key. A popup window with "Execute EXPORT?" will appear, asking you to confirm the operation. 8 To execute the export, move the cursor to the OK button and press the [ENTER] key. Exporting will begin. If you move the cursor to the CANCEL button (instead of the OK button) and press the [ENTER] key, the export operation will be cancelled. (However, it is not possible to abort the export process once it has been started.) Only if you selected "Tr1-16" as the export-source, the maximum of sixteen WAV files can be distributed between multiple volumes of media as they are exported. (Even in this case, it is not possible to write a single WAV file that is larger than the capacity of the media.) When the "Exchange Next Media" popup window appears, exchange the media and press the [ENTER] key. Tip! • All WAV files will be written to the root directory. • Since the AW16G does not have a concept of the real- world date and time, dummy values will be written as the file creation date and time of the WAV files. Note • If CD-R/RW media that contains no data is inserted, WAV file export will begin. • If CD-RW media that contains data is inserted, a message of "Erase CD-RW media?" will appear, suggesting that you erase the media. Move the cursor to the OK button and press the [ENTER] key to erase the media, or exchange the media. • If media other than the above is inserted, it will automatically be ejected, and a message of "Change Media, Please." will appear. If this message appears, exchange the media. • Tracks that do not contain data in the specified region will not be exported. Importing from an audio CD or WAV file CD audio data (CD-DA) or a WAV file from a CD-ROM or CD-R can be imported (loaded) into an AW16G audio track. After being imported, this data can be handled in the same way as any recorded audio track. 1 If you want to import from an audio CD, repeatedly press the Work Navigate section [UTILITY] key or hold down the [UTILITY] key and use the CURSOR [ ]/[ ] keys to access the D.IN • HDD page of the UTILITY screen. Immediately after the AW16G is powered-on, it will be set to prohibit digital recording from an external source or importing from a CD. Before you can import, you will need to disable this prohibition in the D.IN - HDD page of the UTILITY screen. 2 Move the cursor to the DIGITAL REC button, and press the [ENTER] key. A message will ask you to confirm that you will observe the applicable copyright laws. 3 Carefully read "Copyright Notice" (→ p. 5), and if you accept these terms, move the cursor to the OK button and press the [ENTER] key. The button display will change from OFF to ON, and digital recording and importing from a CD will be enabled. Note The DIGITAL REC button will return to the OFF setting each time you turn on the power. 12 Track editing 133
-
 1
1 -
2
-
3
-
4
-
5
-
6
-
7
-
8
-
9
-
10
-
11
-
12
-
13
-
14
-
15
-
16
-
17
-
18
-
19
-
20
-
21
-
22
-
23
-
24
-
25
-
26
-
27
-
28
-
29
-
30
-
31
-
32
-
33
-
34
-
35
-
36
-
37
-
38
-
39
-
40
-
41
-
42
-
43
-
44
-
45
-
46
-
47
-
48
-
49
-
50
-
51
-
52
-
53
-
54
-
55
-
56
-
57
-
58
-
59
-
60
-
61
-
62
-
63
-
64
-
65
-
66
-
67
-
68
-
69
-
70
-
71
-
72
-
73
-
74
-
75
-
76
-
77
-
78
-
79
-
80
-
81
-
82
-
83
-
84
-
85
-
86
-
87
-
88
-
89
-
90
-
91
-
92
-
93
-
94
-
95
-
96
-
97
-
98
-
99
-
100
-
101
-
102
-
103
-
104
-
105
-
106
-
107
-
108
-
109
-
110
-
111
-
112
-
113
-
114
-
115
-
116
-
117
-
118
-
119
-
120
-
121
-
122
-
123
-
124
-
125
-
126
-
127
-
 128
128 -
 129
129 -
 130
130 -
 131
131 -
 132
132 -
 133
133 -
 134
134 -
 135
135 -
 136
136 -
 137
137 -
 138
138 -
139
-
140
-
141
-
142
-
143
-
144
-
145
-
146
-
147
-
148
-
149
-
150
-
151
-
152
-
153
-
154
-
155
-
156
-
157
-
158
-
159
-
160
-
161
-
162
-
163
-
164
-
165
-
166
-
167
-
168
-
169
-
170
-
171
-
172
-
173
-
174
-
175
-
176
-
177
-
178
-
179
-
180
-
181
-
182
-
183
-
184
-
185
-
186
-
187
-
188
-
189
-
190
-
191
-
192
-
193
-
194
-
195
-
196
-
197
-
198
-
199
-
200
-
201
-
202
-
203
-
204
-
205
-
206
-
207
-
208
-
209
-
210
-
211
-
212
-
213
-
214
-
215
-
216
-
217
-
218
-
219
 |
 |
