Yamaha AW16G Owner's Manual - Page 163
Using the AW16G with external devices, Using the AW16G with a “workstation synth” - owner s manual
 |
View all Yamaha AW16G manuals
Add to My Manuals
Save this manual to your list of manuals |
Page 163 highlights
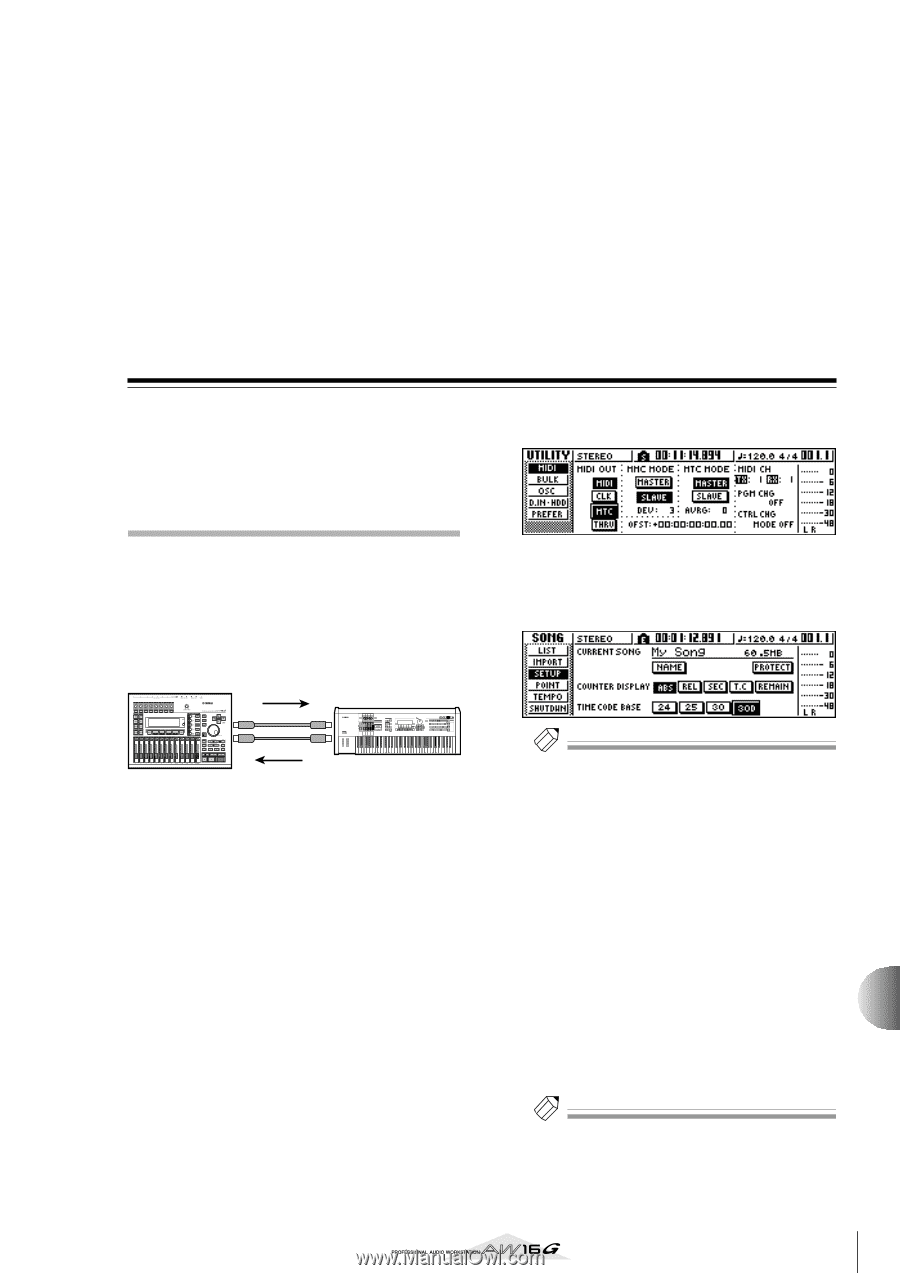
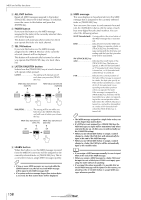
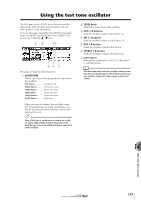
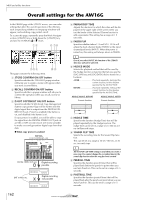
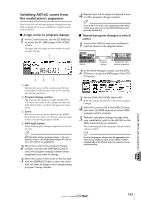
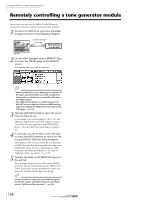
Chapter 15 Using the AW16G with external devices This chapter describes various examples of how you can use the AW16G in conjunction with external devices. Using the AW16G with a "workstation synth" There are numerous ways in which you can use the AW16G together with a workstation synthesizer (a synthesizer that has a built-in sequencer). Synchronizing the AW16G with the workstation's sequencer Here's how you can use MTC to synchronize the AW16G song with the sequencer built into your workstation synth. In this example we will also use MMC to remotely control the transport of the AW16G from your workstation synth. 1 Refer to the following diagram, and connect the AW16G to your workstation synthesizer. AW16G MTC MIDI OUT MIDI IN MIDI IN MIDI OUT MMC REC SONG SCENE MUSIC PRODUCTION SYNTHESIZER Integrated Sampling Sequencer Real-time External Control Sur face Modular Synthesis Plug-in System Synthesizer with built-in sequencer 2 In the Work Navigate section, use the [UTILITY] key to access the MIDI page of the UTILITY screen. Turn on the SLAVE button in the MMC MODE field, and turn on the MASTER button in the MTC MODE field. The AW16G will be set to function as MMC slave and MTC master. 3 Move the cursor to the DEV field, and set the value to match the device number of your workstation synthesizer. When using MMC, you must set the AW16G and the external MIDI device to the same MMC device number. For details on the device numbers that your workstation synth can use, refer to its owner's manual. 4 In the MIDI OUT field, turn on the MIDI button and MTC button. Now when the AW16G runs, MTC will be transmitted from the MIDI OUT/THRU connector. ● Example settings for synchronization using MTC and MMC 5 In the Work Navigate section, use the [SONG] key to access the SETUP page of the SONG screen, and select a frame rate in the TIME CODE BASE area. Tip! The frame rate you specify here will affect not only synchronization with the external device, but also the time code that is displayed in the counter, etc. 6 Set your workstation synth to function as MMC master and MTC slave, and set its MMC device number and MTC frame rate to the same settings as the AW16G. For details on how to make these settings, refer to the manual for your workstation synth. 7 Play back the sequencer (of your workstation synth). When you play back the sequencer of your workstation synth, the corresponding MMC commands will be sent to the AW16G, and the AW16G will begin running. At the same time, the AW16G will transmit MTC to your workstation synth, and the sequencer will run in synchronization with it. Tip! You can synchronize using MIDI Clock and Start/Stop/ Continue messages instead of using MTC and MMC. For details on the settings in this case, refer to the section that follows, "Recording/playing AW16G mix operations on your sequencer." 163
-
 1
1 -
2
-
3
-
4
-
5
-
6
-
7
-
8
-
9
-
10
-
11
-
12
-
13
-
14
-
15
-
16
-
17
-
18
-
19
-
20
-
21
-
22
-
23
-
24
-
25
-
26
-
27
-
28
-
29
-
30
-
31
-
32
-
33
-
34
-
35
-
36
-
37
-
38
-
39
-
40
-
41
-
42
-
43
-
44
-
45
-
46
-
47
-
48
-
49
-
50
-
51
-
52
-
53
-
54
-
55
-
56
-
57
-
58
-
59
-
60
-
61
-
62
-
63
-
64
-
65
-
66
-
67
-
68
-
69
-
70
-
71
-
72
-
73
-
74
-
75
-
76
-
77
-
78
-
79
-
80
-
81
-
82
-
83
-
84
-
85
-
86
-
87
-
88
-
89
-
90
-
91
-
92
-
93
-
94
-
95
-
96
-
97
-
98
-
99
-
100
-
101
-
102
-
103
-
104
-
105
-
106
-
107
-
108
-
109
-
110
-
111
-
112
-
113
-
114
-
115
-
116
-
117
-
118
-
119
-
120
-
121
-
122
-
123
-
124
-
125
-
126
-
127
-
128
-
129
-
130
-
131
-
132
-
133
-
134
-
135
-
136
-
137
-
138
-
139
-
140
-
141
-
142
-
143
-
144
-
145
-
146
-
147
-
148
-
149
-
150
-
151
-
152
-
153
-
154
-
155
-
156
-
157
-
 158
158 -
 159
159 -
 160
160 -
 161
161 -
 162
162 -
 163
163 -
 164
164 -
 165
165 -
 166
166 -
 167
167 -
 168
168 -
169
-
170
-
171
-
172
-
173
-
174
-
175
-
176
-
177
-
178
-
179
-
180
-
181
-
182
-
183
-
184
-
185
-
186
-
187
-
188
-
189
-
190
-
191
-
192
-
193
-
194
-
195
-
196
-
197
-
198
-
199
-
200
-
201
-
202
-
203
-
204
-
205
-
206
-
207
-
208
-
209
-
210
-
211
-
212
-
213
-
214
-
215
-
216
-
217
-
218
-
219
 |
 |