Yamaha AW16G Owner's Manual - Page 135
From WAVE file, Mono/stereo, LISTEN/ENTER/UP button, To TRACK, To V.TR, To Start, Use the To TRACK
 |
View all Yamaha AW16G manuals
Add to My Manuals
Save this manual to your list of manuals |
Page 135 highlights
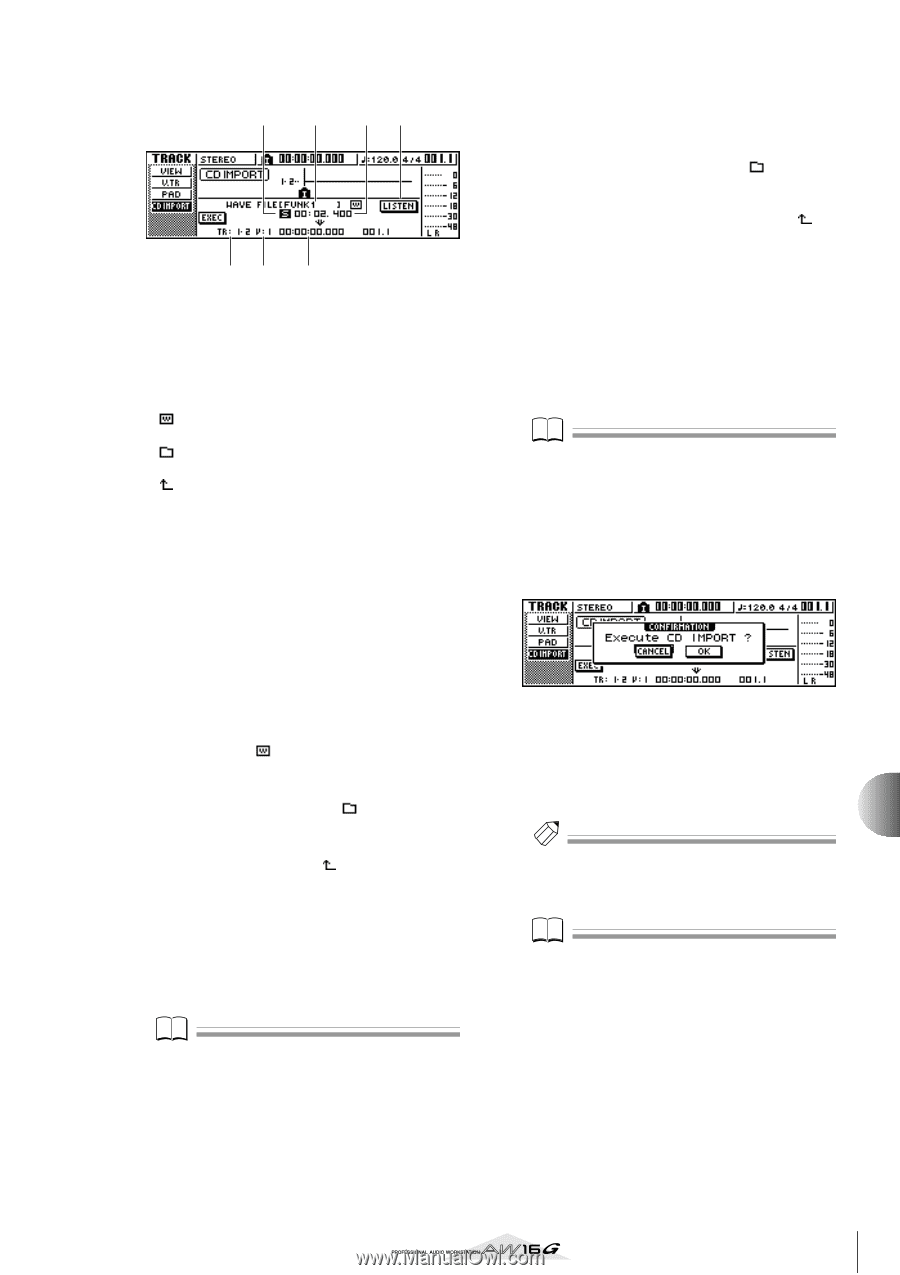
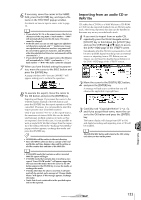
● When importing a WAV file 21 34 56 7 1 From WAVE file Selects the WAV file that will be imported. If the media contains folders (directories), move to the folder that contains the WAV file you want to import, and then specify the desired WAV file. The icons shown here have the following meaning. Indicates that a WAV file is selected. Indicates that a folder in the same level is selected. Indicates that the folder in the next higher level is selected. B Mono/stereo Indicates whether the WAV file selected for importing is monaural (M) or stereo (S). This field is for display only, and cannot be changed. C Size Indicates the playback length (in msec) of the WAV file selected for importing. This field is for display only, and cannot be changed. D LISTEN/ENTER/UP button The name and function of the button displayed here will change depending on the item that is selected by the From WAVE file parameter. ● If a WAV file ( ) is selected The LISTEN button will be displayed, allowing you to hear the WAV file repeatedly. ● If a folder in the same level ( ) is selected The ENTER button will be displayed, allowing you to move into that folder. ● If the next higher folder ( ) is selected The UP button will be displayed, allowing you to move to the next higher folder. E To TRACK F To V.TR G To Start These fields are the same as when you are importing from audio CD or CD-Extra. Note • If a Mixed Mode CD is inserted in the CD-RW drive, a popup window will appear, allowing you to select AUDIO (CD-DA) or WAVE (WAV files) to import. Move the cursor to the button for the data that you want to import, and press the [ENTER] key. • You can import only monaural or stereo WAV files that are in 16-bit/44.1 kHz format. • When you move the cursor to the LISTEN button and press the [ENTER] key, there will be a slight time lag while the data is read from the CD before you hear it. 7 If you are importing a WAV file, move the cursor to the From WAVE file field, and turn the [DATA/JOG] dial to select the WAV file that you want to import. To move to a lower level, display the icon in this field, then move the cursor to the ENTER button in the screen and press the [ENTER] key. To move to the next higher level, display the icon in this area, then move the cursor to the UP button and press the [ENTER] key. 8 If you are importing from audio CD or CDExtra, use the From Start and From End fields to specify the region that will be imported. 9 Use the To TRACK, To V.TR, and To Start fields to specify the track number, virtual track number, and starting location into which the data will be imported. Note If the import-destination already contains data, it will be overwritten. Be careful not to accidentally overwrite important data. 10 When you have finished making settings, move the cursor to the EXEC button and press the [ENTER] key. A popup window will ask you to confirm the operation. 11 To execute the import operation, move the cursor to the OK button and press the [ENTER] key. Importing will begin. If you move the cursor to the CANCEL button and press the [ENTER] key, importing will be cancelled. Tip! Even after you press the [ENTER] key, you can press the [UNDO/REDO] key to return to the state prior to importing, as long as you have not executed any editing or recording operation since the import. Note You cannot execute the Import operation while the AW16G is running. 12 Track editing 135
-
 1
1 -
2
-
3
-
4
-
5
-
6
-
7
-
8
-
9
-
10
-
11
-
12
-
13
-
14
-
15
-
16
-
17
-
18
-
19
-
20
-
21
-
22
-
23
-
24
-
25
-
26
-
27
-
28
-
29
-
30
-
31
-
32
-
33
-
34
-
35
-
36
-
37
-
38
-
39
-
40
-
41
-
42
-
43
-
44
-
45
-
46
-
47
-
48
-
49
-
50
-
51
-
52
-
53
-
54
-
55
-
56
-
57
-
58
-
59
-
60
-
61
-
62
-
63
-
64
-
65
-
66
-
67
-
68
-
69
-
70
-
71
-
72
-
73
-
74
-
75
-
76
-
77
-
78
-
79
-
80
-
81
-
82
-
83
-
84
-
85
-
86
-
87
-
88
-
89
-
90
-
91
-
92
-
93
-
94
-
95
-
96
-
97
-
98
-
99
-
100
-
101
-
102
-
103
-
104
-
105
-
106
-
107
-
108
-
109
-
110
-
111
-
112
-
113
-
114
-
115
-
116
-
117
-
118
-
119
-
120
-
121
-
122
-
123
-
124
-
125
-
126
-
127
-
128
-
129
-
 130
130 -
 131
131 -
 132
132 -
 133
133 -
 134
134 -
 135
135 -
 136
136 -
 137
137 -
 138
138 -
 139
139 -
 140
140 -
141
-
142
-
143
-
144
-
145
-
146
-
147
-
148
-
149
-
150
-
151
-
152
-
153
-
154
-
155
-
156
-
157
-
158
-
159
-
160
-
161
-
162
-
163
-
164
-
165
-
166
-
167
-
168
-
169
-
170
-
171
-
172
-
173
-
174
-
175
-
176
-
177
-
178
-
179
-
180
-
181
-
182
-
183
-
184
-
185
-
186
-
187
-
188
-
189
-
190
-
191
-
192
-
193
-
194
-
195
-
196
-
197
-
198
-
199
-
200
-
201
-
202
-
203
-
204
-
205
-
206
-
207
-
208
-
209
-
210
-
211
-
212
-
213
-
214
-
215
-
216
-
217
-
218
-
219
 |
 |