Yamaha AW16G Owner's Manual - Page 52
Using the EQ library
 |
View all Yamaha AW16G manuals
Add to My Manuals
Save this manual to your list of manuals |
Page 52 highlights
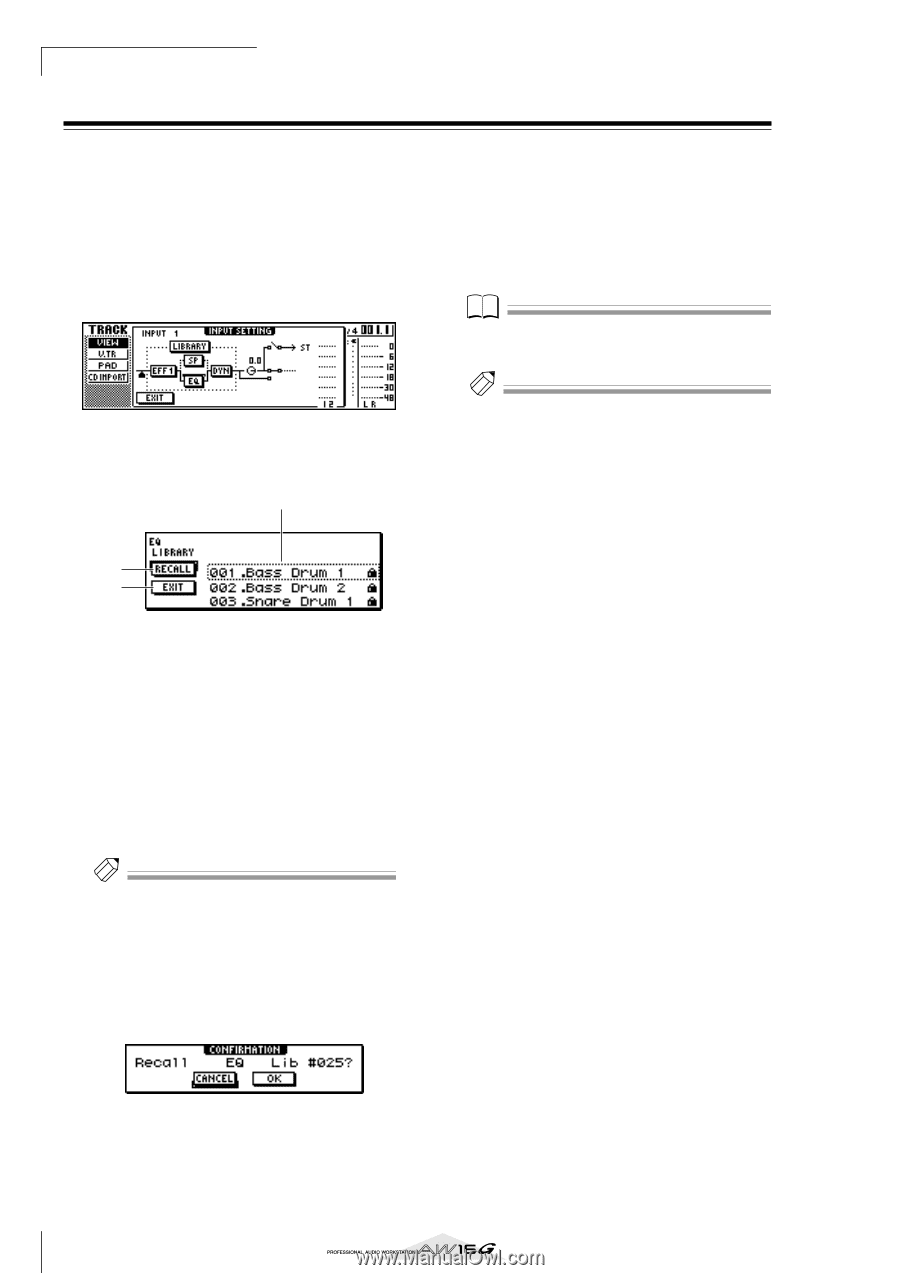
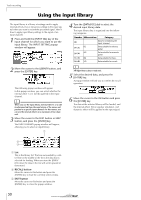
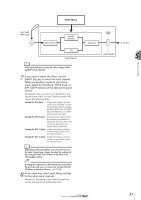
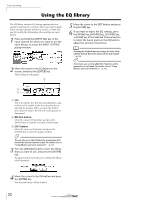
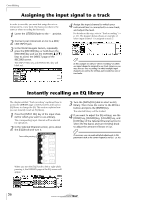
Track recording Using the EQ library The EQ library contains EQ settings appropriate for a variety of instruments. Use these when you want to apply EQ to an input channel while you record, or when you want to modify the EQ settings after recalling an input library. 1 Press and hold the [INPUT SEL] key of the input channel for which you want to use the input library, to access the INPUT SETTING popup window. 2 Move the cursor to the EQ button in the screen, and press the [ENTER] key. The EQ library will appear. 1 5 Move the cursor to the EXIT button and press the [ENTER] key. 6 If you want to adjust the EQ settings, press the [HIGH] key, [HI-MID] key, [LO-MID] key, or [LOW] key of the Selected Channel section to select the band, and turn the EQ knob to adjust the amount of boost/cut. Note If turning the EQ knob does not change the tone, check whether EQ may have been turned off for that channel (→ p. 92). Tip! If necessary, you can also adjust the frequency and Q parameters of each band. For details, refer to "Using libraries and scene memories" (→ p. 73). 2 3 1 List This is the library list. The line surrounded by a dotted line in the middle of the list is the data that is selected for loading. When you turn the [DATA/ JOG] dial, the data in the list will scroll upward or downward. B RECALL button Move the cursor to this button and press the [ENTER] key to load the currently selected data. C EXIT button Move the cursor to this button and press the [ENTER] key to close the popup window. Tip! You can also access the EQ library by pressing the [EQ] knob of the Selected Channel section. For details, refer to "Using libraries and scene memories" (→ p. 73). 3 Turn the [DATA/JOG] dial to select the library that you want to use, and press the [ENTER] key. A popup window will ask you to confirm the library recall operation. 4 Move the cursor to the OK button and press the [ENTER] key. The selected library will be loaded. 52
-
 1
1 -
2
-
3
-
4
-
5
-
6
-
7
-
8
-
9
-
10
-
11
-
12
-
13
-
14
-
15
-
16
-
17
-
18
-
19
-
20
-
21
-
22
-
23
-
24
-
25
-
26
-
27
-
28
-
29
-
30
-
31
-
32
-
33
-
34
-
35
-
36
-
37
-
38
-
39
-
40
-
41
-
42
-
43
-
44
-
45
-
46
-
 47
47 -
 48
48 -
 49
49 -
 50
50 -
 51
51 -
 52
52 -
 53
53 -
 54
54 -
 55
55 -
 56
56 -
 57
57 -
58
-
59
-
60
-
61
-
62
-
63
-
64
-
65
-
66
-
67
-
68
-
69
-
70
-
71
-
72
-
73
-
74
-
75
-
76
-
77
-
78
-
79
-
80
-
81
-
82
-
83
-
84
-
85
-
86
-
87
-
88
-
89
-
90
-
91
-
92
-
93
-
94
-
95
-
96
-
97
-
98
-
99
-
100
-
101
-
102
-
103
-
104
-
105
-
106
-
107
-
108
-
109
-
110
-
111
-
112
-
113
-
114
-
115
-
116
-
117
-
118
-
119
-
120
-
121
-
122
-
123
-
124
-
125
-
126
-
127
-
128
-
129
-
130
-
131
-
132
-
133
-
134
-
135
-
136
-
137
-
138
-
139
-
140
-
141
-
142
-
143
-
144
-
145
-
146
-
147
-
148
-
149
-
150
-
151
-
152
-
153
-
154
-
155
-
156
-
157
-
158
-
159
-
160
-
161
-
162
-
163
-
164
-
165
-
166
-
167
-
168
-
169
-
170
-
171
-
172
-
173
-
174
-
175
-
176
-
177
-
178
-
179
-
180
-
181
-
182
-
183
-
184
-
185
-
186
-
187
-
188
-
189
-
190
-
191
-
192
-
193
-
194
-
195
-
196
-
197
-
198
-
199
-
200
-
201
-
202
-
203
-
204
-
205
-
206
-
207
-
208
-
209
-
210
-
211
-
212
-
213
-
214
-
215
-
216
-
217
-
218
-
219
 |
 |