Yamaha AW16G Owner's Manual - Page 48
Recording on a track
 |
View all Yamaha AW16G manuals
Add to My Manuals
Save this manual to your list of manuals |
Page 48 highlights
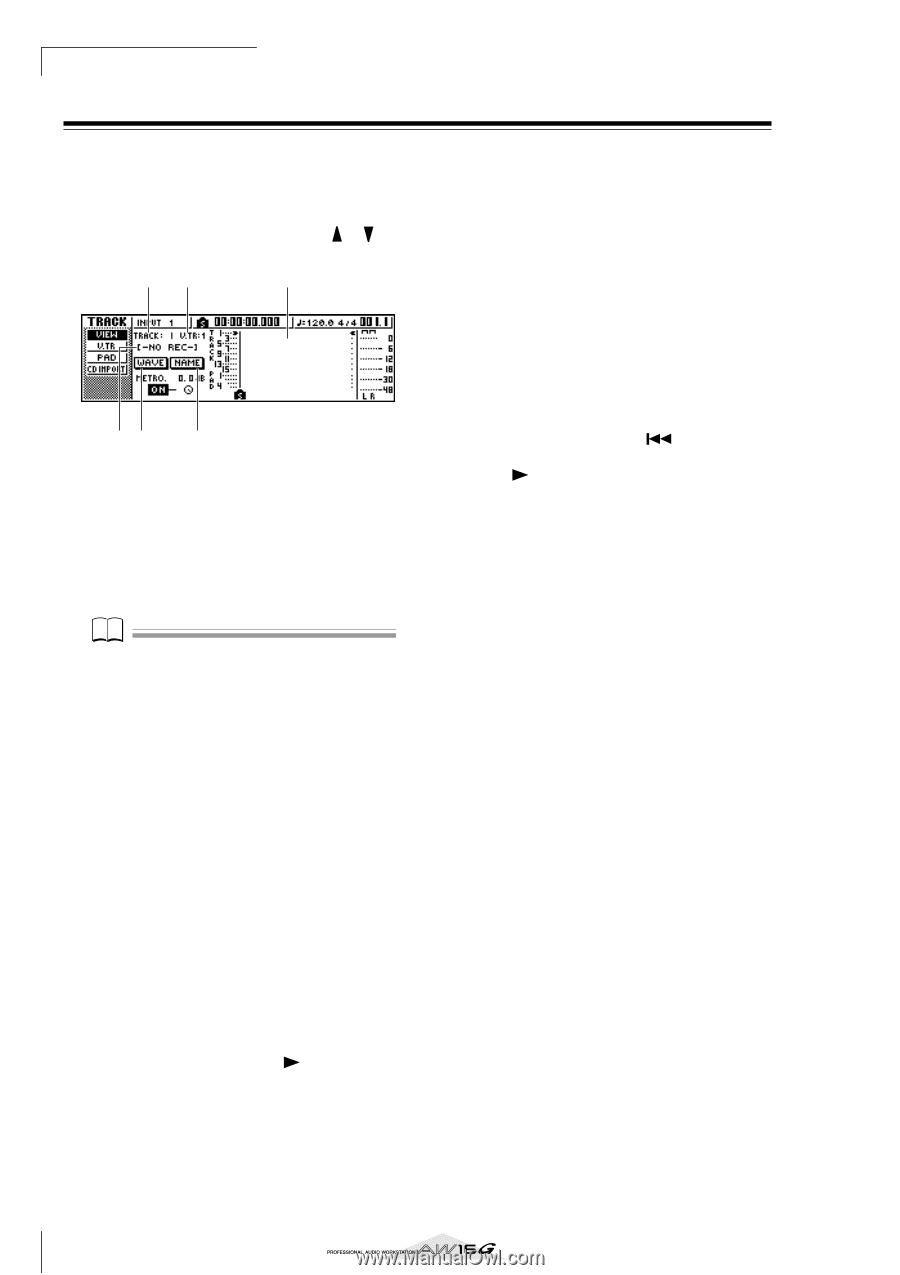
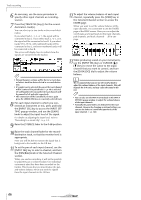
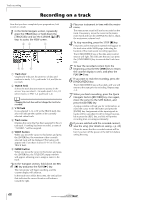
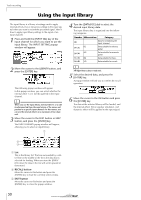
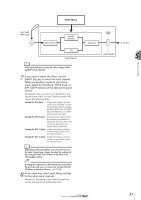
Track recording Recording on a track Now that you have completed your preparations, let's record on a track. 1 In the Work Navigate section, repeatedly press the [TRACK] key or hold down the [TRACK] key and use the CURSOR [ ]/[ ] keys to access the VIEW screen. 23 1 45 6 1 Track view Graphically indicates the presence of data and markers in tracks 1-16, pad tracks 1-4, and the stereo track. B TRACK field Selects the track that you want to operate in the screen. You can select 1-16 (audio track 1-16), ST (stereo track), or PAD 1-4 (pad track 1-4). Note Changing the track here will not change the track to be recorded. C V.TR field If you selected 1-16 or ST in the TRACK field, this area will indicate the number of the currently selected virtual track. D Track name Displays the name that has been assigned to the virtual track. If nothing has been recorded, a name of "-NO REC-" will be assigned. E WAVE button When you move the cursor to this button and press the [ENTER] key, the waveform of the currently selected track will be displayed. This button will appear only if you have selected 1-16 or ST in the TRACK field. F NAME button When you move the cursor to this button and press the [ENTER] key, the TITLE EDIT popup window will appear, allowing you to assign a name to the track. 2 In the Transport section, hold down the REC [●] key and press the PLAY [ ] key. The metronome will begin sounding, and the counter display will advance. In the track view within the screen, the vertical line that indicates the current location will advance toward the right. 3 Play your instrument in time with the metronome. The metronome sound will not be recorded on the track. If necessary, move the cursor to the metronome knob and turn the [DATA/JOG] dial to adjust the metronome volume level. 4 To stop recording, press the STOP [■] key. I (In point) and O (Out point) symbols will appear in the track view of the VIEW page, indicating the location of the most recent recording operation. The [UNDO/REDO] key of the data entry/control section will light. This indicates that you can press the [UNDO/REDO] key to execute the Undo function. 5 To hear the recorded content from the beginning, press the RTZ [ ] key to return the counter display to zero, and press the PLAY [ ] key. 6 If you want to redo the recording, press the [UNDO/REDO] key. The [UNDO/REDO] key will go dark, and you will return to the state prior to recording. Repeat steps 2-5. 7 When you finish recording, press the Quick Navigate Section [RECORD] key once again, move the cursor to the SAFE button, and press the [ENTER] key. A popup window will ask you for confirmation, so move the cursor to the OK button and press the [ENTER] key. Assignments of the input signals to tracks will be cancelled. It will no longer be possible to press the [REC] key, and this will prevent recording from occurring accidentally. 8 If you are satisfied with the recorded content, save the song. (For details on saving → p. 63) Please be aware that the recorded content will be lost if you turn off the power of the AW16G before saving the song. 48
-
 1
1 -
2
-
3
-
4
-
5
-
6
-
7
-
8
-
9
-
10
-
11
-
12
-
13
-
14
-
15
-
16
-
17
-
18
-
19
-
20
-
21
-
22
-
23
-
24
-
25
-
26
-
27
-
28
-
29
-
30
-
31
-
32
-
33
-
34
-
35
-
36
-
37
-
38
-
39
-
40
-
41
-
42
-
 43
43 -
 44
44 -
 45
45 -
 46
46 -
 47
47 -
 48
48 -
 49
49 -
 50
50 -
 51
51 -
 52
52 -
 53
53 -
54
-
55
-
56
-
57
-
58
-
59
-
60
-
61
-
62
-
63
-
64
-
65
-
66
-
67
-
68
-
69
-
70
-
71
-
72
-
73
-
74
-
75
-
76
-
77
-
78
-
79
-
80
-
81
-
82
-
83
-
84
-
85
-
86
-
87
-
88
-
89
-
90
-
91
-
92
-
93
-
94
-
95
-
96
-
97
-
98
-
99
-
100
-
101
-
102
-
103
-
104
-
105
-
106
-
107
-
108
-
109
-
110
-
111
-
112
-
113
-
114
-
115
-
116
-
117
-
118
-
119
-
120
-
121
-
122
-
123
-
124
-
125
-
126
-
127
-
128
-
129
-
130
-
131
-
132
-
133
-
134
-
135
-
136
-
137
-
138
-
139
-
140
-
141
-
142
-
143
-
144
-
145
-
146
-
147
-
148
-
149
-
150
-
151
-
152
-
153
-
154
-
155
-
156
-
157
-
158
-
159
-
160
-
161
-
162
-
163
-
164
-
165
-
166
-
167
-
168
-
169
-
170
-
171
-
172
-
173
-
174
-
175
-
176
-
177
-
178
-
179
-
180
-
181
-
182
-
183
-
184
-
185
-
186
-
187
-
188
-
189
-
190
-
191
-
192
-
193
-
194
-
195
-
196
-
197
-
198
-
199
-
200
-
201
-
202
-
203
-
204
-
205
-
206
-
207
-
208
-
209
-
210
-
211
-
212
-
213
-
214
-
215
-
216
-
217
-
218
-
219
 |
 |