Yamaha AW16G Owner's Manual - Page 37
Playing a sound clip, SOUND CLIP] key.
 |
View all Yamaha AW16G manuals
Add to My Manuals
Save this manual to your list of manuals |
Page 37 highlights
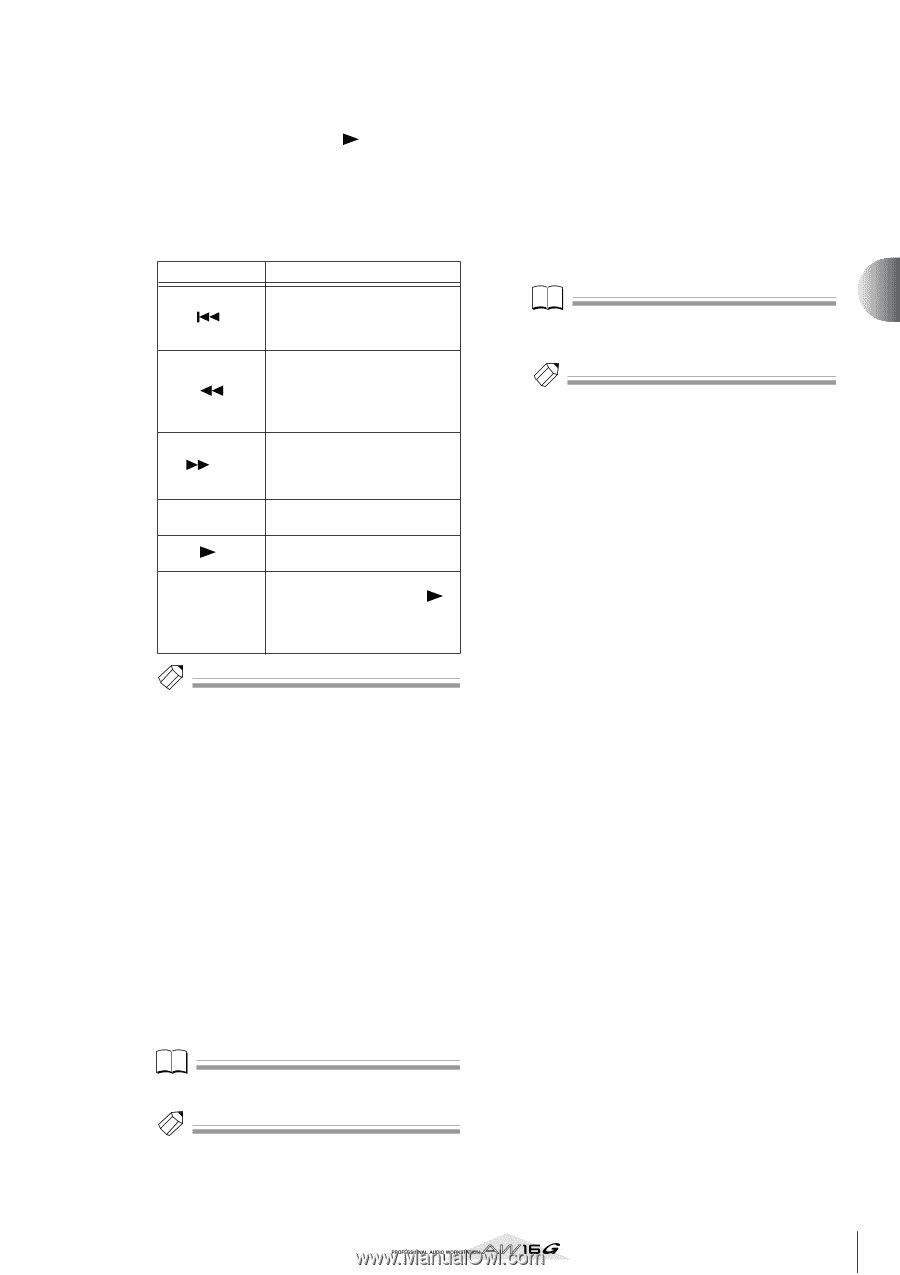
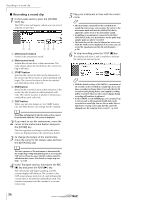
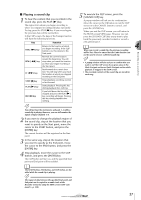
■ Playing a sound clip 1 To hear the content that you recorded in the sound clip, press the PLAY [ ] key. The region from where you began recording to where you stopped recording will play repeatedly. To stop, press the STOP [■] key. If you record again, the previous data will be overwritten. In the CLIP screen, the keys of the Transport section will have the following functions. Key Function RTZ [ ] key REW [ ] key FF [ ] key STOP [■] key PLAY [ ] key REC [●] key Returns to the location at which you began recording. If the CLIP button is on, this returns to the Start point. Rewinds the current location toward the beginning. You will stop when you reach the location at which you began recording or the Start point. Fast-forwards the current location. You will stop when you reach the location at which you stopped recording or the End point. Stops playback, recording, rewind, or fast-forward. Starts playback. Pressing this key during playback does nothing. If you hold down this key while stopped and press the PLAY [ ] key, recording will begin. Pressing this key during playback does nothing. Tip! You will not hear the metronome and pads 1-4 while a sound clip is playing. However, you can still monitor the signals of input channels 1-8. 2 If you want to change the playback region of the sound clip, stop at the location that you want to specify as the Start point, move the cursor to the START button, and press the [ENTER] key. The current location will be registered as the Start point. 3 In the same way, stop at the location that you want to specify as the End point, move the cursor to the END button, and press the [ENTER] key. 4 Stop playback, move the cursor to the CLIP button, and press the [ENTER] key. The CLIP button will turn on, and the specified Start point and End point will be enabled. Note The START button, END button, and CLIP button are disabled while the sound clip is playing. Tip! The region of data between the specified Start point and End point can be copied to an audio track of the Recorder section by using the EDIT screen COPY command (→ p. 128). 5 To execute the CLIP screen, press the [SOUND CLIP] key. A popup window will ask you for confirmation. Move the cursor to the OK button to exit the CLIP screen or to the CANCEL button to cancel, and press the [ENTER] key. When you exit the CLIP screen, you will return to the TRACK screen VIEW page. However you can press the [SOUND CLIP] key at any time to play back the previously recorded content or record a new performance. Note When you record a sound clip, the previous recording will be lost. Please be aware that the Undo function cannot be used to recover a deleted sound clip. Tip! • A popup window will also ask you to confirm that you want to exit the CLIP screen if you press a key in the Work Navigate section or Quick Navigate section while playback is stopped in the CLIP screen. • The recorded contents of the sound clip are stored for each song. 4 37 Recording to a sound clip
-
 1
1 -
2
-
3
-
4
-
5
-
6
-
7
-
8
-
9
-
10
-
11
-
12
-
13
-
14
-
15
-
16
-
17
-
18
-
19
-
20
-
21
-
22
-
23
-
24
-
25
-
26
-
27
-
28
-
29
-
30
-
31
-
 32
32 -
 33
33 -
 34
34 -
 35
35 -
 36
36 -
 37
37 -
 38
38 -
 39
39 -
 40
40 -
 41
41 -
 42
42 -
43
-
44
-
45
-
46
-
47
-
48
-
49
-
50
-
51
-
52
-
53
-
54
-
55
-
56
-
57
-
58
-
59
-
60
-
61
-
62
-
63
-
64
-
65
-
66
-
67
-
68
-
69
-
70
-
71
-
72
-
73
-
74
-
75
-
76
-
77
-
78
-
79
-
80
-
81
-
82
-
83
-
84
-
85
-
86
-
87
-
88
-
89
-
90
-
91
-
92
-
93
-
94
-
95
-
96
-
97
-
98
-
99
-
100
-
101
-
102
-
103
-
104
-
105
-
106
-
107
-
108
-
109
-
110
-
111
-
112
-
113
-
114
-
115
-
116
-
117
-
118
-
119
-
120
-
121
-
122
-
123
-
124
-
125
-
126
-
127
-
128
-
129
-
130
-
131
-
132
-
133
-
134
-
135
-
136
-
137
-
138
-
139
-
140
-
141
-
142
-
143
-
144
-
145
-
146
-
147
-
148
-
149
-
150
-
151
-
152
-
153
-
154
-
155
-
156
-
157
-
158
-
159
-
160
-
161
-
162
-
163
-
164
-
165
-
166
-
167
-
168
-
169
-
170
-
171
-
172
-
173
-
174
-
175
-
176
-
177
-
178
-
179
-
180
-
181
-
182
-
183
-
184
-
185
-
186
-
187
-
188
-
189
-
190
-
191
-
192
-
193
-
194
-
195
-
196
-
197
-
198
-
199
-
200
-
201
-
202
-
203
-
204
-
205
-
206
-
207
-
208
-
209
-
210
-
211
-
212
-
213
-
214
-
215
-
216
-
217
-
218
-
219
 |
 |