Yamaha AW16G Owner's Manual - Page 46
TING popup window, and use the [GAIN], knob to adjust the input level of the signal.
 |
View all Yamaha AW16G manuals
Add to My Manuals
Save this manual to your list of manuals |
Page 46 highlights
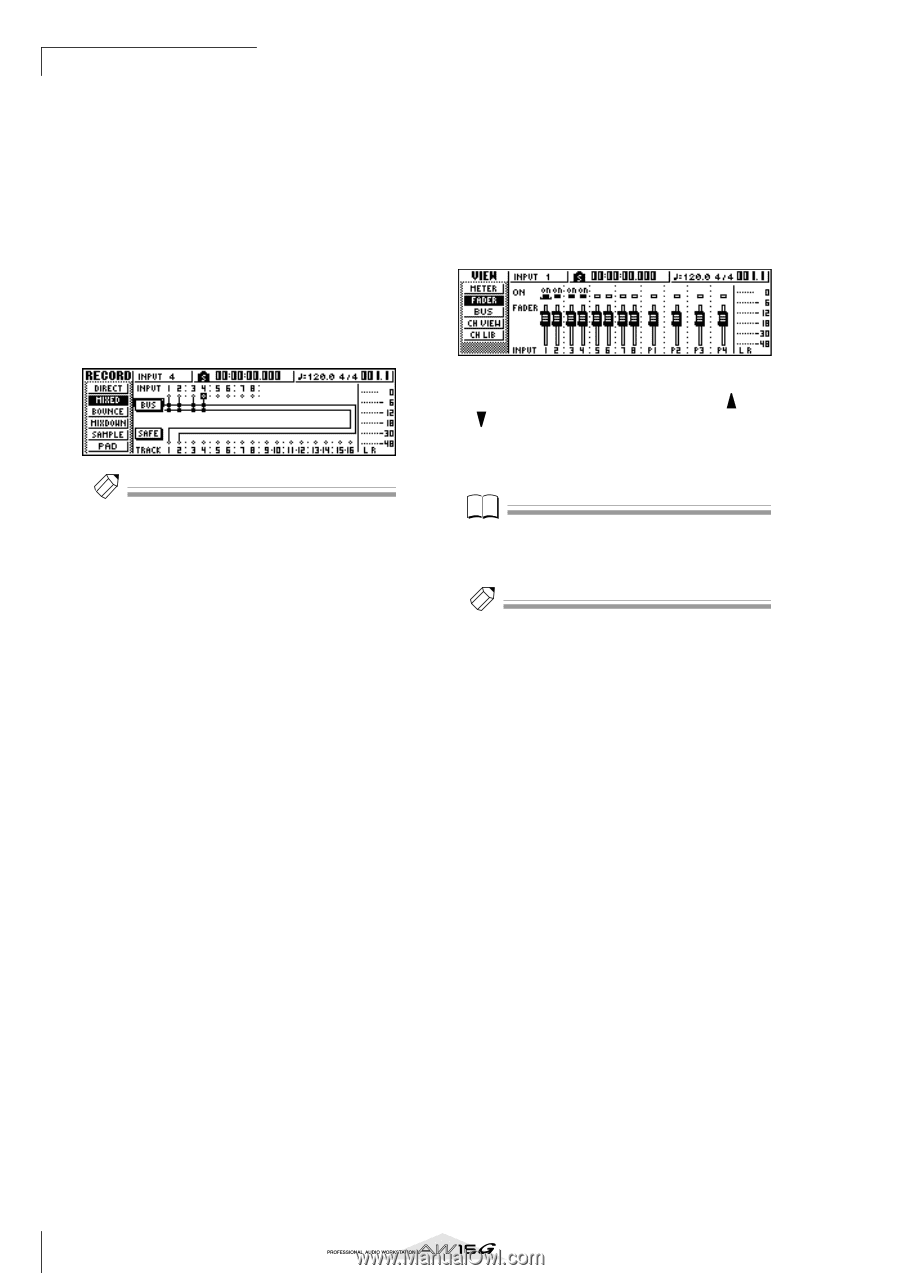
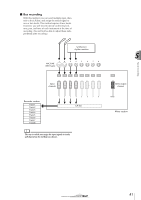
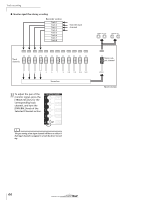
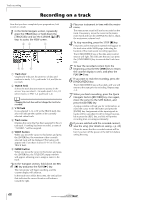
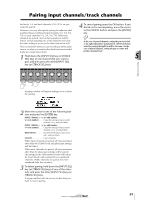
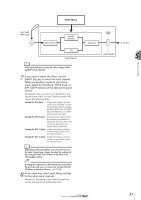
Track recording 6 As necessary, use the same procedure to specify other input channels as recordingsources. 7 Press the [TRACK SEL] key(s) for the recorddestination track(s). You can select up to two tracks as the record-destination. If you select track 1, 3, 5, or 7, the signal will be connected to bus L. If you select track 2, 4, 6, or 8, the signal will be connected to bus R. If you select tracks 9/10-15/16, odd-numbered tracks will be connected to bus L, and even-numbered tracks will be connected to bus R. The screen will display lines to indicate how the signals are connected to the track(s). Tip! • EQ and dynamics settings will be flat for a track channel whose track has been selected as a record-destination. • If a single track is selected, the pan of the track channel will be centered. If a paired track (→ p. 49) is selected, the odd-numbered/even-numbered track channels will be panned to left and right respectively. • The connection will be cancelled if you once again press the [TRACK SEL] key of a currently selected track. 8 For each input channel to which you connected an instrument or mic, press and hold the [INPUT SEL] key to access the INPUT SETTING popup window, and use the [GAIN] knob to adjust the input level of the signal. For details on adjusting the input level, refer to "Recording to a sound clip" (→ p. 33). 9 Raise the [STEREO] fader to the 0 dB position. 10 Raise the track channel fader for the recorddestination track, so that the monitor level is appropriate. Now you will be able to monitor the signal that is being sent to the track(s) via the L/R bus. 11 To set the pan of each input channel, use the [INPUT SEL] key to select a channel, and turn the [PAN/BAL] knob of the Selected Channel section. When you use bus recording, it will not be possible to adjust the pan or volume balance for individual instruments after they have been recorded on the track(s). This means that you must finalize the pan and volume balance when you send the signals from the input channels to the L/R bus. 12 To adjust the volume balance of each input channel, repeatedly press the [VIEW] key in the Selected Channel section to access the FADER page. When you want to set the volume balance of the input channels, it is convenient to use the FADER page of the VIEW screen. Here you can adjust the on/off status and input levels for the input channels, pad channels, and track channels - all in one page. 13 While producing sound on your instruments, use the [INPUT SEL] keys or CURSOR [ ]/ [ ] keys to move the cursor to the input channel that you want to control, and turn the [DATA/JOG] dial to adjust the volume balance. Note We recommend that you not use the [GAIN] knob to adjust the volume balance of the input channels. This will degrade the S/N ratio, and may cause the sound to distort. Tip! • You can also use the INPUT LEVEL knob in the INPUT SETTING popup window to adjust the volume balance of the input channels. • Normally, the panel faders are dedicated to the track channels. However by changing an internal setting, you can use the faders to control the input levels of the input channels. (→ p. 162) 46
-
 1
1 -
2
-
3
-
4
-
5
-
6
-
7
-
8
-
9
-
10
-
11
-
12
-
13
-
14
-
15
-
16
-
17
-
18
-
19
-
20
-
21
-
22
-
23
-
24
-
25
-
26
-
27
-
28
-
29
-
30
-
31
-
32
-
33
-
34
-
35
-
36
-
37
-
38
-
39
-
40
-
 41
41 -
 42
42 -
 43
43 -
 44
44 -
 45
45 -
 46
46 -
 47
47 -
 48
48 -
 49
49 -
 50
50 -
 51
51 -
52
-
53
-
54
-
55
-
56
-
57
-
58
-
59
-
60
-
61
-
62
-
63
-
64
-
65
-
66
-
67
-
68
-
69
-
70
-
71
-
72
-
73
-
74
-
75
-
76
-
77
-
78
-
79
-
80
-
81
-
82
-
83
-
84
-
85
-
86
-
87
-
88
-
89
-
90
-
91
-
92
-
93
-
94
-
95
-
96
-
97
-
98
-
99
-
100
-
101
-
102
-
103
-
104
-
105
-
106
-
107
-
108
-
109
-
110
-
111
-
112
-
113
-
114
-
115
-
116
-
117
-
118
-
119
-
120
-
121
-
122
-
123
-
124
-
125
-
126
-
127
-
128
-
129
-
130
-
131
-
132
-
133
-
134
-
135
-
136
-
137
-
138
-
139
-
140
-
141
-
142
-
143
-
144
-
145
-
146
-
147
-
148
-
149
-
150
-
151
-
152
-
153
-
154
-
155
-
156
-
157
-
158
-
159
-
160
-
161
-
162
-
163
-
164
-
165
-
166
-
167
-
168
-
169
-
170
-
171
-
172
-
173
-
174
-
175
-
176
-
177
-
178
-
179
-
180
-
181
-
182
-
183
-
184
-
185
-
186
-
187
-
188
-
189
-
190
-
191
-
192
-
193
-
194
-
195
-
196
-
197
-
198
-
199
-
200
-
201
-
202
-
203
-
204
-
205
-
206
-
207
-
208
-
209
-
210
-
211
-
212
-
213
-
214
-
215
-
216
-
217
-
218
-
219
 |
 |