Yamaha AW16G Owner's Manual - Page 19
Mixer Selected Channel STEREO SEL] key - 16 track recorder
 |
View all Yamaha AW16G manuals
Add to My Manuals
Save this manual to your list of manuals |
Page 19 highlights
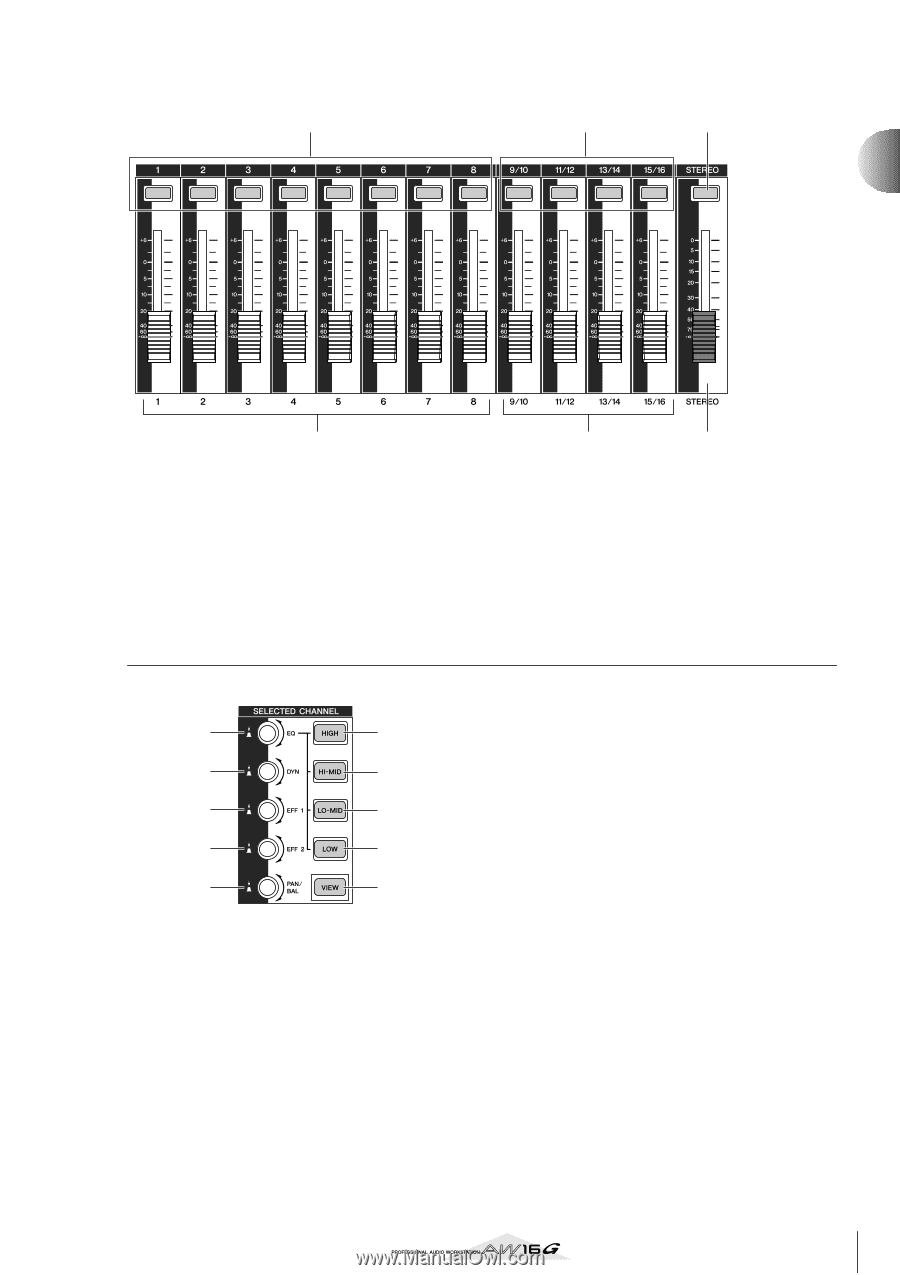
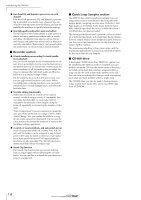
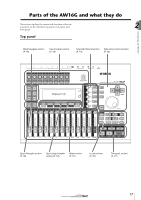
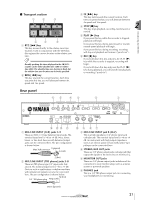
■ Mixer section 1 2 3 2 Introducing the AW16G 4 1 [TRACK SEL] keys 1-8 B [TRACK SEL] keys 9/10-15/16 C [STEREO SEL] key Use these keys to select the mixer track channels or recorder tracks that you want to control. 5 6 D Faders 1-8 E Faders 9/10-15/16 Normally, these faders adjust the playback level of each recorder track. By changing the internal settings, you can also use these faders to control the input levels of input channels 1-8 and pads 1-4. F [STEREO] fader This adjusts the output level of the stereo bus. ■ Selected Channel section 1 6 2 7 3 8 4 9 5 J 1 [EQ] knob Turning this knob will adjust the EQ (equalizer) gain for the currently selected channel. You can press this knob to access the EQ screen, where you can adjust all of the EQ settings. B [DYN] knob Turning this knob will adjust the dynamics depth for the currently selected channel. You can press this knob to access the DYN screen, where you can adjust all of the dynamics settings. C [EFF 1] knob D [EFF 2] knob Turning these knobs will adjust the amount of signal that is sent from the currently selected channel to the internal effects 1 and 2 (i.e., effect send levels 1 and 2). You can press these knobs to access the EFF1 or EFF2 screens, where you can adjust the parameters of the internal effects. E [PAN/BAL] knob Turning this knob will adjust the pan of the currently selected channel (or the balance of the stereo output channel). You can press this knob to access the PAN screen, where you can adjust pan for multiple channels. F [HIGH] key G [HI-MID] key H [LO-MID] key I [LOW] key These keys select one of the four EQ bands (HIGH, HI-MID, LO-MID, LOW) to be adjusted. J [VIEW] key This key accesses the VIEW screen, where you can check the level of each channel, or perform onscreen adjustments to the faders and other mix parameters of each channel. 19
-
 1
1 -
2
-
3
-
4
-
5
-
6
-
7
-
8
-
9
-
10
-
11
-
12
-
13
-
 14
14 -
 15
15 -
 16
16 -
 17
17 -
 18
18 -
 19
19 -
 20
20 -
 21
21 -
 22
22 -
 23
23 -
 24
24 -
25
-
26
-
27
-
28
-
29
-
30
-
31
-
32
-
33
-
34
-
35
-
36
-
37
-
38
-
39
-
40
-
41
-
42
-
43
-
44
-
45
-
46
-
47
-
48
-
49
-
50
-
51
-
52
-
53
-
54
-
55
-
56
-
57
-
58
-
59
-
60
-
61
-
62
-
63
-
64
-
65
-
66
-
67
-
68
-
69
-
70
-
71
-
72
-
73
-
74
-
75
-
76
-
77
-
78
-
79
-
80
-
81
-
82
-
83
-
84
-
85
-
86
-
87
-
88
-
89
-
90
-
91
-
92
-
93
-
94
-
95
-
96
-
97
-
98
-
99
-
100
-
101
-
102
-
103
-
104
-
105
-
106
-
107
-
108
-
109
-
110
-
111
-
112
-
113
-
114
-
115
-
116
-
117
-
118
-
119
-
120
-
121
-
122
-
123
-
124
-
125
-
126
-
127
-
128
-
129
-
130
-
131
-
132
-
133
-
134
-
135
-
136
-
137
-
138
-
139
-
140
-
141
-
142
-
143
-
144
-
145
-
146
-
147
-
148
-
149
-
150
-
151
-
152
-
153
-
154
-
155
-
156
-
157
-
158
-
159
-
160
-
161
-
162
-
163
-
164
-
165
-
166
-
167
-
168
-
169
-
170
-
171
-
172
-
173
-
174
-
175
-
176
-
177
-
178
-
179
-
180
-
181
-
182
-
183
-
184
-
185
-
186
-
187
-
188
-
189
-
190
-
191
-
192
-
193
-
194
-
195
-
196
-
197
-
198
-
199
-
200
-
201
-
202
-
203
-
204
-
205
-
206
-
207
-
208
-
209
-
210
-
211
-
212
-
213
-
214
-
215
-
216
-
217
-
218
-
219
 |
 |