Yamaha AW16G Owner's Manual - Page 92
Editing the EQ parameters, ON/OFF button, Response curve, FLAT button, ATT. Attenuation knob
 |
View all Yamaha AW16G manuals
Add to My Manuals
Save this manual to your list of manuals |
Page 92 highlights
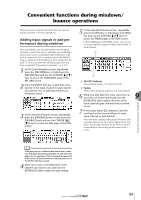
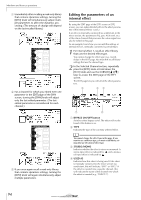
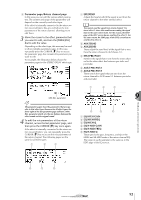
Mixdown and bounce operations Editing the EQ parameters The chapters entitled "Track recording" and "Overdubbing" explained how to load an EQ library and use the Selected Channel section [EQ] knob to make adjustments. Here's how you can make more detailed adjustments to the EQ parameters. 1 Press an [INPUT SEL] key, a pad 1-4, a [TRACK SEL] key, or the [STEREO SEL] key to select the channel whose EQ you want to adjust. 2 If desired, load library data from the EQ library. 3 Repeatedly press the Selected Channel section [EQ] knob or hold down the [EQ] knob and use the CURSOR [ ]/[ ] keys to access the EDIT page of the EQ screen. The EDIT page of the EQ screen lets you edit all of the EQ parameters. 6 2 34 5 1 78 1 ON/OFF button Switches the EQ on/off. B Response curve Graphically indicates the approximate response of the EQ. C FLAT button Move the cursor to this button and press the [ENTER] key to reset the boost/cut amount of all bands to 0 dB. D ATT. (Attenuation) knob Attenuates the signal immediately before it is input to the EQ, over a range of -96 to 0 dB. This is used mainly to prevent the signal from clipping when you use the EQ to boost a specific frequency region. E Output meter Indicates the level of the signal after it has passed through the EQ. F Q knobs Specify the Q (steepness) at which each band (HIGH, HI-MID, LO-MID, LOW) will be boosted or cut. The range is 10-0.10, and higher settings will produce a steeper curve. G F (Frequency) knobs Specify the center frequency of the boost/cut, over a range of 21.2 Hz-20.0 kHz. H G (Gain) knobs Specify the amount of boost/cut, over a range of -18.0 dB to +18.0 dB. 4 Move the cursor to the parameter that you want to edit, and use the [DATA/JOG] dial to adjust the value. 5 To switch the LOW band type, move the cursor to the LOW band Q knob and turn the [DATA/JOG] dial toward the left. With the default EQ settings, the LOW band is a shelving type. (The value field for the Q knob will indicate "L.SHL".) If you turn the Q knob toward the left, the Q knob value field will change to a numerical value, and will switch to the same boost/cut type as the HIMID and LO-MID bands. If you continue turning the Q knob toward the left, the Q knob value field will indicate "HPF," and the LOW band will function as a high-pass filter. If "HPF" is selected, you can use the LOW band G knob to switch the high-pass filter on/off. 6 To switch the HIGH band type, turn the HIGH band Q knob all the way to the left. With the default EQ settings, the HIGH band is a shelving type. (The value field for the Q knob will indicate "H.SHL".) If you turn the Q knob toward the left, the Q knob value field will change to a numerical value, and will switch to the same boost/cut type as the HIMID and LO-MID bands. If you continue turning the Q knob toward the left, the Q knob value field will indicate "LPF," and the HIGH band will function as a low-pass filter. If "LPF" is selected, you can use the HIGH band G knob to switch the low-pass filter on/off. 7 To switch the EQ on/off, press the [ENTER] key. In the EDIT page, you can press the [ENTER] key to switch the EQ on/off (except when the cursor is located at the FLAT button). Tip! • If the meter display clips because you boosted a certain band, lower the ATT. knob to attenuate the signal. • The [EQ] knob of the Selected Channel section will still operate even while the EDIT page of the EQ screen is displayed. 92
-
 1
1 -
2
-
3
-
4
-
5
-
6
-
7
-
8
-
9
-
10
-
11
-
12
-
13
-
14
-
15
-
16
-
17
-
18
-
19
-
20
-
21
-
22
-
23
-
24
-
25
-
26
-
27
-
28
-
29
-
30
-
31
-
32
-
33
-
34
-
35
-
36
-
37
-
38
-
39
-
40
-
41
-
42
-
43
-
44
-
45
-
46
-
47
-
48
-
49
-
50
-
51
-
52
-
53
-
54
-
55
-
56
-
57
-
58
-
59
-
60
-
61
-
62
-
63
-
64
-
65
-
66
-
67
-
68
-
69
-
70
-
71
-
72
-
73
-
74
-
75
-
76
-
77
-
78
-
79
-
80
-
81
-
82
-
83
-
84
-
85
-
86
-
 87
87 -
 88
88 -
 89
89 -
 90
90 -
 91
91 -
 92
92 -
 93
93 -
 94
94 -
 95
95 -
 96
96 -
 97
97 -
98
-
99
-
100
-
101
-
102
-
103
-
104
-
105
-
106
-
107
-
108
-
109
-
110
-
111
-
112
-
113
-
114
-
115
-
116
-
117
-
118
-
119
-
120
-
121
-
122
-
123
-
124
-
125
-
126
-
127
-
128
-
129
-
130
-
131
-
132
-
133
-
134
-
135
-
136
-
137
-
138
-
139
-
140
-
141
-
142
-
143
-
144
-
145
-
146
-
147
-
148
-
149
-
150
-
151
-
152
-
153
-
154
-
155
-
156
-
157
-
158
-
159
-
160
-
161
-
162
-
163
-
164
-
165
-
166
-
167
-
168
-
169
-
170
-
171
-
172
-
173
-
174
-
175
-
176
-
177
-
178
-
179
-
180
-
181
-
182
-
183
-
184
-
185
-
186
-
187
-
188
-
189
-
190
-
191
-
192
-
193
-
194
-
195
-
196
-
197
-
198
-
199
-
200
-
201
-
202
-
203
-
204
-
205
-
206
-
207
-
208
-
209
-
210
-
211
-
212
-
213
-
214
-
215
-
216
-
217
-
218
-
219
 |
 |