Yamaha AW16G Owner's Manual - Page 111
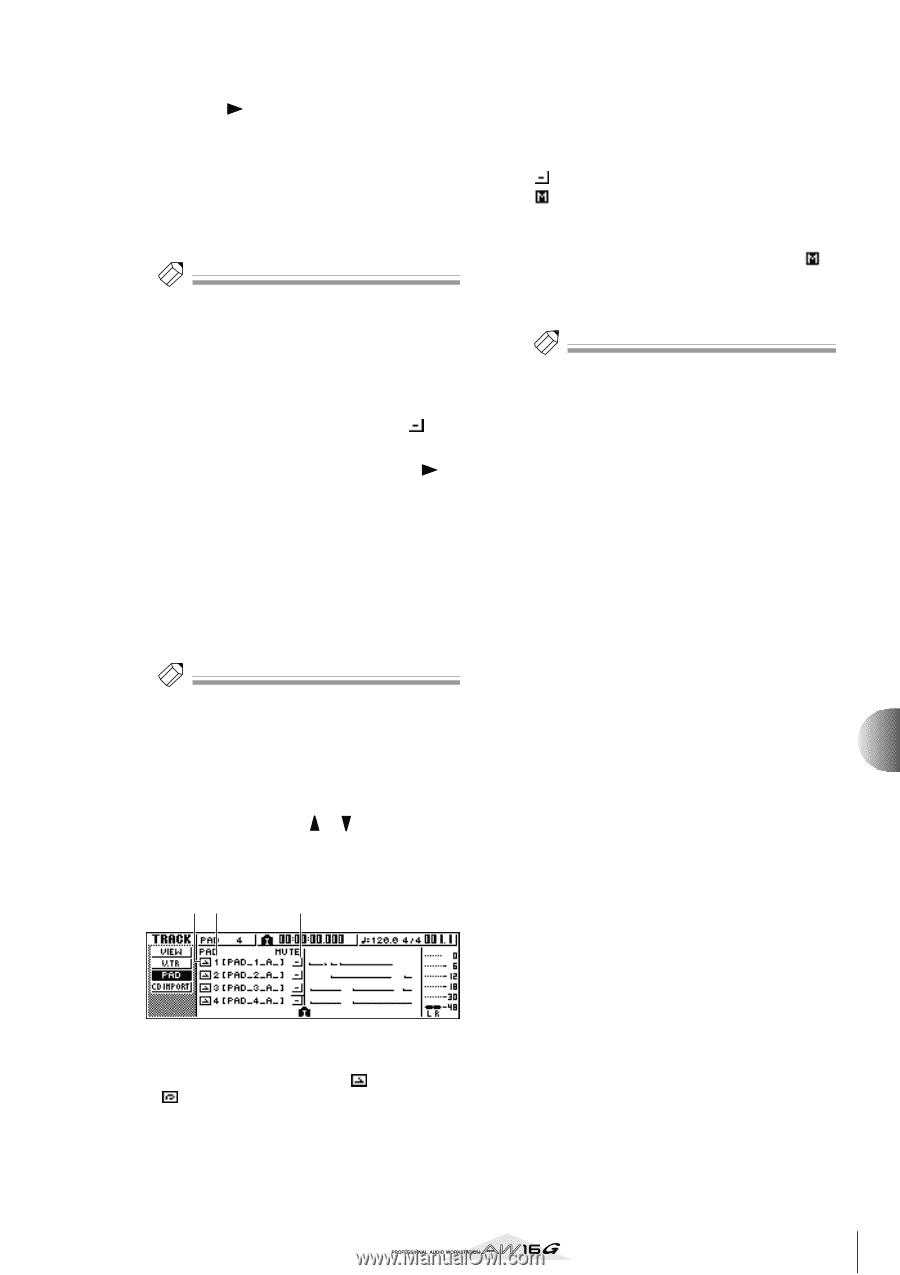
One Shot/Loop mode, Pad track number, Track mute button, track status button and press the [ENTER] key
 |
View all Yamaha AW16G manuals
Add to My Manuals
Save this manual to your list of manuals |
Page 111 highlights
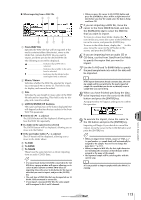
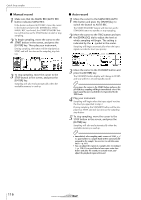
5 To begin recording on the pad track, press the PLAY [ ] key. The recording will begin running, and pad event recording will begin. 6 Play the pads while you listen to the audio tracks play back. Pad events will be recorded on the pad tracks. The pad events that are recorded will appear in the pad track view in realtime. Tip! Pad tracks record only the pad on/off status. 7 To stop recording, press the STOP [■] key. The recorder will stop. 8 To play back the events that were recorded on the pad tracks, move the cursor to the track status button and press the [ENTER] key several times to switch the display to . 9 Locate to the point from which you want to start playing back, and press the PLAY [ ] key. The pad track(s) will play back in synchronization with the recorder. If you want to re-do the recording, repeat steps 6-9. It is also possible to re-record just a specific region of a pad track. In this case, the newly recorded pad events will overwrite the previously-recorded events. However, you need to be careful, since this will also affect any overlapping pad events before or after the re-recorded region. Tip! The contents of a recorded pad track can be edited in a variety of ways using editing commands. For details, refer to "What you can do using editing commands" (→ p. 123). 10 If you want to mute a specific pad track, press the Work Navigate section [TRACK] key repeatedly or hold down the [TRACK] key and use the CURSOR [ ]/[ ] keys to access the PAD page of the TRACK screen. In the PAD page of the TRACK screen you can switch muting on/off for each pad track. 12 3 C Track mute button This button switches muting on/off for each track. Move the cursor to this button and press the [ENTER] key to switch between the following two settings. The pad track can be played The pad track is muted. 11 Move the cursor to the track mute button for the track that you want to mute, and press the [ENTER] key to switch the button to (muted). To cancel muting, move the cursor to the track mute button and press the [ENTER] key once again. Tip! If a pad track is muted and the pad is set to LOOP/TRIGGER, the pad will play if you simply press the [PLAY] key to play back the recorder. This means that you can use this feature as a rhythm machine even without recording on a pad track. 11 Quick loop sampler 1 One Shot/Loop mode An icon indicates whether the sample assigned to the pad is set to One Shot mode ( ) or Loop mode ( ). B Pad track number This indicates the pad track number 1-4. At the right is displayed the name of the sample assigned to the sample bank selected for that pad. 111
-
 1
1 -
2
-
3
-
4
-
5
-
6
-
7
-
8
-
9
-
10
-
11
-
12
-
13
-
14
-
15
-
16
-
17
-
18
-
19
-
20
-
21
-
22
-
23
-
24
-
25
-
26
-
27
-
28
-
29
-
30
-
31
-
32
-
33
-
34
-
35
-
36
-
37
-
38
-
39
-
40
-
41
-
42
-
43
-
44
-
45
-
46
-
47
-
48
-
49
-
50
-
51
-
52
-
53
-
54
-
55
-
56
-
57
-
58
-
59
-
60
-
61
-
62
-
63
-
64
-
65
-
66
-
67
-
68
-
69
-
70
-
71
-
72
-
73
-
74
-
75
-
76
-
77
-
78
-
79
-
80
-
81
-
82
-
83
-
84
-
85
-
86
-
87
-
88
-
89
-
90
-
91
-
92
-
93
-
94
-
95
-
96
-
97
-
98
-
99
-
100
-
101
-
102
-
103
-
104
-
105
-
 106
106 -
 107
107 -
 108
108 -
 109
109 -
 110
110 -
 111
111 -
 112
112 -
 113
113 -
 114
114 -
 115
115 -
 116
116 -
117
-
118
-
119
-
120
-
121
-
122
-
123
-
124
-
125
-
126
-
127
-
128
-
129
-
130
-
131
-
132
-
133
-
134
-
135
-
136
-
137
-
138
-
139
-
140
-
141
-
142
-
143
-
144
-
145
-
146
-
147
-
148
-
149
-
150
-
151
-
152
-
153
-
154
-
155
-
156
-
157
-
158
-
159
-
160
-
161
-
162
-
163
-
164
-
165
-
166
-
167
-
168
-
169
-
170
-
171
-
172
-
173
-
174
-
175
-
176
-
177
-
178
-
179
-
180
-
181
-
182
-
183
-
184
-
185
-
186
-
187
-
188
-
189
-
190
-
191
-
192
-
193
-
194
-
195
-
196
-
197
-
198
-
199
-
200
-
201
-
202
-
203
-
204
-
205
-
206
-
207
-
208
-
209
-
210
-
211
-
212
-
213
-
214
-
215
-
216
-
217
-
218
-
219
 |
 |